Monday 22 May 2017

Happy World Goth Day! (Goth Fairy Cakes)

Happy World Goth Day, everyone! A day to celebrate the colour black, bats, and everything morbid and macabre!


The first time I wore a completely black outfit, I was about fifteen years old. That was the start of a love affair with the gothic that has never stopped. Once you embrace black, you can't go back! My wardrobe and drawers are populated with black, grey, red, blue, purple, and the odd neon accent; leather, fishnet and opaque coloured tights, tartan, and pirate paraphernalia, too. I started my collection of piercings when I was 17 (12 in total, so far), and my tattoos followed later on at 25. Neither collection is finished.


So, as you can probably guess, Goth Day and Halloween are my favourite times of the year. This year, however, is the first time I've got around to wearing false vampire teeth! When I say teeth, I mean some white false stiletto style fingernails stuck on with denture adhesive. Does the job though!


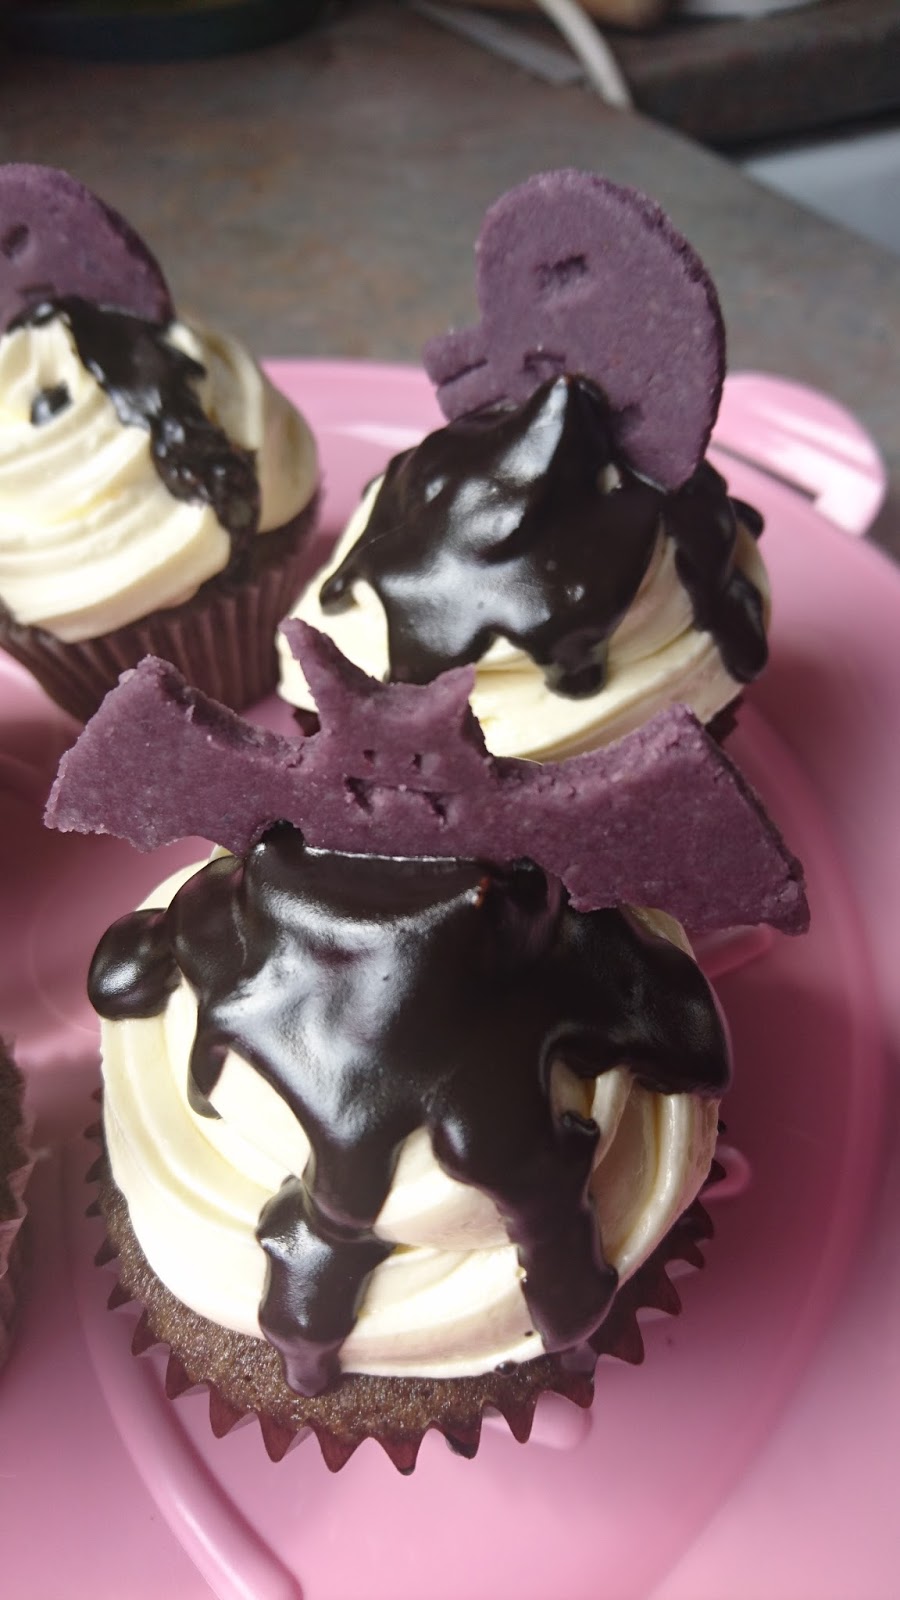
To celebrate, I made some lovely purple velvet fairy cakes, swirled with buttermilk-spiked cooked milk icing, drizzled in super-black chocolate glaze, and crowned with a marzipan batty-bat.

I made the cakes using my red velvet cake recipe, using two eggs and scaling the other ingredients down accordingly, and using purple food colouring instead of red; this amount made 12 cakes. I topped off the cakes with the same icing as the red velvet cake too, only I used half the amount.


The chocolate glaze was made using 2 ounces (55 grammes) dark chocolate, 1 ounce (30 grammes) butter, half a tablespoon of black liquid food colouring, and half a tablespoon of milk. I melted all these ingredients together in a bowl in the microwave, heating for 15 seconds at a time and stirring between. I allowed it to cool down enough to pour over the icing swirls without melting it.

I coloured some marzipan purple, rolled it out to roughly a quarter inch (5 millimetres), and cut out bats and skulls. I drew the designs freehand on some card and cut out them out to make the templates.

The outside crusts of the cakes aren't very purple, I must admit. But the insides are suitably luminous! I was very pleased with how these turned out, and I'm even more pleased about the Goth ensemble with false teefs!

THIS TIME IN 2016: Mocha Cupcakes: Chocolate and Coffee Join Forces (Gluten Free; Dairy Free Option)
THIS TIME IN 2015: Super Moist and Rich Chocolate Cake
THIS TIME IN 2013: Coconut Custard Creams (Wheat Free)
There was no blog this time in 2014.

Wednesday 17 May 2017

Kitchen Experiment: DIY Bundt Tin

Time for another one of my kitchen experiments, and this time it's an equipment trial. This was my last minute fix for a DIY Bundt tin.


 You can't move a pace on Pinterest without running into a ring shaped cake. Some of them are plain with straight sides, some are even square, and then others are made in beautifully ornate tins, some of which are heirloom items. Once the Germans brought the ring cake to America, it took on a whole life of its own.

However, the rung shaped cake tins can be incredibly expensive, or difficult to find. Especially here in Ireland, where the only walk in cake supply shops are in major cities, or sometimes not at all; for example, there isn't one in Limerick since it closed down in February.


So, what's a girl to do?

I thought'd I'd experiment with ways of making a traditional round cake tin into a ring tin by putting things in the middle. The first thing I tried was a glass, but it wasn't very effective: the crust from inside the hole came off on the glass.

I then tried an empty can, washed and dried thoroughly with all labels removed, and filled it with rice to hold it in place. I greased everything really well, and this method worked much better. Even though the inside crust still didn't fully form, it was much straighter and easier to get out.


In both attempts, the hole never properly crusted. I wonder if it has something to do with the rice weights: maybe the heat can't flow through the centre tube well enough when it's full of rice. A quick trip onto the aforementioned Pinterest shows that a crustless hole is no big deal: there's many a Bundt and tube cake without an interior crust.


Eating a cake in the shape of a ring is a novelty, but it doesn't really change the flavour or texture than much. I do understand that some kinds of cake mixture bake better in a tube pan, where the centre doesn't stay soggy. But, to me, this is merely a novelty.


Maybe I'll try this technique to make a nice German kugelhopf, which is a yeast risen ring shaped cake.

No blogs on this day in previous years.

Monday 15 May 2017

Success, at Last! Hazelnut Ice Cream (No Churn, Egg Free)

Mögen Sie Haselnuss-Eis? Ich mag!


I'm sure throughout the four years that I have been blogging, and you have all been reading and supporting, I have mentioned my trips to Germany often. In 2008 and 2012, I visited North and East Germany, travelling to Lübeck, Ratzeburg, Magdeburg, Hamburg, Leipzig, Berlin, Bernburg, and many other villages in the mountains whose names I never knew. Both times were to visit my good friend who I met in secondary school, whom I've known ever since.

I will admit it has been way, way, way too long since I was in Germany, and I often find myself missing it dearly. My companion and I hope to go over this year for the Christmas markets in Berlin, and I want to promise myself that from hereon in I'll go at least once every two years. Hell, if I could afford to, I'd divide my year between living in Ireland and living in Germany.

There are many flavours of Germany I miss—from their delicious meat dishes, like hamburgers and sausages, to their incredible doughnuts and cream cakes—but of all of them it's the ice cream I miss the most.

When I was last in Germany, I was in Berlin on what was possibly one of the worst holidays I've ever had: I went with my companion at the time, and our relationship was cracking. It wasn't long after we returned that our partnership dissolved. We both wanted very different things out of life, and we especially wanted very different things from that holiday!

The only thing that made that holiday bearable was the ice-cream: at pretty much every corner in Berlin was an ice-cream stand that sold scoopable ice-cream of many flavours. Not only was it delicious, but it was also very cheap: even in the capital, which was more expensive on the whole, a cone with a scoop of ice-cream was €1.50, and each additional scoop ranged between 80c and €1. Here in Ireland, ice-cream parlours charge a hefty €2.60 per scoop!


When I was there, I always got any nut flavoured ice-cream—hazelnut and pistachio are particularly tasty—or coconut; and also a German speciality, Waldmeister!

Since then, I have tried to recreate some of my favourite flavours, but to no avail. Nut flavoured ice-cream always alluded me, until now! This is my take on a no-churn hazelnut flavoured ice-cream, that isn't Nutella.

I still have to work on getting my Waldmeister ice-cream right. Keep your eye out for any upcoming attempts!

INGREDIMENTS
Makes about 2 UK pints (1 litre) of ice cream

  • 16 UK fluid ounces (455 millilitres) whipping cream, about 35% fat, plus extra if needed
  • 12 UK fluid ounces (340 millilitres) condensed milk, cold
  • 3 to 6 ounces (85 to 170 grammes) hazelnuts, to taste
  • 2 teaspoons (10 millilitres) vanilla essence
  • Generous pinch of salt
  • Roughly chopped hazelnuts, to decorate

METHOD
  • In a food processor, or with a large plastic bag and a rolling pin, crush the hazelnuts to a fine powder. 3 ounces (85 grammes) will give you a mild nutty flavour, whereas the full 6 ounces (170 grammes) will produce an intense nutty flavour. Grind as much as you think you'd like.
  • In a dry frying pan, gently toast the ground hazelnuts over medium heat. Cook only until the nuts become fragrant and take a little bit of colour. Be careful, because nuts burn easily.
  • Pour the hazelnuts into a medium saucepan, and add the whipping cream and salt. Place the saucepan over medium low heat, and bring to boiling point. Once it begins to boil, remove from the heat and allow to cool completely before chilling for at least 2 hours to steep. The cream needs to be good and properly cold.
  • Strain the cream through a fine sieve to remove the ground hazelnuts; discard the ground hazelnuts. In the process of straining, you may lose some cream, as such you might need to top the cream level back up to 16 fluid ounces (455 millilitres).
  • In a large bowl, beat the infused cream, condensed milk, and vanilla essence together until it becomes light and moussey.
  • Pour into a 2 pint (1 litre) container and decorate the top with hazelnuts, if you like. Freeze overnight.
No blogs on this day in 2014, 2015, nor 2016.

Saturday 13 May 2017

American Style: Chocolate Fudge Tart

What's not to like about a buttery pastry case filled with chocolate custard? Nothing, that's what!


I know recently I've been doing a lot of American style stuff, but I've been wanting to experiment with custard tarts for a while, and I thought making a chocolate one would be a good start! I am my father's daughter insofar as I'm a complete chocoholic, after all!

The filling has the consistency of a nicely firm set chocolate ganache, but is nowhere near as heavy as the traditional chocolate-and-cream confection: this is made with chocolate, butter, sugar, and eggs to provide something a little more custard like.


I've been tirelessly researching the science and ratios of custard tarts, and how eggs interact with other ingredients. I did so much research that my mind was beginning to be boggled, so I thought what the heck, let'd just experiment!

I decided to take my red velvet cake, and simply replace the flour with melted chocolate, maintaining its ratio to the butter, sugar, and eggs, and omitting all the liquid and leavening ingredients. And it was a tremendous success. Although at first I was doubting this project, because my pastry crust hadn't turned out as well as usual, the success of the filling more than made up for it! The filling is gorgeously soft and custardy, with a paper thin shiny crust.


This cake is a fantastic indulgent treat, and best enjoyed in small doses! This nine inch (twenty-two centimetre) tart should serve 12 to 16 people. I will definitely be continuing my experimentations with custard tarts.

INGREDIMENTS
For one 9 inch (22 centimetre) pie

  • One 9 inch (22 centimetre) blind baked pie crust
  • 9 ounces (250 grammes) plain chocolate, 50% cocoa or more
  • 6 ounces (170 grammes) butter
  • 3 medium eggs
  • 6 ounces (170 grammes) light brown sugar
  • 3 ounces (85 grammes) caster sugar
  • 2 teaspoons (10 millilitres) vanilla essence

METHOD

  • Preheat the oven to 180°C (350°F, Gas Mk.4).
  • In a large jug or medium sized mixing bowl, melt together the chocolate and butter until smooth and without lumps. 
  • Add in the sugars and mix completely, before beating in the eggs until well combined.
  • Pour the mixture into the blind baked pie crust, and tap firmly on the counter top to release any trapped bubbles, Place onto the centre shelf of the preheated oven and bake for 30 to 35 minutes, or until the top has become a thin, shiny crust, and the filling is slightly puffed.
  • Remove from the oven and cool completely on a wire rack before chilling for about an hour or two, or until firmly set. Serve cold with whipped cream, or ice cream.

THIS TIME IN 2016: Chocolate Biscuit Cake, a.k.a: Rocky Road
THIS TIME IN 2013: Experiment: Homemade Sprinkles
No blogs on this day in 2014 or 2015.

Wednesday 10 May 2017

Happeee Birthdaeee, Mumeee!: Lemon Meringue Layer Cake

Happy birthday, Mummy! To celebrate the occasion, I made her her favourite dessert in cake form: lemon meringue layer cake!


I think as long as I have done this blog and beyond, Mum has wanted a lemon or an orange cake for her birthday. In fact, my Mum loves anything citrusy and zesty: she loves lemon yoghurt, lemon meringue tart, lemon sorbet, lemonade, the list is endless.

So this year, I thought I'd do a mash up of a birthday cake and a lemon meringue tart. I'd researched on Pinterest for a few weeks, but I could find no-one who had put a meringue layer in their cake. Even when I shared pictures of this cake into one of the baking groups I'm a member of on Facebook, a few people commented that they'd never seen a meringue layer in a cake before.


I'm aware in Australia and New Zealand covering cakes in meringue is a thing, but nobody does it here. I'm glad to do something new and unusual!

With further ado, let's get to the recipe.


INGREDIMENTS

For the cake,
  • One deep 8 inch (20 centimetres) round vanilla cake, dome cut off and cut into two layers
  • Up to 1 pound (455 grammes) lemon curd, shopbought or homemade
  • 2 egg whites
  • 4 ounces (155 grammes) sugar
For the icing,
  • 4 ounces (115 grammes) unsalted butter, softened
  • 4 ounces (115 grammes) caster sugar
  • 6 fluid ounces (180 millilitres) milk
  • 2 teaspoons (10 millilitres) cornflour
  • 1 teaspoon (5 millilitres) vanilla essence

METHOD

First, prepare the meringue,
  • Preheat the oven to 120°C (250°F, Gas Mk.½), and line a flat baking tray with baking paper. Turn the paper upside down, and draw a 7 inch (18 centimetre) circle on it with a pen, then turn it right way up again.
  • Using the egg whites and sugar, make a meringue mixture. Fill a piping bag fitted with a half inch (1 centimetre) round tip, and use some of the mixture to fix the paper to the baking tray.
  • Pipe one large meringue disk into the circle, about a half inch (1 centimetre) thick, making sure the sides are straight and don't taper. In the free paper around the circle, pipe some little meringue kisses: I made eight 1 inch (2 centimetre) meringues, but the size and shape is up to you. If you don't have enough room on one tray, use two.
  • Bake in the centre of the preheated oven for 30 to 40 minutes, or until they are crisp on the outside but still pale. You don't want them to brown.
  • Allow to cool on the trays completely before handling.
Next, make the icing,
  • Mix the cornflour and milk in a small saucepan until completely smooth and place over medium high heat. Bring to a boil, and cook at boiling for 2 minutes, until it has thickened well.
  • Transfer the mixture to a small bowl to cool fully, mixing occasionally to preventing a skin forming. It will be very thick when cool, almost like a jelly.
  • Beat the butter in a mixing bowl very well using an electric mixer until almost white; this should take about 3 or 4 minutes. 
  • Then, beat in the sugar gradually until fully mixed and fluffy. This should take another 4 minutes or so.
  • Add the cooled custard and continue to beat until it comes together into a fluffy mass, about 2 or 3 minutes. Add in about 3 ounces (85 grammes) of lemon curd to make a nice pale yellow icing with a hint of zesty flavour.
  • Fill a piping bag fitted with a half inch (1 centimetre) round tip halfway with icing, and set aside.
Finally, assemble the masterpiece,
  • On your serving plate, fix the bottom layer of your cake (which is traditionally the top half of the cake with the cut dome side facing up) with a little dab of icing. Pipe a dam around the edge and fill with lemon curd, about 4 or 5 tablespoons (60 or 75 millilitres). Place the meringue layer on top, pressing very gently to fix together. 
  • Again, pipe a dam around the edge, and fill with the same amount of lemon curd. Finish off with the final top cake layer, and press down gently but firmly until all the layers are well fused together.
  • Place in the fridge for about 30 minutes to allow everything to set a bit to make icing easier. If there is icing left in your piping bag, just pipe it all back into the bowl with the rest of the icing.
  • Once chilled, ice the top and sides of the cake with the remaining icing, leaving enough behind for piping detail. I don't like a load of icing on my cakes, but if you feel you need more icing, you can make more.
  • Finish the cake off with some piped borders, and the little meringue kisses. Chill for about an hour. When you want to eat it, let it sit on the counter for 20 minutes to take the chill off it.

This cake is best stored in the fridge, and will happily live there for up to 5 days. I have not frozen it, so I'm not sure of its freezing capabilities.

THIS TIME IN 2013: A Cautionary Tale on the Dangers of Novelty Cakes: The Dinnersaurus (This blog is my number one most viewed post!)

As you can see, all of Mum's birthday cakes of the past 4 years are lemon flavoured. I wasn't lying!

Sunday 7 May 2017

Variation on a Theme: Pepperoni, Mozarella, and Spinach Quiche

Got leftover pizza toppings and eggs in the fridge? Why, make a quiche of course!

A few weeks ago, I made my first ever quiche and became a convert: who'd have thought that an omelette in an edible plate of pastry would be so delicious? And also, who'd have thought that--like and omelette--they're great for using up stuff in the fridge.


The other night, my companion and I had a pizza, and I had some leftover pepperoni, mozzarella, and spinach. So, I just cooked up the leftover pepperoni, about 2 ounces (55 grammes) worth, and a few handfuls of spinach with half a red onion, chopped finely, and then scattered it into the pre-baked 9 inch pastry crust along with a few handfuls of mozzarella. I know these measurements aren't really exact, but quiche filling isn't an exact science!


I used three medium eggs in the filling, mixed with twice as much (in weight) milk, for the filling. I replaced about an ounce (30 grammes) of the milk with some yoghurt for extra interest. After adding salt, pepper, and cayenne pepper to taste, I poured it over the filling in the pastry case before topping off with some grated cheddar for added crustification (which is now a word thanks to Chef John of Food Wishes).


I baked the quiche for about 40 minutes at 180°C (350°F, Gas Mk.4), until it was puffed and golden. Because I cooked this the night before for my companion to enjoy the next day while I wasn't around, I didn't have any; but I have it on his good authority that it was very, very tasty indeed!

THIS TIME IN 2015: Peppermint Ice (Totally not a rip off of Kendal Mint Cake at all. I promise)
No blogs on this day in 2016, 2014, or 2013

Photographs by SilverBolt

Saturday 6 May 2017

Yeast Risen Cinnamon Rolls (Wheat Free)

Fancy a lazy weekend breakfast treat? Here are some deliciously spicy, soft, and rich cinnamon rolls!


I really, thoroughly enjoy the combination of yeasty, doughy, extra light and fluffy dough and squishy gooey spicy centres found in cinnamon rolls: it's such a pleasing thing to eat. They look really pretty too, and the fluffy sides revealed by breaking the rolls apart is one of the best parts.


In the UK, these buns usually have some dried fruit along with the sugary spicy filling and are called Chelsea buns, but my companion really doesn't like dried fruit. So, this American style take on the spiral bread roll is much more likely to be eaten in our household!


To be honest, I prefer them too: the dried fruit kind of gets in the way of enjoying that ooey-gooey middle bit, especially is it's slathered in buttery, creamy, yet tart icing, like a yoghurt or cream cheese glaze.

INGREDIMENTS 
For 8 cinnamon rolls 

For the icing
  • 4 ounces (115 grammes) icing sugar
  • 1 ounce (30 grammes) very soft butter
  • Plain natural yoghurt, buttermilk, or milk to mix

METHOD 

  • Prepare the dough as instructed, and allow to rise. Grease a 11 by 7 inch (28 by 18 centimetre) rectangular dish, or any other similar size.
  • When the dough is nicely puffed up and doubled in size, roll it out on a lightly floured work surface until it becomes a rectangle just under half an inch (1 centimetre) thick. 
  • Spread the soft butter over the whole surface of the dough, except for an inch (2 centimetres) on one of the long sides. Butter it like you'd be generously buttering toast, but don't drown the surface in it: you don't want the rolls to be greasy, there should just be enough to allow the sugar to stick.
  • In a cup or bowl, mix up the sugars and cinnamon. Sprinkle the sugar over the buttered surface until it forms a sandy surface. Make sure the sugar distribution is nice and even.
  • Slightly wet the un-sugared long side of the dough, and roll from the fully sugared long side to the wet long side, making a loose but snug roly-poly: if you roll it too tightly, the buns will grow noses in the oven, because the tightly rolled middle will have nowhere to go but up! Pinch the join well.
  • Cut the big cinnamon sausage into 8 pieces, and then place cut side up into the dish, only barely touching each other.
  • Cover, and leave to rise for about 20 to 30 minutes, or until increased by a half or so. In the meantime, preheat the oven to 180ºC (350ºF, Gas Mk.4). 
  • Once they are puffed, and the oven preheated, place the dish in the oven on the centre shelf for 30 minutes, or until deliciously golden brown.
  • While the buns are cooking, make the icing. Cream together the butter and the icing sugar until smooth and clump free. Mix into a glaze with some yoghurt, buttermilk, or milk to make a thick but running glaze.
  • Remove from the oven, and cool for 5 minutes before drizzling the glaze over the buns while still warm.
TIP
If you want to eat these first thing in the morning, but don't want to get up early to make the dough, you can make these the night before. Prepare the cinnamon rolls right up to the point that you arrange them in the dish, and then wrap tightly with cling film. Pop in the fridge overnight, and then in the morning put them straight from the fridge into the cold oven, then turn it on. The buns will rise while the oven is preheating, and in 40 to 45 minutes you'll have delicious breakfast cinnamon rolls!


Best eaten on the day they are made. If there are leftovers, eat within three days, or freeze for up to 2 months.

THIS TIME IN 2016:  Milky Ice Pops: Chocolate Flavour (Naturally Gluten Free; Dairy-Free Option)
THIS TIME IN 2015: Battenberg Birthday Cake (Wheat and Dairy Free)
THIS TIME IN 2014: American Style Pancakes... also known as drop scones, ssh. (Wheat Free)
THIS TIME IN 2013: Cake Pops, a Maiden Voyage: Jaffa Cake Pops

Wednesday 3 May 2017

Red Velvet Cake, with Traditional Cooked Milk Frosting (Wheat Free, with Dairy Free Option)

I can't think of anything more American than red velvet cake, apart from possibly root beer or barbecue chicken. And now, it's a global sensation.


I've avoided the red velvet craze for a few years now, because I was sick of the sight of it. However, I was on Pinterest one day and I came across a kind of icing I wanted to try: Ermine frosting. Traditionally, this icing goes with red velvet cake, not the cream cheese icing that people would initially assume. So, I thought if I'm going to try making that icing, I'd may as well make the cake that traditionally goes with it!


As someone who's never eaten a homemade red velvet cake, I was really pleasantly surprised at how delicious it is: it's like a mild chocolate muffin, but bigger! And its luminous redness is really, really appealing. The first one I made, however, went into the oven red but came out brown. After some research, I learnt that this was because I used natural food dye. To keep the red colour throughout cooking, it has to be artificial colour. Which isn't ideal, but this is a sometimes treat.


The icing was also a delicious surprise: it turned out remarkably like a Swiss meringue buttercream, but without the hassle of cooking egg whites. It's super silky smooth, not super sweet, spreads like a dream, and makes beautiful sharp edges when cut. It sort of tastes like a sweetened whipping cream. The first time I made it I used salted butter, and it wasn't very nice at all: as such, I strongly urge you to use only unsalted butter to make this icing.

I took a detour from the original recipe, that uses a flour roux, and made a cornflour custard instead. Also, I decided to make it taste mildly reminiscent of a cream cheese icing, which is nowadays more commonly associated with red velvet cake, by adding some buttermilk. You can leave that out and use normal milk, if you prefer.

INGREDIMENTS
For one 8 inch (20 centimetre) two-layer cake

For the cake,
  • 8½ ounces (240 grammes) white spelt flour, or gluten free flour
  • ½ ounce (15 grammes) cocoa powder
  • ½ teaspoon baking powder
  • ¾ teaspoon baking soda
  • 3 medium eggs
  • 9 ounces (250 grammes) caster sugar, divided in two
  • 3 fluid ounces (90 millilitres) sunflower oil
  • 3 ounces (85 grammes) butter, at room temperature, or margarine
  • 6 fluid ounces (180 millilitres) buttermilk, or milk alternative mixed with 2 teaspoons of lemon juice or white vinegar; or dairy-free yoghurt thinned down with water to buttermilk consistency
  • Artificial red food colouring*
  • 2 teaspoons (10 millilitres) vanilla essence
For the icing,
  • 8 ounces (225 grammes) unsalted butter, or margarine**
  • 8 ounces (225 grammes) caster sugar
  • 10 fluid ounces (240 millilitres) milk, or milk alternative
  • 2 tablespoons (30 millilitres) cornflour
  • 2 teaspoons (10 millilitres) vanilla essence
  • 3 to 4 fluid ounces (90 to 120 millilitres) buttermilk***, at room temperature, or dairy-free yoghurt
* Artificial red colouring doesn't evaporate in the oven, whereas natural colouring does. If you use natural colouring, your cake will come out brown. Artificial red colours include E110, E122 to E129, E161 (c,d, h, and j), E162 and E180.

** If you can't get unsalted butter in your area, the originally recipe used vegetable shortening... which you can try if you're feeling adventurous.

*** If you want your icing not to taste slightly sour, just use normal milk.

HOW-TO

First, prepare the cake.
  • Preheat the oven to 170°C (325°F, Gas Mk.3), and grease and flour a tall round 8 inch (20 centimetre) cake tin.
  • In a large mixing bowl, cream butter with an electric mixer until very pale. Take one half of the sugar and gradually add it, beating all the time, until it's light and fluffy
  • In a jug, beat together the oil, eggs, and remaining sugar with the electric mixer (you don't have to change the beaters) until completely incorporated and slightly pale.
  • Return to beating the butter mixture, gradually adding in the egg mixture a little at a time until it is all beaten in.
  • In a separate bowl, mix the flour, soda, power, and cocoa together. Sieve half of the dry ingredients into the butter and egg mix, and fold through until nearly mixed.
  • Add in the buttermilk and a little food colouring, fold a little bit, and finally the remaining dry ingredients. Fold until completely combined. If you want the cake to be redder, add more colour a little at a time until you get the shade you like.
  • Pour the mixture in the prepared tin, and bake on the centre shelf of the preheated oven for one hour, checking for doneness at 45 minutes.
  • Cool for 15 minutes in the tin, then unmould and cool completely on a wire rack before leveling and cutting in half.
While the cake is cooling, start on the icing.
  • Mix the cornflour and milk in a small saucepan until completely smooth and place over medium high heat. Bring to a boil, and cook at boiling for 2 minutes, until it has thickened well.
  • Transfer the mixture to a small bowl to cool fully, mixing occasionally to preventing a skin forming. It will be very thick when cool, almost like a jelly.
  • Beat the butter in a mixing bowl very well using an electric mixer until almost white; this should take about 3 or 4 minutes. 
  • Then, beat in the sugar gradually until fully mixed and fluffy. This should take another 4 minutes or so.
  • Add the cooled custard and continue to beat until it comes together into a fluffy mass, about 2 or 3 minutes. Add enough of the remaining buttermilk to adjust the consistency until it becomes like whipped cream; you don't have to use it all.
  • Use the icing to sandwich the cakes together, and to ice the top and sides. If you like, you can do some piped decorations and add some sweets, too.
VARIATION
If you want to make a plain milk, without butter milk, you can replace the buttermilk with regular milk and replace the baking soda with 1½ teaspoons (7 millilitres) of baking powder, making 2 teaspoons (10 millilitres) in total.

It's been a while! Happy 9th Anniversary!

  It's been a while. The past two years have been a helluva a ride. This year is gonna hold some big changes for this blog. I'm comp...