Monday 29 April 2013

Dinosaur Kimberleys (Wheat Free)

I apologise for the distinct lack of blogs last week on both Monday and Thursday: my laptop is under going some serious surgery at the moment and needs a while to recover. The disk drive decided to corrupt, and as such a crucial Windows file was made impossible to read, and when we tried to do a direct swap of files from a working XP computer to the laptop some of the registry was deleted in the process and Windows couldn't boot.

Basically, it's banjaxed.

But enough of that! Recently, I've rediscovered my fascination with gingerbread houses. In my pursuits of learning German I've been watching a lot of cookery videos in German, and the bakery staple of that fabulous country is lebkuchen, which basically is gingerbread. The German people - in my narrow experience - seem to have as great a love for the gingerbread house as our American cousins - based also on my narrow experience. As such, my interest in 3D constructions with
gingerbread laminae has been reignited.


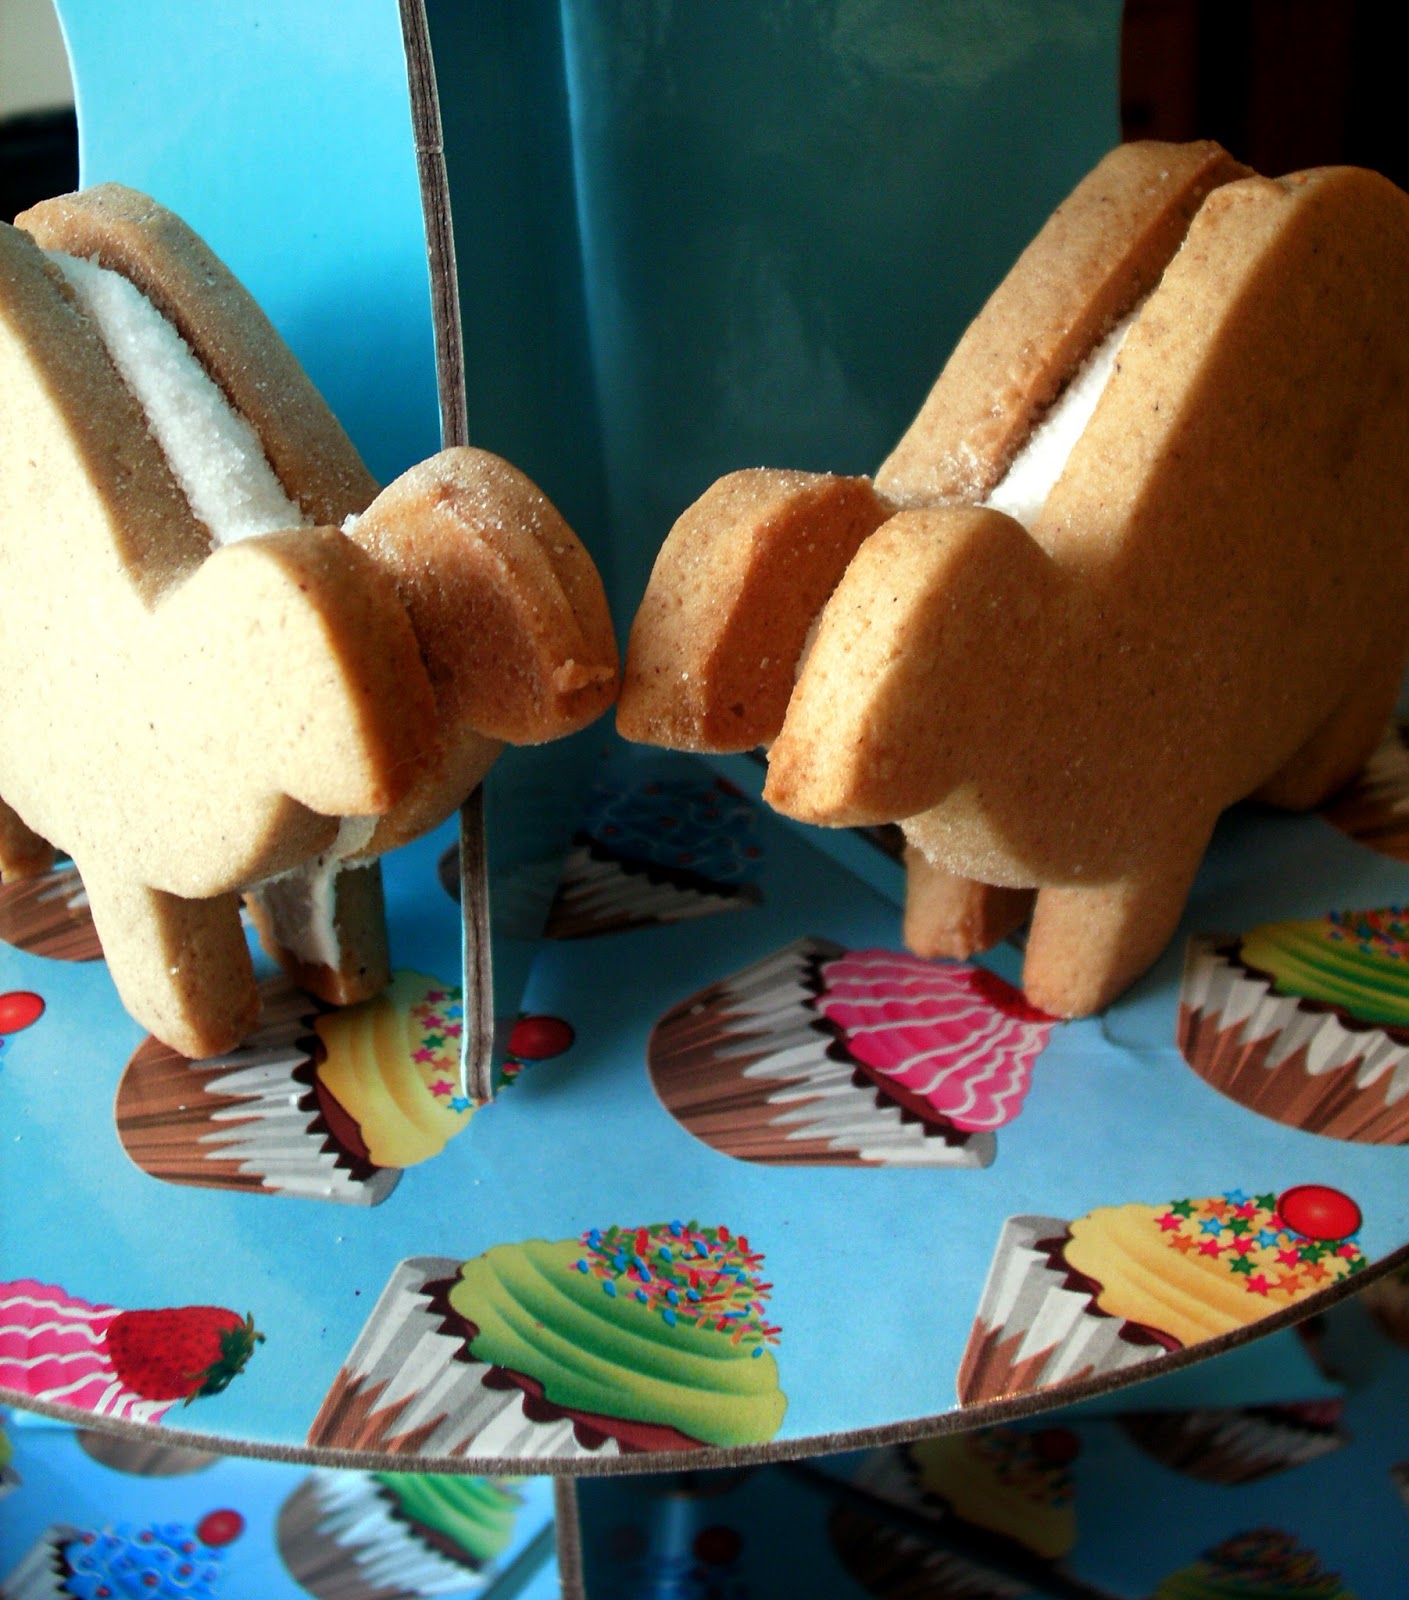
But, my musings on 3D gingerbread constructions is not limited to architecture alone, but to how one could make animals and people that will stand up of their own accord. The company SUCK UK does 3D dinosaur biscuit cutter sets that look awesome, but I wanted to try my own hand at this ambitious design. I went through a few ideas and sketches, but then I arrived at a seemingly juvenile solution when I was nostalgically looking through one of my childhood cooking books: a dinosaur sandwich that due to its width will stand up of its own accord. This was the birth of the Dinosaur Kimberley.

For those of you who are not Irish, a Kimberley biscuit is a confection made by Jacob's which is basically two round, soft gingerbread biscuits sandwiched together with marshmallow and edged with coarsely ground sugar (see here for a visual cue and bizarre advertisement). What better and more elegant way to solve the 3D dinosaur biscuit conundrum than by transforming it into a perennial Irish favourite.


I drew a little dinosaur shape onto some card and cut it out to use as a template. You could use a pre-bought one, or draw your own, or use a completely different shape.

Without any further adon't, here's my gingerbread biscuit recipe.

INGREDIMENTS
For the gingerbread:
  • 4 ounces (115 grammes) butter, or margarine, at room temperature
  • 4 ounces (115 grammes) of brown sugar
  • 1 ounce (30 grammes) of golden syrup, or treacle
  • 1 medium egg
  • 2 ounces (55 grammes) cornflour
  • 7 ounces (200 grammes) spelt flour
  • 2 teaspoons ground ginger
  • 1 teaspoon ground cinnamon
  • ½ teaspoon ground coriander
  • ¼ teaspoon ground cloves
  • Pinch of salt

For the marshmallow filling:
  • 8 ounces (230 grammes) white sugar
  • 1 ounce (30 grammes) golden syrup, or glucose syrup
  • 4 fluid ounces (115 millilitres) water
  • 3 drops white vinegar, or lemon juice
  • 2 tablespoons (30 milliliters) gelatine powder
  • Pinch of salt

HOW TO
For biscuits:
  • Sieve the flours, spices and salt together into a large bowl to mix together consistently; set aside.
  • In another bowl, cream the butter, sugar, and syrup or treacle until pale and fluffy with a wooden spoon, spatula or electric hand mixer. Beat in the egg until fully combined.
  • Add in half of the dry ingredients and beat until fully mixed but still soft, then add in the remaining dry ingredients. You might need to use your hands to mix in the remaining flour.
  • Mix into a smooth dough that is soft but not sticky. Flatten out to an inch thick (2 centimeters) and wrap in cling film. Refrigerate for at least 1 hour. This dough also freezes well if you don't need it right now.
  • Preheat your oven to 170°C (325°F, Gas Mk.3, or very moderate). Lightly grease two baking trays.
  • Sprinkle the work surface with flour and roll out the dough to your desired thickness. For me, about 1/4 inch (6 millimeters) works well for soft, cakey biscuits, and 1/8 inch (3 millimeters) makes nice crispy biscuits.
  • Cut out the biscuits and put on the trays. Bake for about 15 minutes, or until lightened in colour (that happens with spelt biscuits), set on the outside and ever so lightly browned around the edges.
  • Remove from the oven and leave to cool for about 5 minutes before transferring to wire racks to cool completely.


For the marshmallow filling:
  • Put the sugar, syrup, salt, vinegar or cream of tartar, and half the water in a large heavy bottomed saucepan and heat gently, stirring until the sugar has dissolved.
  • While the sugar is dissolving, pour the remaining water into a large bowl and sprinkle on the gelatine to bloom. This takes about ten minutes
  • Once the sugar has dissolved, bring to the boil and cook to soft ball stage (115°C, or 240°F). This takes anywhere between ten to fifteen minutes.
  • When the sugar has cooked to soft ball stage, prepare yourself. Have an electric hand mixer at the ready, and pour the sugar onto the gelatine in a thin stream while beating the mixture. Beat the living daylights out of the mixture for a solid ten minutes, or until cool and about tripled in size.
  • Lightly grease the inside of a piping bag, fitted with a medium-sized round nozzle, and fill it with the marshmallow mixture. Working very quickly, fill and sandwich the biscuits. Whatever marshmallow mixture is left over can be piped into shapes on a greased baking tray that has been liberally and heavily dusted with icing sugar.

These would be even nicer if they were iced with royal icing and then sandwiched; the ultimate sugar rush.

Thursday 18 April 2013

Pouring Fondant Done the Awkward Way

I promised a recipe for pouring fondant, and I have delivered! Pouring fondant is very similar to glacé icing (only less watery and insipid) in that it is runny when made, but sets into a soft, sugary layer of icingy loveliness when it's set; compare it to ganache in this respect. This is the kind of icing found in the tops of Bakewell tarts, or enveloped around French Fancies.

As the title would suggest, this isn't the World's easiest way of making pouring fondant, but I don't like doing things easily. I like finding the most arse-about-face way of making things just to bask in the glory of succeeding at a challenge... I exaggerate: the only complicated thing about this recipe is a sugar thermometer, and you don't even need one. The important thing to note in this recipe, though, is that there are two separate stages of preparation: it's not a case of mix it up and it's done, there's a little bit of kitchen science involved.

When the sugar cooks in the saucepan, it becomes a liquid syrup because the sugar molecules have been dissolved into the water and all the little grains and crystals of sugar have been disintegrated. This is why recipes that require boiling sugar ask not to stir the syrup while it's boiling and to wash the sides of the pans while cooking: if the syrup is disturbed, or any crystals of sugar reintroduced into the mixture, it will start a chain reaction in which all the crystals of sugar are linked together again, and it'll set into a rock because the heat produces the perfect crystal growing conditions.

However, when making sweets such as fondant and fudge, we actually want a certain, controlled level of crystallisation to make the sweets opaque and a tiny bit grainy. This grainy sensation gives the eater the illusion of creaminess and smoothness, instead of full on sticky-sweet sugariness. But in order to control the level of crystallisation, we have to allow the syrup to cool down; this means the reaction won't run away with itself given the slightest excuse.

Don't believe this scientific gobbledigook? Check it out here in the completely unreferenced source of all my sugar-cooking knowledge.

Now, to start:

INGREDIMENTS
This will cover one 8 inch (20 centimeter) round cake, 7x9 (17x24 centimeter) rectangle cake, or 12 fairy cakes

  • 8 ounces (225 grammes) caster sugar
  • 2 fluid ounces (60 milliliters) water
  • ¼ teaspoon white vinegar, or lemon juice
  • Optional: 1 tablespoon glucose syrup, or light corn syrup

HOW TO
  • Prepare your work area: ready a shallow bowl of water and ice-cubes for sugar testing, and lightly grease a medium sized glass bowl.
  • In a medium-size heavy saucepan, pour the water and stir in the cream of tartar or vinegar. 
  • Pour the sugar into the middle of the water, and add the syrup if using. This makes a ring of water between the edge of the pan and the pile of sugar, reducing the chances of crystallisation.
  • Put onto a medium-low heat and stir with a wooden spoon or spatula. Stir until the sugar has dissolved, then allow to come to the boil.
  • Once the sugar is boiling, stop stirring. Don't even touch it. If you see crystals clinging to the pan sides, use a pastry brush dipped in hot water to wash them off, but for the love of God don't scrape anything.
  • Once boiling, attach your handy-dandy sugar thermometer to the side of the pan. Cook to soft ball stage, which is 113 - 115°C (235 - 240°F). Or you can do a cold water test: take the pan off the heat momentarily and take a teaspoon of syrup. Drop it into the bowl of water and ice-cubes. The syrup should be firm enough to be rolled into a ball, but the ball should be flattened easily and shouldn't be able to hold its shape of its own accord.
  • Having reached the appropriate temperature, take the pan and pour the contents into the glass bowl, never scraping the sides under any circumstances. Set on the work surface and allow to cool to about 37°C (100°F), or until the pan is a touchable heat from below.
  • Beat the fondant until opaque and thick but still pourable, as pictured. Pour onto your preferred cake, and spread around to smooth.

NOTES
  • Beat in 1 ounce of any of strained jam at the end.
  • Make the syrup comepletely with citrus juice, or any fruit juice for that matter.
  • Use half water, half coconut milk.
  • Add a teaspoon of any kind of flavouring essence, like vanilla, peppermint or rum.
  • Add a tablespoon of golden syrup to the syrup, and beat in 1 ounce of softened butter at the end for toffee or caramel flavour.

This is my favourite icing for cake slices and traybakes, as it can be poured onto the pre-cut cake in one fell swoop, and the cake can be cut into pieces once iced. To cut this icing you'll need to cut it while still a little soft and with a hot knife, like I explained in my coffee and raspberry slice recipe.
This is the basic basey base of the fondant icing, and it can be coloured and flavoured very easily. There are a myriad of ways to flavour this versatile icing. For example:


Monday 15 April 2013

Black Forest Gâteau: a Retro Classic? (Wheat Free)


I was researching the old Black Forest Gateau recently as a friend of mine - who was celebrating her birthday yesterday - told me it was her favourite cake. Chocolate, cherries and cream: what's not to like? I always thought it was more finicky and complex than chocolate cake, cherry jam and sweetened cream, but I was wrong, it seems. But in my research I came across loads of recipes that quoted the Black Forest Gateau as a 'retro classic', which I thought was odd. Surely, people still eat Black Forest Gateau, it's not like a by-gone thing: my corner shop's bakery makes a mean Black Forest Gateau, and has several on display every day; in fact most bakeries do. Am I missing something?

Anyway! I decided to bundle together the ingredients needed for the cake, but it turns out that Lidl, who used to sell cherry jam, has realised people don't like it and has stopped selling it. If a shop near you sells cherry jam, by all means use it instead of the cherry filling I've devised.

INGREDIMENTS:

For cherry filling:
  • 2 x 15 ounce (425 gramme) cans of black cherries in light syrup (or Morello cherries, if you can get them)
  • 2 teaspoons cornflour
  • 1 tablespoon caster sugar
  • Optional: 1 tablespoon lemon juice

For two 9 inch (23 centimeter) round sandwich cakes
  • 5 ounces (140 grammes) spelt flour
  • 3 ounces (85 grammes) cornflour
  • 2 ounces (55 grammes) cocoa powder
  • 2 teaspoons baking powder
  • 5 medium eggs, at room temperature
  • 2½ ounces (70 grammes) soft brown sugar
  • 5 ounces (140 grammes) caster sugar
  • 1 teaspoon vanilla essence
  • 2½ ounces (70 grammes) sunflower oil
  • 2½ ounces (70 grammes) butter or block margarine
For cream icing/filling:
  • 15½ fluid ounces (445 milliliters) whipping cream
  • 4 ounces (115 grammes) soft cream cheese
  • 3 tablespoons icing sugar
  • Optional: 1 teaspoon vanilla essence
For ganache topping:
  • 2 fluid ounces (55 milliliters) whipping cream
  • 2½ ounces (70 grammes) dark chocolate
For assembly (optional):
  • 1 tablespoon kirsch
  • 1 teaspoon cocoa powder
  • 1 teaspoon icing sugar

HOW-TO:

First, prepare the cherry filling (it's best to do this the day before):
  • In a saucepan, empty one of the cans of cherries. Bring to the boil, then allow to cook for 10 minutes. If you could only find black cherries, but like the tartness of Morello cherries, add the lemon juice here. If you like the syrupy sweetness of black cherries, leave it out.
  • Using a potato masher or fork, gently squish the cherries. You want this to be like jam, so make sure it still has a little texture.
  • Take about 1 tablespoon of the cooking liquid and put into a glass. Add the cornflour and sugar and mix into a paste.
  • Add the cornflour and sugar mixture back into the saucepan and cook the jam until thickened, about 2 or 3 minutes. Remove from the heat and pour into a bowl; allow to cool.
  • Once cooled cover with cling film, making sure the cling film touches the surface of the jam, and put in the fridge until set for at least 4 hours, or overnight.
Second, prepare the cakes:
  • Preheat your oven to 180°C (350°F, Gas Mk.4, or moderate).
  • Prepare the cake mixture as per the basic sponge recipe, and pour into two greased and floured 9 inch (23 centimeter) cake tins. Cook for 20 to 25 minutes until ready. Allow to cool complete in tins.
  • Once cold, cut each cake in half horizontally, and cut the dome off one of them. Decide how you will assemble the layers, making sure the top-with-the-dome-left-on is always the top layer.
Then, prepare the cream icing/filling:
  • A note on whipping the cream: to make sure the cream whips nicely and doesn't split, put the mixing bowl, preferably made of glass, and whatever you will be beating the cream with - whether it be a balloon whisk or the beaters of an electric hand mixer - into the fridge for 1 hour or the freezer for 15 minutes.
  • Put the whipping cream, cream cheese, icing sugar and vanilla essence into the chilled bowl and whisk together until the mixture holds stiff peaks. This is the ideal spreading consistency.
  • Put one third of this mixture into a bowl and set aside for decorating.
Next, prepare the ganache:
  • In a bowl over a saucepan of simmering water, combine the chocolate (broken up, of course) and the cream. Whisk together until smooth and shiny, then allow to cool to spreading consistency while you assemble the cake.
Assemble the masterpiece:
  • Take the cake layers: put the bottom one on the plate you intend to serve the gateau on, set aside the top one for later, and put the middle two on their own plates. This makes the assembling easier, as each piece will be filled and iced individually.
  • Take the remaining can of cherries and drain the liquid into a bowl, keeping the cherries in the sieve to drain fully. Take half of the cherries (keeping the rest for another time) and cut each of them in half, bar 12 for decoration.
  • Take 9 tablespoons cherry liquid (reserving the rest for another time). If you want, you can mix the kirsch with the cherry liquid, but I don't take alcohol so I leave it out. Sprinkle the liquid evenly across the three cake layers and watch the sponge drink it right up.
  • Divide the cherry jam across the three cake pieces and spread in an even thin layer.
  • Divide the remaining two-thirds of cream mixture across each cake, spreading around to about an inch (2 centimeters) away from the edge of each cake. This stops the filling squidging out the sides when you put all the layers together.
  • Divide the sliced cherries across the three cakes and sprinkle them over the cream.
  • Now, here's where you need to take care. Take the two middle cakes cakes and stack them on the bottom cake on the serving platter. Take the topmost layer, which you set aside, and put it on top of all the cakes. Gently press down to cement all the layers together, put not so hard as to squeeze all the filling out of the sides. And there, pretty much, is your Black Forest Gateau, the next steps are for frills.
Decorate the masterpiece:
  • Spread the cooled ganache over the top of the cake with a palette knife. You can make swirls if you want, but I like to make streaks.
  • Take the cream you set aside and put into a large piping bag fitted with a large closed-star nozzle. Pipe rosettes along the top of the cake, between the layers, and where the cake meets the serving platter, as shown in the photo. Or, you could decorate it whatever which way you want.
  • Use the cherries you kept earlier and put between the rosettes. For that extra element of kitch, you could use red glacé cherries instead of the canned black cherries for this bit.
  • Dust the sides with cocoa powder, and the top with icing sugar.

And there she is, in all her glory. Of course, you can choose to decorate it however you like, and you may elect to use just plain whipped cream, without the cream cheese, sugar and vanilla, and you could use shop-bought cherry jam if you can get your hands on it. This is just how I've made it, and dayum... it tastes delicious!

This is an awful lot of effort, in fairness, but it really pays off in the end because it looks and tastes amazing! I don't have any photos of the inside because a) I'm not the best at slicing cakes, and b) I didn't bring a camera to the birthday party, like a big silly. Next time!

Thursday 11 April 2013

Gingerbread of the Gingeriest Proportions (Wheat Free)

I will admit: the fluffy blue teddy isn't what one would associate with a die-hard metal fan, but the
gingerbread was made for a church event entitled 'Teddy Bear Parachute Jumping Contest'. Don't ask: Church of Ireland people have these vagueries.

And no: it isn't chocolate, this is traditional treacle gingerbread. Usually baked in loaf form as a tea bread, this sticky sweet treat is very heavy going and best enjoyed in small doses, due to its rich, dense texture and its almost palette-abusing amount of spices. Of course, the spiciness can be adjusted to taste, but this is a recipe I have altered over time to yield an intense taste experience. I like to eat this spread with real butter with a nice cuppa shcald, but you can enjoy this like a cake if you prefer; I actually made this in traybake form for the church event, not in loaf form.

I also like to have a sticky glaze on my gingerbread, which calls upon an unusual ingredient: Coca-Cola. Before you say anything, don't knock it! Coca-Cola is flavoured with a unique blend of spices and herbal extracts, and its zingy flavour works well with the spiciness of the gingerbread.

The list of ingredients may seem daunting, but it's like literally any tea bread: mix the dry ingredients in a bowl, mix the wet ingredients in a bowl, then mix the wet into the dry. Only, the wet ingredients are mixed in a saucepan in this one and the eggs are added last.

This recipe is adapted from Tate and Lyle Refineries' book Sweet Success, published in 1977.

INGREDIMENTS:
This makes one 8x4 inch (21x10 centimeter) loaf, or one 10 inch (25 centimeter) square cake

Dry ingredients:
  • 7 ounces (200 grammes) spelt flour
  • 3 ounces (85 grammes) cornflour
  • ½ teaspoon bicarbonate of soda
  • 2 teaspoons ground ginger
  • 1 teaspoon ground cinnamon
  • 1/2 teaspoon ground coriander
  • 1/2 teaspoon ground mixed spice
  • 1/4 teaspoon ground cloves
  • 1/4 teaspoon dried chili flakes
  • 1/4 teaspoon salt
Wet ingredients:
  • 6 ounces (170 grammes) golden syrup
  • 4 ounces (115 grammes) treacle
  • 4 ounces (115 grammes) soft brown sugar
  • 4 ounces (140 grammes) butter
  • 1 ounce (30 grammes) root ginger, grated finely
  • 1 ounce (30 grammes) crystalised ginger, cut finely
  • 6 fluid ounces (170 milliliters) warm water
  • 2 medium eggs

For the glaze:
  • 1 tablespoon golden syrup, or stem ginger syrup if you can find it
  • 1 tablespoon caster sugar
  • 2 fluid ounces hot water
  • 2 fluid ounces Coca-Cola

HOW-TO
  • Preheat the oven to 160°C (325°F, Gas Mk.3, or very moderate).
  • Prepare your tin of choice by greasing and flouring, or lining with baking paper. I use silicone-greased paper, but waxed paper works just as well; greaseproof paper needs to be greased.
  • Put all the wet ingredients, except the eggs, into a saucepan and cook over medium-low heat until the sugar and butter have melted and it has formed an even mixture. Allow to cool enough for it not to scramble the eggs later.
  • Sieve all the dry ingredients together in a large bowl.
  • Make a well in the centre of the dry ingredients and pour in the wet ingredients from the saucepan. Mix together gently with a spatula, wooden spoon or balloon whisk.
  • Add in the eggs and beat vigorously until well combined and smooth. 
  • Pour the mixture into the prepared tin and cook for 30 to 35 minutes. It's done when it's springy to the touch and a cocktail stick or skewer stuck into the thickest part comes out clean or with one or two crumbs stuck to it. About 5 minutes before it's due out of the oven, start preparing the glaze if you want to use it.
  • To make the glaze, put all the glaze ingredients into a small saucepan and heat slowly, stirring to dissolve the sugar. Bring to the boil, then remove from the heat.
  • Skewer the cake while it's still hot and pour on the glaze even over the surface. Return to the oven for another 2 minutes to set the glaze slightly.
  • If you have glazed the cake, allow to cool completely in the tin before taking out and serving; if you haven't glazed it, you can take out of the tin when it is cool enough to handle and allow to cool completely on a wire rack. 


The texture of this bread is second to none, and it is sinfully moist. As nice as it is eaten while still warm from the oven, it's best to leave it overnight before cutting. This way, all the spices have time to breathe and release their flavours into the cake.

Monday 8 April 2013

You are a Pirate!

If asked the ultimate question 'Pirate or Ninja', I would always go for ninja. Jussayin'. I'd also go as far as to make a guilty confession that when the day comes that I am to be married I will not budge over my wish to have a fancy dress wedding where I would be dressed as a pirate. I was a kid when I saw 'The Pirates of the Caribbean: the Curse of the Black Pearl' in the cinema, and I was converted there and then... (although I did go out with a ninja; pirates are in short supply these days).


Okay, I have a confession: I'm a sucker for all things cute. I love cute things, small things, tacky things, kitch things; you name it, if it's ridiculous I'll probably like it. As for what that has to do with baking, well, let me tell you. I was in my local neighbourhood Dealz and I found a kit for making pirate cakes: it came with 24 pirate cake cases, and 24 little Jolly Roger cake decorations. Before I knew it, I had bought them... as if by magic.

I then began to ponder, what does a pirate cake taste like? What do pirates eat, or what kind of flavours would one associate with a pirate? I did a little brainstorm: pirates -> boats -> sunny places -> Caribbean -> bananas -> coconuts -> limes -> rum -> cane sugar -> spices. So much to work with!

In all honesty, I don't like bananas; I like banana bread, but that's about it, so bananas were off the list. I had made coconut and lime fairy cakes in the past, inspired by a cookery book I was given by an acquaintance for Christmas two or three years ago, and that was a delicious combination; but I didn't have the ingredients to make coconut cakes or icing. After some thought, I settled on rum and brown sugar cakes with lime buttercream icing, and they were the shizz.

(I apologise for the quality of the photos: I didn't have my trusty blur-banishing tripod with me, so I had to rely on my shaky hands.)

Following the same technique as outlined in my basic sponge cake post, I used this recipe:

  • 3 ounces (85 grammes) spelt flour
  • 1 ounce (30 grammes) cornflour
  • 3/4 teaspoon baking powder
  • 2 medium eggs, at room temperature
  • 3 ounces (85 grammes) soft brown sugar instead of caster sugar
  • 1 teaspoon rum essence (available from the Home Baking aisle of the supermarket) instead of vanilla essence
  • 1 ounce (30 grammes) butter or block margarine
  • 1 ounce (30 grammes) sunflower oil

I also made a basic buttercream using this recipe:
  • 2 ounces (55 grammes) butter, at room temperature
  • 6 ounces (170 grammes) icing sugar, sifted
  • Rind of 1 whole lime
  • 1 tablespoon lime juice
  • 1 - 2 drops each of green and yellow food colouring (I used the liquid kind)

As you can see, it's a normal sponge but I replaced all the caster sugar with soft, dark brown sugar, and added a teaspoon of rum essence with the vanilla essence. This was a little bit of an experimental guess, and although the cakes where quite nice, I wouldn't choose to make them again. The icing was the best bit, being made with shed-loads of lime juice and lime rind; in the process of beating the icing together, the green colour from the rind mildly coloured the buttercream. It didn't colour it enough for me, though: I added a few drops of green and a few drops of yellow to get the perfect limey green.

But my adventures with the pirate cases didn't stop there. A friend was visiting from Roscommon (of all places) and as an afternoon activity we made some pirate cakes for my brother, who was feeling ill. These were just vanilla cakes with raspberry icing, but in true Mr Freeze style I coloured the raspberry icing luminous blue. Why are raspberry flavoured sweets and lollies always coloured blue, I wonder...?


The dragon-smiley faced one in the middle was designed by my visiting friend. It's definitely the coolest one there.

And have a gratuitous shot of the inside of the cake... just for me to show off my fantastic taste in butter-flavoured sandwich spread, and whatever that is next to it on the work surface.

Hopefully the next time I get an inch for pirate cakes, I'll have the right ingredients to make coconut cakes and lime buttercream. Trust me, it's one of the nicest combinations there is for a cake. Don't forget to toast a handful of desiccated coconut in a frying pan or wok to sprinkle on top, because it's very yummy.

Here's some trivia for the day: desiccated coconut in German is kokosraspel. Lidl has taught me something today; and I'm not sponsored by Lidl, I promise.

Thursday 4 April 2013

Buttercream Icing: the King of all Icings

Buttercream icing is possibly one of the most versatile kinds of icing there is. Either spread haphazardly or
piped artistically onto a cake, it still looks and tastes great, and is very quick and easy to prepare. In fact, the only thing simpler than it is good old whipped cream, which doesn't have the same keeping power as buttercream. It's just butter, icing sugar, milk and flavouring

Due to its simplicity, buttercream icing is easily flavoured, easily used, and easily stored. If you've made too much, you can keep it in the fridge in a air-tight box and it'll keep for up to a fortnight (in my experience). However when storing exercise caution: it must be kept airtight, because it's high butter content (and thus high fat content, sorry to disappoint) makes it a magnet for unwanted tastes and odours.

But Anna - I imagine hearing you say - I'm lactose intolerant? Do I have to give up buttercream forevar? Fear not! I have a friend who is lactose intolerant, and as such making cakes for him was a worry when it came to buttercream. I discovered, however, that it works just as well with margarine instead of butter, and water instead of milk; just make sure it's the soft kind, not the block kind. Then, even as a non-dairy eater, you can enjoy the silky creaminess of buttercream icing.

Here is how to make the baker's wonder material.

INGREDIMENTS:
This will easily ice 12 fairy cakes, or ice the top and fill an 8 inch (20 centimeter) cake.
  • 6 ounces (170 grammes) butter, softened to room temperature
  • 12 ounces (340 grammes) icing sugar, sieved
  • 2 to 3 tablespoons (30 to 45 millilitres) milk, or more if needed
  • 1 teaspoon vanilla essence, or essence of your choice: such as peppermint or almond.
It is absolutely imperative that all the ingredients -- including the milk -- are at room temperature, otherwise the buttercream and curdle.

HOW-TO:
  • Beat the butter, vanilla essence and the first tablespoon of milk with about a third of the sugar to start with, using a wooden spoon or electric hand mixer, until fully blended.
  • Beat in another third of the sugar until fully blended with the second tablespoon of milk, then add the final third of sugar and beat continuously for about 3 or 4 minutes until light, fluffy and pale.
  • If the mixture is too stiff to use properly, add milk a teaspoon at a time until it's just right. It should be soft, but still hold stiff peaks when the beater/wooden  spoon is pulled out of the icing.

And that, truly, is it. The awesome versatility in application and flavouring has been hailed and capitalised upon by bakers for a very long count of years. If you want to make buttercream that isn't just plain old vanilla (which, don't get me wrong, has its time and place), then here are some simple tips, taking the measurements of the above recipe in mind.


If you want an orange, lemon or other citrus icing, take 1 whole citrus and grate off its zest (you want only the orange or yellow outer layer of skin, not any of the white bit underneath – known as pith – because it’s very bitter) and add this with the first addition of icing sugar before beating. Instead of the milk, add the same amount of the citrus juice. You can keep the vanilla essence in for extra sweetness, or replace it with citrus essence for extra zing.

If you would like a chocolate icing, replac½ ounce of the icing sugar with ½ ounce of cocoa powder. This makes a very rich, dark chocolate icing, so if you don’t like it as dark you can reduce the substitution, or use hot drinking chocolate power, which is sweeter.

If you would like a coffee icing, replace the milk with the same amount of very strong black coffee, either made with instant espresso powder or from a filter. If you're extra coffee mad, you can replace the vanilla essence with coffee essence.

For toffee or caramel icing, simply add a tablespoon of golden syrup or toffee-flavoured ice-cream sauce, which you can get from any supermarket. If you can get it, you can use butter-vanilla flavouring instead of the vanilla essence; I managed to get a few vials of such flavouring from Lidl.

For any kind of berry or soft fruit icing, such as strawberry, banana or raspberry, replace the milk with the same quantity of fruit purée (you can make this by squidging fresh or defrosted frozen fruit through a sieve) or add about an ounce of strained jam. Also, you could add some fruit flavoured ice-cream sauce, or milk-shake powder.

For coconut icing, replace the milk with the same quantity of coconut milk or juice. If you can get your hands on solid coconut milk, you can replace an ounce of the butter with the coconut milk.

For peanut flavoured icing, replace half of the butter with smooth peanut butter. If you can get your hands on any other kind of nut butter, you could use those too, such as almond, hazelnut or cashew nut. Similarly, you could substitute half the butter for any other kind of thick, sweet sandwich spread; like Nutella.

The options don't stop there! A while back I made Coca Cola flavoured buttercream on vanilla cakes, which was inspired by a recipe I read online for Coca Cola cupcakes. I tried the original recipe and it was a disaster, but I took inspiration from it to make another cake (at the time I was allergic to chocolate, so this recipe for moist chocolate cakes wouldn't have been for my consumption anyway). The Coca Cola flavoured icing was nice, but in future I think I'll reduce the cola over heat to make it thicker and more concentrated before adding it to the icing.

I hope this recipe serves you well!


Monday 1 April 2013

Different Sponge Cake Flavours (no April Fool, it's after 12pm)

Yes, it is April Fool's day, but I got up late today and thus missed the 12pm cut-off for practical jokes. Although, not many people know this is a rule.

And so, we move onto how to flavour the basic sponge cake recipe. Last week I uploaded a blog on a coffee cake, so I thought I'd be kind an tell people how to make the normal vanilla flavour sponge into a coffee sponge, and various other kinds of sponge. In the picture, there is a vanilla cake, a coffee cake and a chocolate cake for sake of demonstration.

The following changes are specifically for the three-egg quantity as explained in the basic sponge cake recipe. If you've changed the amount of cake mixture, the alterations will need to be changed accordingly. To jog your memory, here is the recipe again.

  • 4 ounces (115 grammes) white spelt flour
  • 2 ounces (55 grammes) cornflour
  • 1 teaspoon baking powder
  • 3 medium eggs, at room temperature
  • 4½ ounces (130 grammes) caster sugar
  • 1 teaspoon vanilla essence (preferably the pure and natural kind)
  • 1½ ounces salted butter (if lactose intolerant, see notes); if using unsalted, add ¼ teaspoon of salt to the flour.
  • 1½ ounces sunflower oil
  • 3 tablespoons (45 milliliters) hot water

If you want an orange, lemon or other citrus cake, take 1 whole citrus and grate off its zest. You want only the orange or yellow outer layer of skin, not any of the white bit underneath – known as pith – because it’s very bitter. Add this to the eggs and sugar before beating. Instead of the hot water, add the same amount of the citrus juice or a mixture of citrus juice and hot water if you want a less intense flavour.

If you would like a chocolate cake, replace 1 ounce of the white flour (not corn flour) with 1 ounce of cocoa powder. Because coca powder is very dry, add an additional tablespoon of hot water. This makes a very rich, dark chocolate cake, so if you don’t like it as dark you can reduce the substitution, or use hot drinking chocolate power, which is sweeter. Also, for a fudgier taste, you can replace half of the caster sugar with soft brown sugar, or even a mixture of caster sugar, brown sugar and golden syrup. Only replace 1 ounce of sugar with golden syrup, though, otherwise weird things happen.

If you would like a coffee cake, replace the milk with the same amount of very strong black coffee, either made with instant espresso powder or from a filter. If you want even more coffeeness, you can replace 2 teaspoons of the white flour with ground coffee beans, or replace the vanilla essence with coffee essence, or both if you’re truly coffee mad.

For toffee or caramel cake, simply replace the caster sugar with soft dark brown sugar, and then also replace one ounce of the sugar with one ounce of golden syrup (only 1 ounce, as aforementioned). If you can get it, you can use butter-vanilla flavouring instead of the vanilla essence; I managed to get a few vials of such flavouring from Lidl, and it adds a lovely note.

For any kind of berry or soft fruit cake, such as strawberry, banana or raspberry, replace the water with the same quantity of fruit purée. You can make this by squidging fresh or defrosted frozen fruit through a sieve. For extra special fruitiness, you can replace one ounce of sugar with the same quantity of fruit jam put through a sieve.

For coconut cake, replace 1 ounce of the plain white flour with desiccated coconut, and the water with the same quantity of coconut milk or juice. In Ireland, coconut milk comes in both liquid and solid form, so if you can only get your hands on solid form, dissolve it in hot water to make up to the quantity needed. Coconut cake is one of my especial favourites, especially with nice pillowy icing on it.

For spiced cake, you don’t need to replace flour with spices, you just add the spices to your dry ingredients at the beginning and sieve them as well. I tend to add a maximum of 2-3 teaspoons total of ground spices, whether you want to add 2-3 teaspoons of one spice (which is quite extreme), or a mixture of spices that amounts to 2-3 teaspoons (as in ½ a teaspoon of cinnamon, ½ a teaspoon of ginger, ¼ a teaspoon of coriander, et cetera).

For Queen cakes, which is basically a vanilla fairy cake with dried fruit in, just add 3 ounces of raisins or currants - tossed well in flour - to the mixture. You could also add chocolate chips for chocolate chip cakes, or even chopped crystallised ginger.

A nice idea for children’s parties (especially little girls) is to add 2 tablespoons of hundreds and thousands. This will make the cake spotty on the inside. Don't use dragées, as they are big and crunchy to find in a delicate little cake.

When adding colouring to your mixture, you can use either gel or liquid colouring, just not powder; it doesn't mix in properly. You can add up to 1 fluid ounce of liquid colour before a) the mixture starts to get too thin, or b) the colour is frightening deep/dark/nuclear. I don't really go in for colouring the actual cake, though, as I like to leave the cake natural and get my colour hit through the icing.

So go forth, and flavour!

It's been a while! Happy 9th Anniversary!

  It's been a while. The past two years have been a helluva a ride. This year is gonna hold some big changes for this blog. I'm comp...