Tuesday 31 July 2018

"Let Me Guess, Someone Stole Your Sweet Roll": Baking Tribute to Skyrim

This summer, when the weather was too hot for doing anything, I was introduced to the wonderful world of Elder Scrolls: Skyrim, a computer game where you are a character in a fantasy world, called Skyrim, who can speak to dragons.

I've never been much of a gamer since I was a teenager, but this game is something new and fabulous! One of my characters is an axe-wielding Viking, the other is a dark-skinned woman from a country called Hammerfell who is a magical archer. You can be anyone in this fantastic game, and in the game you complete quests that require fighting bad guys and dragons, and finding hidden treasure in catacombs and caves.

In this game, your character can eat different kinds of food, including treats like the boiled creme treat, apple pies, and--my favourite--sweetrolls!

Image result for skyrim sweetroll

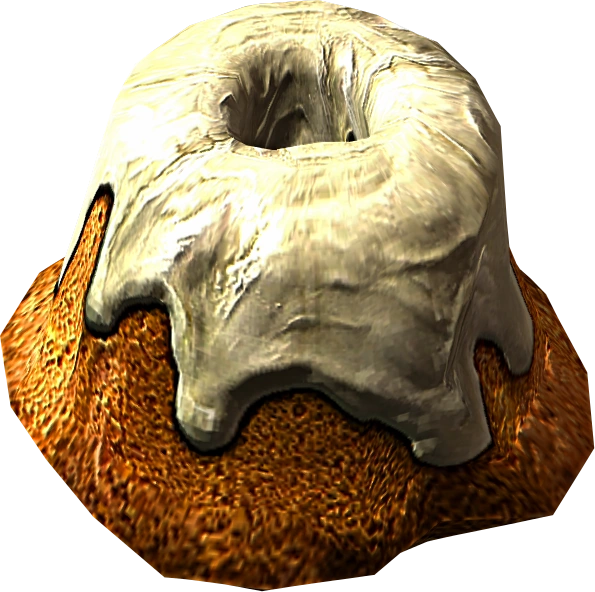
As pictured, the Skyrim sweetroll looks like a mountain-shaped piece of bread covered in sweet glacé or fondant icing. It's not specified in the game whether it's a bread roll or a cake, because it's simply a background detail. In fact, the only time in the game that it's ever spoken about is when sometimes as incidental dialogue a town guard will say "Let me guess, someone stole your sweetroll".

The sweetroll is a running gag in many games by Skyrim's production company, Bathesda. It seems someone in their design team has a sweet tooth!

Ever since playing it, I wanted to recreate the delicious looking treat. At first, I tried modelling some sweet bread dough into mountain shape rolls, but it never kept its shape on baking. However, the recently I was wandering through my local Lidl and I saw the perfect solution to my problem: a Bundt tin!


Last year, I experimented with making my own tube pan by putting a food can in the middle of a round cake tin. In the blog, I mentioned that Bundt tins are hard to come by here, and are often expensive, but the one I found in Lidl was being flogged off in their reduced section for a princely sum of roughly €5. I was delighted!


This attempt at a sweet roll is a simple vanilla and almond Madeira cake which I then topped off with some melted rolling fondant (I had some leftover from making the Zesteratops, and had read online that it can be melted into pouring fondant. It didn't work as well as I'd wanted to....)


I was super pleased with the results! I was delighted with how clean the details from the Bundt tin came out on the cake itself (I buttered and floured the Hell out of it), and it made a perfectly delicious Skyrim sweetroll, albeit a giant one.


However, I don't believe Vikings, or Medieval princes and princesses, had access to the ingredients to make a modern Madeira cake. I personally believe that an authentic Skyrim sweetroll would actually be a piece of bread with icing on, like a German kugelhopf. I'll try this approach in the future.

Maybe sometime in the future too I could get a mini Bundt tray and make lots of little sweetrolls. Someone has already done that with sponge cake mix, but not with bread. I think further experimentations are in order for bringing the magical world of Skyrim to the real world.

I'll also be doing some experiments with recreating other Skyrim sweets too! Keep your eyes peeled for further Tamriel treats.....

Saturday 28 July 2018

I've Got OCD: Obsessive Cupcake Disorder!

I've made about four dozen fairy cakes over the past few days, possibly more because I've been sending the excess cakes to work with my fiancé.

I'm going a little mad in the search for the perfect fairy cake: fluffy yet moist, tall and rounded, and deliciously sweet but not sickly.

However, the oven in my current house has become my worst enemy: recipes that worked like a treat in my mother's and two of my previous homes' ovens are routinely failing in my current oven. I think all my experiments are to be done anymore in my mother's oven because I no longer have access to the ovens in my previous rental homes, obviously!


Here is a batch of cupcakes using the traditional pound cake recipe: a quarter pound each of sugar, flour, eggs, and butter. I'm not a fan of pound cake, personally, but normally it turns out nicely in my mother's oven. These however were simultaneously peaked and flat, and dense in texture.


This batch was made using my Madeira cake recipe. These too had noses, which I couldn't work out how to prevent.


On the right hand side is a batch of cakes using the light sponge cake recipe that I normally use for fairy cakes, which normally works in my mother's oven, but in my oven they were dry, dense, and flat.


This final batch is the same recipe, however the baking powder in the recipe was replaced with a quarter teaspoon of baking soda for every quarter pound of flour. The rise on these cakes was much more even, but in fear of the cakes deflating after coming out of the oven I overcooked them and they were dry.

I think I'll have to redo all my tests in my mother's oven and see what the issue is because I'm at my wit's end. I cannot find a way to prevent my cakes from:

  • Either rising flat, or peaking and growing 'noses'
  • Being too dense, or too dry
  • Shrinking or flattening after cooking.
The tests continue......

Wednesday 25 July 2018

Wedding Talk: Making My Own Cake!

My wedding is happening in less than a year! Wow. When I was a little girl, I had imagined being married but it was always "away in the future"; that future is now, and it's surreal!

I never imagined my wedding in great detail when I was younger: I never imagined a dress or a cake or a ceremony or anything, I just imagined having a husband. To be completely honest, I'm not really a weddings person: I don't really like going to other people's weddings, and I find them mostly perfunctory for social expectation. Every single wedding is the same white-dress-and-dinner thing, and sometimes the weddings are just put on to keep the family happy, and don't seem genuine to the couple.

I don't want that kind of wedding; to be honest, I just want a husband: having a small church ceremony with about 30 guests who are in Halloween costumes and then go home afterwards for a family dinner. However, I'm not the only one getting married of course! My fiancé's dream wedding has to be taken into consideration!

So, we'll be having a hotel reception but with our own twist: we're going for a red and black palette with a kinda spooky vampire theme. I want to look like a pretty vampire bride. Fancy dress will be very much encouraged.

But the main thing of interest for this blog is of course the cake, which I will be making myself! Yes, I have decided to put my baking skills to the final test and make a cake for about 100 to 120 guests, and I'm extremely excited about it.

At the time being my plan is to make a cupcake wedding cake with a small cake at the top for cutting with my brand new husband. The colour themes is black and red, with white, and so the cakes will be a selection of flavours decorated with red and white icing. I thought decorating them with little superhero royal icing run-outs would be a nice touch for my fiancé's interest in geeky stuff.

I'll be keeping a record of all my experiments and sketches on this blog as I develop my concept and practise making lots of fairy cakes!

I'm super excited to do this, and I hope you'll all be excited to follow my progress!

Thursday 19 July 2018

Having Fun with Dough: Biscuit Creatures

Baking is all about fun, so let's have fun! Here are some little creatures I made using the biscuit dough I shared in my last post.


This isn't so much a recipe as it is just showing off my modelling skills: does it show that I studied ceramics in college? Seems my skills of working with clay are quite transferable to baking. However, it's important not to overwork the dough, and if it starts to get to soft and oily, pop it back in the fridge for 20 to 30 minutes. These biscuits have to be cold before they're cooked so they keep their shape.


I just started colouring some bits of lemon biscuit dough and started playing around. I found the best way of incorporating gel food colouring into the premade dough is using the French sablée technique, which is smearing the dough across the work surface and gathering it back up. It works the gluten in the flour the less than kneading it in. I also used cocoa powder mixed to a paste with boiling water to colour the brown dough.

I'll share with you how I made the hedgehogs, tortoises, and snakes.


To make the hedgehogs, I took a piece of brown dough, and a piece of white dough about a third of the size. I rolled them together to make a cone, and then stuck black sesame seeds in to make the face.

I allow the little hedgies to chill out in the fridge for half an hour before using the tip of a cocktail stick to rough up the brown dough to emulate spines. I then baked them for 12 minutes.


To make the snakes, I took two equal parts of coloured dough, in this case red and green, and rolled them each into a rope. I then rolled the ropes together and twisted them together to make stripes, keep one end thicker to make the head. I then pointed its nose and gave it two black sesame seed eyes.

Next time, I'll add a glacé cherry tongue.

I baked the snakes for a shorter time, about 10 minutes, because they're more fragile than the hedgehogs.


To make the tortoises, I rolled a piece of coloured dough into a ball and slightly flattened it to make a dome. I then took smaller pieces of dough, maybe a fifth of the size of the shell, and made the head and legs; the head is slightly larger than the legs.

Like the others, I used black sesame seeds for eyes, and after a half-hour rest in the fridge I used the back of a table knife to score shell markings into each tortoise's back.

I baked them for roughly 12 minutes.


I have a whole lot of ideas now for further biscuit creature ideas: maybe some bears, or little rabbits. Maybe I can hide pieces of chocolate inside, or marshmallow. Also, designs can be embellished and refined with icing or melted chocolate. I still like the traditional 2D cut out biscuits, of course, but the new 3D angle has a lot of interesting possibilities.

It's really opened up a whole lotta doors and a whole rake of new ideas for birthday gifts and party favours.....

Thursday 12 July 2018

Recipe Revision: Sweet Biscuits, or "Sugar Cookie", and Sandwich Biscuits

When I first started this blog, I did a series where I shared a bunch of recipes based on what I made for a bake sale in our church. In it I shared a recipe for some delicious orange bourbons and coconut custard cream biscuits which are a simple sandwiches of plain (or chocolate) shortcake biscuits and buttercream filling. And since then, I've not made a huge amount of biscuits; I thought that needed remedying!


I'm not really a biscuits person now that I'm an adult: I loved biscuits when I was a kid, but now I prefer cake or pastries, and if I ever eat a biscuit it's a savoury one with cheese on top. At the absolute most, I'll have a digestive or a rich tea to dip in my tea. I don't know when my delight in biscuits began to disappear, but I've not properly baked a biscuit in about 3 years.

Now that the weather is starting to cool down from the viciously volcanic heat we've been suffering from since the middle of June, I'm being once again tempted into the kitchen. I wanted to ease myself back into the spirit of baking with something nice and simple, and also something a little different from the usual pace of cakes, pastries, and desserts that I've settled into over the past two or so years.


So I made a batch of biscuits using the recipe I used in the aforementioned bourbon and custard cream recipes: it immediately showed how out of practise I was! They were lumpy, bumpy, uneven, flavourless and lost their shape in the oven. I needed to address this loss of skill immediately!

The two main issues I encountered were that a) I used unsalted butter, which has become by go-to butter since I had the "why bakers use unsalted butter" revelation earlier last year, and b) egg yolks are not all made equal, and neither are all batches of flour.

So, in this recipe revision, I specify the use of salted butter in order to have good flavour, and also using beaten egg instead of just the yolk. Because every homebaker knows the annoyance of having a spare egg white hanging around in the back of the fridge, but also this recipe could need more or less egg depending on the dryness of the flour and the softness of the butter, similar to how you use water in pastry.

INGREDIENTS

6 ounces (115 grammes) caster sugar
6 ounces (115 grammes) salted butter, room temperature
1 medium egg*, beaten
3 ounces (55 grammes) cornflour
9 ounces (170 grammes) plain white spelt flour
1 teaspoon (5 millilitres) vanilla essence, or almond essence

* - in Ireland, a medium egg weighs between 1¾ and 2 ounces (50 to 55 grammes)

To make the lemon sandwiches

Add 1 teaspoon of lemon zest to the dough, with the butter and sugar
½ ounce (15 grammes) unsalted butter
½ ounce (15 grammes) lemon curd
3 ounces (85 grammes) icing sugar
About a teaspoon (5 millilitres) lemon juice


To make chocolate nougat sandwiches

Replace half the cornflour in the dough with cocoa powder
½ ounce (15 grammes) unsalted butter
½ ounce (15 grammes) chocolate hazelnut spread
3 ounces (85 grammes) icing sugar
Up to 2 teaspoons (10 millilitres) milk, to mix


METHOD

  • In a mixing bowl using a wooden spoon, cream the butter and sugar together until well combined. It will be a challenge at first because the butter is cool and hard, but persevere!
  • Beat in the egg until the mixture is light and creamy. After the egg, mix in the vanilla essence, or almond essence if using.
  • Sieve in the cornflour and flour, and work in gently with the wooden spoon. Turn out onto a well floured work surface and gently, gently work into a smooth dough.
  • Wrap the dough in some cling film and flatten into a disc about half an inch (1 centimetre) thick. Chill in the fridge for at least 1 hour, preferably 2 hours.
  • Once chilled, roll the mixture out to roughly an eighth of an inch (3 millimetres) and cut out shapes. You can re-roll the trimmings once before you'll need to chill it for about 20 minutes for a break to re-roll it again.
  • Pop the cut outs on a cutting board and pop in the fridge while you preheat the oven to 170°C (340°F, Gas Mk.3).
  • Line two baking trays with non-stick paper, or grease lightly with oil, and put the cut outs on the trays about half an inch (1 centimetre) apart. Decorate the tops of half the biscuits to make the tops, and then prick the remaining biscuits with a fork or cocktail stick. You can prick them all instead of decorating, if you prefer.
  • Bake the biscuits for 10 to 12 minutes, turning the trays around halfway through baking, until the biscuits begin to turn golden around the edges. This is obviously harder to tell on chocolate biscuits, so to test chocolate biscuits they should look dry and the edges should feel slightly crusty.
  • Remove from oven and transfer to a wire rack to cool completely.

To make sandwiches
  • Make a simple buttercream with the filling ingredients, either lemon or nougat, and pipe a little on each bottom biscuit and sandwich with a top biscuit. When sandwiching, make sure the tops of every biscuit are facing outwards, with the filling on the flat bottom side.
  • Allow to set for about an hour before eating. These are best eaten after several hours of sitting, but it's not necessary.

Friday 6 July 2018

2018's Annual No-Machine Ice-Cream Experiments: We're Here Again!

 Once again it's time to experiment with ice-cream creations as July, which is International Ice Cream Month, rolls around.

This year's trials have been broad and involved a lot more research and experimentation that in previous years, because nowadays as the Internet grows and information is more widely and readily available, research is easy to conduct from the comfort of your own living room.

The biggest research resource these days is YouTube, where you can find a video on nearly anything you can imagine and there are hundreds of thousands of aspiring cooking-show hosts who have taken the brave step of setting up a camera in their kitchen for the whole world to see.

Unfortunately, pointing a camera at what you're doing is as good as useless if you don't thoroughly and adequately explain what you're doing, and this is something I've discovered on my educational travels around YouTube.

Here are a few things I tried from online videos, and what the results were like for me. Spoilers: only one of them worked, and I already knew it worked.


Homemade Salt and Ice Churn

I found this video by an Italian man and it was very convincing and I gave it a try, but when I actually did I found that there was a lot of missing information:


In the video, the presenter:

Makes a simple vanilla custard in the traditional way with cream, milk, eggs, sugar, and vanilla
Chills the custard to be frozen later.
Prepares a bowl full of ice and salt in a rough proportion of 1 part salt to 4 parts ice
Places a metal bowl on top of the ice and adds in the custard
Mixes the custard with a wooden spatula as it freezes from the coldness of the ice

Now, making ice-cream with ice and salt is nothing new—kids have been doing this for as long as I can remember, including when I was a kid myself—but there are several things missing from this video:
  1. How long does the whole churning process take?
  2. Does it have to be fine salt, or will any salt do?
  3. Does the ice and salt mixture need refreshing at any point in the process?
  4. Can this ice-cream be stored in the freezer in a tub, or must it be eaten immediately?
When I tried this myself, these are all problems I encountered and my ice-cream never actually froze and all the ice melted before anything happened. I used coarse salt, and maybe that was an issue, but it was all very disappointing.


Food Processor Trick

Another trick I see frequently online is using a food processor to make ice-cream in a similar way to an ice-cream churn. Most people have a food processor, and this means you don't need to buy another kitchen gadget when you already have one that'll do.


In this video, the presenter:

Takes an ice-cream base and freezes it into a thin sheet in a freezer bag
Breaks up the frozen sheet
Blitzes the frozen pieces into a smooth soft serve ice-cream
Pours it into a tin to freeze for 2 hours before eating

This one works quite well, however the ice-cream freezes into a solid lump the longer it stays in the freezer: not enough air is incorporated to keep it fluffy over long storage times. Also, I found that pouring the ice-cream base directly into the food processor bowl, popping that into the freezer, and taking it out and blitzing it every 30 minutes in the same way an old fashioned make-at-home ice-cream would be made worked a whole lot better. It was still a big frozen lump after 5 hours, though.


Semifreddo, not Ice-Cream

This one has no video, but I remember seeing Nigella Lawson do this kind of thing on one of her programmes once. In this recipe, you mix eggs and sugar into a fluffy sabayon before folding with softly whipped cream and freezing into a loaf. This loaf is then sliced up and served with fresh fruit and sauce.

I tried this and it was quite tasty, but definitely not ice-cream: it's mouthfeel was more like a frozen mousse, and as it thawed and melted it produced a thick bubbly mixture all over the plate. Like the food processor ice-cream, it too freezes completely solid if left for too long.


Cream and Condensed Milk Old Favourite

This method is the one I have used on here for about 4 years at this point, and it still works fabulously. My only tiny issue is that if you over whip the cream the resulting butter-fat can leave an oily film on the roof of your mouth that makes for quite an unpleasant mouthfeel. In comparison to the other methods, however, that's only a tiny gripe.

It has the richness of a luxury ice-cream, like Haagen-Dazs or Ben and Jerry's, so if you're looking for something a little lighter like a French ice-cream or a gelato this really isn't the recipe to use. That's why I was experimenting with the other methods to see if I could make something a little lighter and a method that could be used to make sorbet too.


In conclusion, I really think if you want to make traditional ice-cream, you need a churn, or you've simply got to accept that no-churn ice-cream will be fiddly, time consuming, and hard to store longterm. Happy ice-creaming!

It's been a while! Happy 9th Anniversary!

  It's been a while. The past two years have been a helluva a ride. This year is gonna hold some big changes for this blog. I'm comp...