Showing posts with label wheat free. Show all posts

Wednesday, 24 July 2019

Sweetie Pie's Perfect Scones! Part 2: Written Recipe


After experimenting over the course of a few days (which you can read all about here) I found what I consider to be the perfect scone: light and fluffy with pale sides and a brown top, with only a little hit of sweetness. I like my scones very plain.

To get the consistency of texture, the dough has to be worked through properly. This is tricky with something like scones, which need to be handled as little as possible before baking so they don't get tough. The way around this is to add some extra starch to reduce the overall amount of gluten in the flour. With a higher percentage of starch, the scones are lighter, fluffier, and easier to work with.

Split these beauties in half and enjoy with jam, butter, or cream. Or maybe all of the above, if you're feeling indulgent....

~~ ^ _ ^ ~~

DIFFICULTY
Very simple! 

TIME
1 hour

RECIPE RATING
Easy!

~~ ^ _ ^ ~~

INGREDIMENTS

6 ounces (170 grammes) white plain flour: spelt or wheat
2 ounces (55 grammes) cornflour
1 tablespoon baking powder, or 1 teaspoon of baking powder with 1/2 teaspoon of baking soda for Irish style scones
1/4 teaspoon salt
2 ounces (55 grammes) butter, room temperature
2 tablespoons (28 grammes) caster sugar
4 fluid ounces (115 millilitres) milk, room temperature
1 teaspoon lemon juice, if using baking soda
Eggwash, made with an egg and a pinch of salt, or you can use milk to omit the egg


METHOD
  • Preheat the oven to 200°C (400°F) and preheat a flat baking tray also.
  • Sieve the flours, baking powder (and baking soda, if using), and salt twice, making sure to hold the sieve high. I like to sieve the mixture out onto a piece of baking paper, then back into the mixing bowl.
  • In a mixing bowl, rub the sieved ingredients with the butter until it's like fine breadcrumbs. It doesn't matter what temperature the butter is, as long as it's very well rubbed in. Stir in the sugar.
  • Add the milk (and lemon juice, if using baking soda) and mix quickly and throroughly with a metal spoon until just mixed.
  • Turn out onto a floured work surface and chaff six times: chaffing is the process of flattening the dough by hand, folding in half, turning through 90 degrees, and then repeating. This is a much gentler process than kneading.
  • Cut out scones using a cutter, shape the dough into a rectangle and cut squares, or shape into a round and cut into wedges. You can gather the remaining dough and re-roll, but the second rolling won't be as even as the first.
  • Sprinkle flour onto the preheated tray and arrange the scones about half an inch apart from each other: if they're a little huddled together, they will rise straighter. Eggwash the tops, making sure it doesn't dribble down the sides. If you like, you can baste the tops with eggwash another two times during cooking for an even richer colour. You can also sprinkle the tops with coarse sugar or salt.
  • Bake near the top of the oven for 15 minutes. This can depend on the size of the scones: when they've risen high and have turned a rich brown on top, they're ready.

These are best eaten the day they are made, but they freeze very well. Freeze any leftovers on the day of baking for best results.

Sunday, 25 November 2018

Frohe Weihnachten! Part 1: Sandwich Biscuits

Frohe Weihnachten! I present to you the first part in a series on German-style Christmas biscuits!


Last year I planned on doing a whole series of German-inspired Christmas biscuits, but I never got the opportunity. So, this year I'm gonna put that to rights! I'm kicking off the season of biscuits with a delicious selection of sandwiches.

This is just a show-and-tell because making biscuit sandwiches is something pretty much any home cook can make. You just choose your favourite buttery cut-out biscuit recipe, like shortbread or plain biscuits, make some tiny cut-outs, and fill them with some icing, ganache, caramel, or jam.


As you can see in this picture, I made a variety of shaped tiny biscuits: these are only about an inch (2½ centimetres) or so wide and about quarter of an inch (5 millimetres) thick, and I have hearts, fluted rounds, snowflakes (even though they look like stars), flowers, and bells. I made a small batch of biscuit mixture of 3 ounces (85 grammes) caster sugar, 3 ounces (85 grammes) salted butter at room temperature, half a medium egg, and 6 ounces (170 grammes) plain white spelt flour. I flavoured it with vanilla essence and almond essence. This amount made about 48 biscuits, or 24 pairs. One pair was sacrificed to quality control before filling....

Each shape was supposed to have a different flavour of filling inside, but after a few biscuits that went out the window. I used chocolate buttercream, lemon curd buttercream, vanilla buttercream (using real vanilla pods), some Araquipe dulce de leche (yes, it's still leftover since my brother got back from Ecuador in August), and some good old fashioned strawberry jam.


After a little trip in the fridge, I dipped the tops of every flavour bar the caramel and jam ones in chocolate. I mixed a little sunflower oil into some white and dark chocolate, and some vanilla seeds into the white chocolate. Once I had dipped some of chocolate-filled ones in dark chocolate, and all the vanilla- and lemon filled ones in white chocolate, I marbled the remaining chocolates together to dip the remaining chocolate filled ones. I dusted the lemon ones with edible gold dust just for visual interest.

So there you have it! A special little treat for someone special in your life this Christmas, or even just for the table after dinner. Keep an eye out for the next few creations! :)

Monday, 25 June 2018

Speculaas: Dutch Style Spice Biscuits (Wheat Free)

Have you ever gone to a café and got a little spice and caramel scented crispy biscuit on the side of your saucer? Well, you don't need to go to a café to get this delicious morsels any longer, because now you can make them at home!

I present to you: Speculaas biscuits! Well, at least my take on them anyway.


Yesterday was my second anniversary with my wonderful companion, and three days ago marked one year until our wedding, so I presented him with some lovely handmade presents. I made him a paintbrush roll from some vibrant neon pink and chocolate brown flock curtain fabric that I found in a bargain bucket in my local fabric shop, and I made him a jar of these lovely, thin, crispy Speculaas biscuits.

These aren't 100% authentic to the original Dutch recipe because they don't have the same amount of spices, and they aren't 100% authentic to the shop bought brands either because they have too many spices. Normally, the shop bought ones tend only to have cinnamon (and occasionally ginger) in them, and the traditional biscuits have white pepper, ground aniseed, ground mace, and ground nutmeg.

I decided to add the aniseed and pepper as optional ingredients to the spice mix, but I generally speaking don't have mace or nutmeg around. If however you don't have access to all these spices, just use shop bought mixed ground spice, like Goodall's.


Another reason that these aren't 100% authentic is that I roll the dough out and cut out the individual biscuits: the traditional ones and the shop bought ones are moulded by having the dough pressed into a wooden or silicone mould. I hope in the future to experiment with using or making moulds

~~ ^ _ ^ ~~

DIFFICULTY
Requires making roll-out cookie dough

TIME
About 2 hours, mostly chilling in the fridge

RECIPE RATING
Easy!

~~ ^ _ ^ ~~

INGREDIMENTS

Spice Mix

4 teaspoons (20 millilitres) ground cinnamon
3 teaspoons (15 millilitres) ground ginger
2 teaspoons (10 millilitres) coriander
1/2 teaspoon (3 millilitres) cloves
Optional: 1/2 teaspoon (3 millilitres) ground white or black pepper
Optional: 1/4 teaspoon (1 millilitre) ground aniseed

Dough

8 ounces (225 grammes) plain white spelt flour
½ teaspoon (3 millilitres) baking soda
Pinch of salt
3 ounces (85 grammes) dark brown sugar
3 ounces (85 grammes) caster sugar
4 ounces (115 grammes) very cold unsalted butter, cut into cubes
1 teaspoon (5 millilitres) vanilla essence
A few drops almond essence
2 tablespoons (30 millilitres) cold milk

~~ ^ _ ^ ~~

METHOD


This recipe is best prepared in a food processor, but you can do it by hand.

To make in a food processor
  • In a mixing bowl, sieve together the spice mix, flour, salt, and baking soda and set aside.
  • In a food processor, blend together the cold butter, the sugars, and the essences until mixed but still cold.
  • Add in the dry ingredients and blend until you have a dry mixture that looks like sand.
  • Add in half the milk and pulse the machine in short bursts to combine. If you need more milk, add it a teaspoon at a time: you don't need a lot of milk to combine the mixture.
  • Once you have a crumbly yet chunky mixture, turn the mixture onto a floured surface and bring together with your hands into a ball.
  • Wrap the ball in some cling film and flatten into a disc and chill completely in the fridge for at least an hour.
To prepare by hand
  • In a mixing bowl, sieve together the spice mix, flour, salt, and baking soda. Add in the sugars and break up the big lumps of brown sugar with your finger tips. Rub the sugars and dry ingredients until it's completely mixed.
  • Add in the cold butter and rub into the dry ingredients as if you were making pastry. Rub until it's completely sandy.
  • Add in the essences and then add half the milk and continue to rub, adding more milk gradually if you need it, until you have a nice dough. Don't add too much milk: just enough to bind it together.
  • Once you have a crumbly yet chunky mixture, turn the mixture onto a floured surface and bring together with your hands into a ball.
  • Wrap the ball in some cling film and flatten into a disc and chill completely in the fridge for at least an hour.
Then, make the biscuits

  • Preheat the oven to 160°C (320°F, Gas Mark 2½). Line one or two baking trays with non-stick baking paper.
  • Take the dough from the fridge and work a little with your hands to make it malleable. Roll out to an ⅛ inch (3 millimetre) thickness and cut out shapes using whatever shape you want.
  • Place the biscuits on the baking sheets about half an inch (1 centimetre) apart, and place in the centre of the preheated oven for 15 to 17 minutes, or until the biscuits are dry and a delicious tan brown colour.
  • Transfer to a wire rack and cool completely before munching down with a cup of coffee. The Dutch are great at coffee.

STORAGE
Keep in an airtight container for up two a fortnight.

Tuesday, 22 May 2018

Madeira Cake, Two Ways! A Traditional English Tea Time Treat

👻 ❤ HAPPY WORLD GOTH DAY EVERYONE! ❤ 👻

I had had another recipe planned for today, but unfortunately it went horribly wrong and went into the bin. Oh well, these things happen! I can't get it right all the time. However, a cake with eyes is spooky enough to qualify for a Goth cake....

So you hopefully have seen my most recent pride and joy—the Polish style loaf cake with eyes—and it relies on using a nice firm cake like a Madeira or Pound cake. As such, I thought I'd share with you my preferred recipe for a nice close-textured but surprisingly light cake.


It is commonly believed that Madeira cake is an invention of Portugal, where the Madeira Islands are: old wives tales will tell you that England imported the confection from their longest standing ally during the reign of Queen Elizabeth I. However, this is incorrect: Madeira cake is simple an eggier version of a traditional English pound cake, and got its name because it was frequently served as an accompaniment to Madeira wine at afternoon tea.

Madeira cake can be made in two ways: using a meringue base, or by creaming the butter. Either way works, but if you're going to use the creamed method I strongly recommend using margarine: it emulsifies a lot better than butter.

This cake can be made into a loaf cake, or this amount will also fit in an 8 inch (22 centimetre) round deep tin. If you make a round cake, split it in half, and make it into a sandwich with strawberry jam and cream, you'll make a wonderful Victoria Sandwich. Just remember to dust with icing sugar!

~~ ^ _ ^ ~~

DIFFICULTY
Requires gradually adding ingredients while whisking

TIME
Roughly 1½ hours

RECIPE RATING
Intermediate

~~ ^ _ ^ ~~

INGREDIMENTS

2 medium (US Large) eggs, at room temperature
4 ounces (115 grammes, half a cup) unsalted butter or block margarine, at room temperature. For a cake with more moisture, you can replace a quarter of the butter with sunflower oil
6 ounces (170 grammes, three-quarters of a cup) caster sugar
6 ounces (170 grammes, one-and-a-half cups) plain white spelt flour
1½ teaspoons (7 mililitres) baking powder
3 fluid ounces (90 millilitres, one-third cup plus one tablespoon) milk
Pinch of salt


METHOD
  • Grease and flour a 2 pound (900 gramme) loaf tin very well and dust it with flour. If you like, you can line the bottom with non-stick baking paper. Preheat the oven to 170°C (340°F, Gas Mk.3).
  • Prepare the cake to one of the methods below, and put the mixture into the loaf tin. Smooth out the top as best you can, and bake on the centre shelf for 45 minutes to an hour. Check for doneness after 45 minutes, but no sooner.
  • Once cooked, allow to cool slightly on a wire rack in the tin for about 15 minutes before turning out of the tin and returning to the wire rack to cool completely.


Method 1: Meringue Based Method (Traditional)

One of the earliest published recipes was by Eliza Acton in her Modern Cookery for Private Families (1845), which stated:

"A Good Madeira Cake: Whisk four fresh eggs until they are as light as possible, then, continuing still to whisk them, throw by slow degrees the following ingredients in the order in which they are written: six ounces of dry pounded and sifted sugar; six of flour, also dried and sifted; four ounces of butter just dissolved, but not heated; the rind of a fresh lemon; and the instant before the cake is moulded beat well in the third of a teaspoonful of carbonate of soda: bake an hour in a moderate oven."

This recipe makes a cake that's very heavy on the eggs, and the problem with eggy cakes is that if they don't rise properly they can taste like omelette. Also, I personally find it easier to whisk eggs to full capacity if they're separated first, then mixed back together: whisking whole eggs alone can take an age, as the fat in the yolks interferes with the aeration of the protein in the whites.

Below, is my adaptation of the traditional recipe. You'll probably have noticed I quite frequently do meringue- or sabayon based sponge cakes, because getting full and proper aeration in a creamed butter mixture can take a lot of practise.

Instructions
  • Set out a sheet of non-stick baking paper, and sieve the flour, baking powder, and salt out onto the paper. Set aside for later.
  • In a a heatproof bowl over warm water, or in a jug in the microwave on the "Defrost" setting, heat together the milk and butter until melted, but not hot. Stir in half of the sugar, and set aside to cool completely.
  • Separate the egg, and put the whites into a large mixing bowl. Stir the yolks into the melted butter mixture.
  • Whisk the eggs to soft peaks, and then gradually add in the remaining sugar to make a stiff meringue.
  • Take a spoon of the meringue and stir it into the melted butter to lighten it, then add that mixture back into the mixing bowl. Fold through gently but quickly with a metal spoon.
  • Pour the flour back into the sieve, and sieve it into the bowl. Fold again gently but thoroughly until you have a batter of soft-dropping consistency

Method 2: Creamed Butter Method (Modern)
Every baker started with a good old pound cake recipe: quarter pound each of butter, sugar, eggs, and self-raising flour mixed together with an electric mixer. The all in one method is very good for beginners, but runs the risk of being uneven or over-mixed, and the longer method of creaming the butter and sugar together and adding the egg gradually runs of the risk of splitting or curdling.

I personally have found the best way to avoid curdling of the butter and eggs is to use margarine, not butter: margarine contains emulsifiers that help bind the eggs and butter together. Also, when adding the egg, it's best to focus the beaters only on the area where the eggs are until it's completely emulsified, before running the beater around the whole bowl.

Instructions
  • Set out a sheet of non-stick baking paper, and sieve the flour, baking powder, and salt out onto the paper. Set aside for later.
  • In a large mixing bowl, beat the butter and sugar together very well for a full two to three minutes, until light and fluffy.
  • Beat the eggs together in a jug, and add the egg to the butter mixture in 4 additions, beating well after each. As I explained earlier: focus your beaters on the butter surrounding the egg until completely mixed before running the beater around the whole bowl to mix the whole thing together.
  • Sieve in a third of the flour and fold in gently but quickly until mixed. Fold in half the milk in the same way. Alternate the rest of the flour and milk, finishing with the flour.

THIS TIME IN 2017: Happy World Goth Day! (Goth Fairy Cakes)
THIS TIME IN 2015: Super Moist and Rich Chocolate Cake
THIS TIME IN 2013: Coconut Custard Creams (Wheat Free)
There were no blogs at this time in 2014 nor 2016.

Monday, 30 April 2018

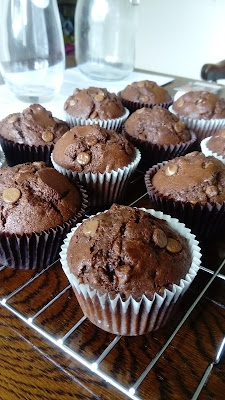
Schoko-Nuss Muffins: Double Chocolate and Pecan Muffins (Wheat Free, with Dairy Free Option)

Today is the last day of (Irish) spring, and before the summer recipe collection starts, here is my final springtime offering: chocolate and pecan nut muffins!


Apologies for the poor photo quality: I'm due a phone upgrade, and as my phone ages (for the whole two or so years I've had it) the camera quality has slowly degraded. The levels and contrast are all over the place. Hopefully, with my new odd job doing homework tutoring, I can save up for a new one!

But anyway, back to the recipe.


It's been a while since I did a muffin recipe: the last one was nearly eighteen months ago back in the September of 2016, where I was introducing my companion to the wonderful world of baking. I don't think I've done many muffin recipes at all on this blog, because I'm not a big lover of muffins, truth be told.

However, I was moved to try a new muffin recipe with inspiration from the Whoopie pie recipe. When I was eating a whoopie pie, I thought they tasted very muffin-like, which made me wonder if the recipe could be adapted. I took the whoopie pie recipe, and simply added an extra medium egg, 4 ounces (115 grammes) of chocolate chips, and 2 ounces (55 grammes) of pecan nuts. I divided the mix among 12 large muffin liners, and baked at the same temperature for 20 to 25 minutes.

They worked really well! Although, next time I think I'll try adding a little extra sugar because they were a little more bready than cakey. They turned out well for an experiment!

THIS TIME IN 2015: Tiramisù Mini Cheesecakes (Wheat Free)
THIS TIME IN 2013: Dinosaur Kimberleys (Wheat Free)
There were no blogs on or around this day in 2014, 2016, nor 2017.

Sunday, 15 April 2018

First Attempt at Whoopie Pies (Wheat Free with a Dairy Free Option)

 There is now a new and improved post about Whoopie Pies here.

Today, I present to you a recipe several months in the making! Behold my own take on the American classic, Whoopie Pies!


About two or three years ago, I got a new cookery book for my birthday, which is a typical gift for me. This book, simply entitled Whoopie Pies introduced me properly to a confection that I had only heard of by name once or twice. I tried a recipe or two from the book, but wasn't a hundred percent happy with how they turned out and, as such, the book is still gathering dust on my bookshelf. 

Then a few months ago I was watching a programme on Food Network, and I saw the cook make some chocolate whoopie pies. It had been quite some time since I had last tried them and I thought Heck, why not give them another go? Seeing as the cook described them as a "mixture between a cupcake and a sandwich cookie", that's the kind of approach I took: I tried merging my basic sponge cake recipe and my chocolate chip cookie recipe together, but the results were disappointingly flat and crispy.


The real breakthrough came when I merged my basic sponge recipe with a basic scone recipe, and replacing the butter with oil: it made a very fluid mixture that puffed up nicely, but didn't spread out too much during baking. The result is a cake that has all the fluffiness and sweetness of a sponge cake, but the sturdiness of a biscuit. However, I'll probably work on this recipe in the future, because I generally am not a fan of the fact that this only uses brown sugar: I don't want my plain vanilla whoopie pies to be brown!

These lovely little sandwiches go slightly sticky on the crust the longer they stay in storage, which is ideal: I have it on good, American authority that a whoopie pie should somewhat stick to your fingers. 


~~ ^ _ ^ ~~

DIFFICULTY
Requires mixing and spooning out runny batter

TIME
About 2 hours

RECIPE RATING
Easy!

~~ ^ _ ^ ~~

INGREDIMENTS

For 12 to 14 sandwiches (24 to 28 total cakes)

8 ounces (225 grammes, 1.8 US cups) plain white spelt flour
2 teaspoons (10 millilitres) baking powder
¼ teaspoon (1 millilitre) salt
6 ounces (170 grammes, 1 US cup) brown sugar
4 fluid ounces (115 millilitres, ½ US cup) sunflower oil
1 medium (US large) egg
6 fluid ounces (170 millilitres, ¾ US cup) buttermilk, or plain soya yoghurt
1 teaspoon (5 millilitres) vanilla essence
About 1 pound (455 grammes) icing filling of your choice: butter cream, ganache, marshmallow fluff, etc.


METHOD

  • Preheat the oven to 170°C (340°F, Gas Mk.3), and grease and flour two flat baking trays.
  • In a large mixing bowl, sieve together the flour, baking powder, salt, and sugar. Make a well in the centre.
  • In a jug, beat together the buttermilk, egg, oil, and vanilla essence until smooth. Pour into the well in the dry ingredients then, using a balloon whisk or electric mixer, mix together until there are no streaks of flour and the mixture is smooth and consistent.
  • Drop teaspoonfuls of the mixture on the baking trays, about an inch (2 centimetres) apart, using the tip of the spoon to smooth the dollops into rounds. Tap the trays sharply on the work surface to flatten out the pies. I got about 6 on each tray.
  • Bake in the centre of the preheated oven for 10 to 12 minutes. Remove from the oven when the pies spring back when touched lightly with a finger.
  • Allow to cool for about 5 minutes before transferring from the trays to wire cooling racks to cool completely. Repeat with the remaining mixture.
  • Pair the cakes together according to size, then sandwich together with about two tablespoons of filling. Set in the fridge for about half an hour before serving.


NOTES

  • For chocolate whoopie pies: Replace an eighth of the flour with cocoa powder, and sieve in with the other dry ingredients.
  • For red velvet whoopie pies: Replace a tablespoon (30 millilitres) of the flour with cocoa powder and sieve with the dry ingredients, and add red food colouring to the wet ingredients to get the shade you want.
  • For pumpkin spice whoopie pies: Add in 1 or 2 tablespoons (15 or 30 millilitres) to taste of your favourite pumpkin spice or mixed spice blend, and sieve in with the other dry ingredients.
  • For coffee whoopie pies: Add 2 teaspoons (10 millilitres) of instant espresso powder, and sieve in with the other dry ingredients

THIS TIME IN 2016: Buttermilk Scones (Wheat Free)
There was no blog on this day in 2014.

Friday, 30 March 2018

Hot Cross Buns, and Iced Buns: Almost No-Knead Bread (Wheat Free with Dairy Free Option)

Today is Good Friday, and as promised I present to you Hot Cross Buns and Easter Iced Buns!


These are brought to you because hot cross buns are traditional this weekend, of course, but also in response to a conversation that I find myself having fairly frequently with other hobby bakers:

"How do you make bread without kneading?"
You don't have to knead bread if it proves overnight in the fridge

"Hmm, I don't have that amount of time. How to I make bread in a few hours?"
Well, if you want it today you'll have to knead it really thoroughly

"Okay, so how do you make bread that doesn't need kneading that I can have in a few hours?"

These people who obviously want to have their bread and eat it too.

If there is one thing that I have come to learn about yeast-risen bread, it's that to make a nice bread you have to spend time, or spend effort. There is no such thing as a no-effort bread that's ready immediately, unless you're making soda bread. As such, the less effort you want to put in the more time you'll have to spend, and the less time you want to spend the more effort you'll have to put in.

Kneading and overnight proving are both used to develop gluten in bread dough: you can develop the gluten by hand through kneading vigorously, or you can let the yeast develop the gluten overnight slowly and steadily. Here are the pros and cons of each:
  • Kneading is the faster solution as you can knead a dough well by hand and have bread ready for its first rise in half an hour. Sometimes, however, when you encounter a particularly sticky dough, people get frustrated and the temptation is to add a load more flour to make the kneading easier, thus making the dough dry and tough. Also, some very sticky doughs need a good 20 to 25 minutes of continuous kneading, which can be exhausting.
  • When you prove dough overnight, the kneading step and the first rise step are combined in a zero effort solution, but if you want bread today you have to start yesterday, which means you really have to plan your bread needs in advance. Also, overnight rises can make a bread that is overproofed, which leads to dense, sour loaves that stale too quickly.
So what's a baker to do? Well, I have come to inform you that there is a halfway house: bread that takes a day to make and requires only moderate kneading effort, harnessing the gluten developing powers of both the yeast and your hands in turns.

In this recipe, I use this bread dough to make a delicious and pretty Easter treat: a tray of hot cross buns, and plain buns iced with little portraits of Bibbit's springtime friends.

Follow the recipe below, and watch the video for full instructions!


~~ ^ _ ^ ~~

DIFFICULTY
The steps are simple, but time consuming

TIME
Roughly 3½ to 4 hours

RECIPE RATING
Intermediate

~~ ^ _ ^ ~~

INGREDIMENTS

Makes 16 buns


1 pound (455 grammes) white spelt flour
2 ounces (55 grammes) unsalted butter, or margarine
1 rounded teaspoon (7 grammes) salt
2 ounces (55 grammes) caster sugar
2 medium (US large) eggs
6 fluid ounces (170 millilitres) milk at body temperature, or milk alternative
Up to 4 extra tablespoons (60 millilitres) milk or milk alternative, to adjust the texture
1 quarter-ounce (7 gramme) packet of dried active yeast

For spiced dough

1 or 2 tablespoons (7 to 15 grammes) ground mixed spice, to taste, moistened with half as much warm water
3 ounces (85 grammes) mixed dried fruit of your choice
Optional: 1 teaspoon (5 millilitres) orange zest
Optional: 1 teaspoon (5 millilitres) lemon zest

To make the crosses

½ ounce (15 grammes) white spelt flour
¾ teaspoon (3 grammes) butter
Water, to mix

To decorate

Runny honey, for brushing
Fresh orange juice, for brushing
12 ounces (340 grammes) icing sugar, sieved
2 ounces (55 grammes) unsalted butter, or margarine
Hot water, to mix
Food colouring: pink, yellow, orange, black, blue, and green.

~~ ^ _ ^ ~~

FREE FROM
Wheat, yeast, nuts

CONTAINS
Eggs, spelt, dairy (dairy free option in italics), refined sugar

~~ ^ _ ^ ~~

POINTS TO REMEMBER


  • Try not to add too much milk, otherwise it will need more rises to develop the gluten. At the absolute most, add a total of 8 fluid ounces (225 millilitres) of milk, which is half as much flour.
  • The first rise will take roughly an hour and a quarter, but it could take up to an hour and a half.
  • Likewise, the second rise should only be 45 minutes, but could take up to an hour.
  • One thing that I forget to mention in the video is that the raw rolls need to be flattened a little bit so they don't rise in a ball shape. 
  • The third and final rise should to 30 to 40 minutes: the rolls should expand by about two thirds, not double. If you poke them on the side and they spring back, they need more rising: your finger should leave a little dent in the side, but not collapse the roll.
  • Bake for 10 to 12 minutes at 200°C (400°F).

There were no blogs on this day in 2014 for 2016

Tuesday, 5 December 2017

Fröhliche Weihnachten! Individual Sacher Tortes (Wheat Free)

Glücklicher Internationaler Sachertorte-Tag!


Our festive tour continues throughout central Europe, stopping off in Austria for a slice of their famous chocolate and apricot jam sponge: Sachertorte!

December the 5th is international Sachertorte day, coincidentally, so what better way to celebrate than sharing my own version of this iconic dessert. Invented by Franz Sacher in 1832 in Vienna, this cake has been an Austrian speciality ever since. Traditionally, it is made with two light and soft cocoa sponge layers, sandwiching sweet sour apricot jam, with two outer layers: one of apricot jam, and one of chocolate icing, made with sugar syrup and dark chocolate.

There is a lot of dispute over which is the definitive Sachertorte, and some recipes even include a double layer of apricot jam under the chocolate icing--which is iced on, rather than glazed on as is typical nowadays--and other versions use melted chocolate in the sponge itself, resulting in a denser, moister cake more like a brownie. But, I personally prefer a simple chocolate creamed sponge with a ganache coating made with chocolate and butter, rather than chocolate and syrup.


As you can see in the pictures, I'm not 100% amazing at glazing cakes: using pourable icing is not my forte. If I were to do this again, I'd wait until the icing is spreadable and ice it onto the cakes over the apricot layer. I also used a wax seal stamp to make individual chocolate decorations, inspired by this Honey Fondant Cakes with Chocolate Wax Seals blog by Heather Baird at Sprinkle Bakes. She explains the entire process of making chocolate wax seals, and I dusted mine with gold fondant dust.

~~ ^ _ ^ ~~

DIFFICULTY
Each step is simple, but there are a lot of steps

TIME
About 2 or 3 hours

RECIPE RATING
Intermediate

~~ ^ _ ^ ~~

INGREDIMENTS

Makes roughly 8 small cakes

2 medium (US Large) eggs
4 ounces (115 grammes) butter, or baking margarine
6 ounces (170 grammes) caster sugar
5 ounces (140 grammes) flour
1 ounce (30 grammes) cocoa
2 teaspoons (10 millilitres) baking powder
4 fluid ounces (115 millilitres) milk, or milk alternative
 1/8 teaspoon (1 millilitre) salt

To decorate

Roughly 4 to 6 fluid ounces (115 to 170 millilitres) apricot jam
6 ounces (170 grammes) plain chocolate, or dairy free chocolate
3 ounces (85 grammes) unsalted butter, or baking margarine
4 tablespoons (60 millilitres) whole milk, or milk alternative
8 chocolate coins, or stamped chocolates (shown below)
Gold fondant dust

~~ ^ _ ^ ~~

FREE FROM
Wheat, yeast, nuts

CONTAINS
Eggs, spelt, dairy (dairy free option in italics), refined sugar

~~ ^ _ ^ ~~

METHOD

Before you begin the cakes, make the chocolate decorations
  • Prepare the wax seal chocolates as instructed in Sprinkle Bakes' article, and set in the fridge. Use a soft brush to dust the chocolates with dry gold fondant dust. If you don't have the means to make chocolate seals, simply unwrap some chocolate coins and dust with gold.
Then, make the cake
  • Preheat the oven to 180ºC (350ºF/Gas Mk.4) and grease and flour a 4½ by 8 inch (11 by 20 centimetre) loaf tin, or you can use a silicone one which doesn't need greasing or flouring. Try to use one with fairly straight sides.
  • In a mixing bowl, or food processor, cream the soft butter and sugar together until light and fluffy. Add in the eggs one at a time, making sure to beat well between each egg, and continue beating (or running the blade) until the mix is well incorporated.
  • Sieve in half of the flour, baking powder, salt, and cocoa powder, fold through until mostly mixed, then add in the milk. Again, fold through until mostly mixed before adding the rest of the dry ingredients and folding through completely.
  • Pour the mixture into the tin and bake on the centre shelf for 25 to 30 minutes, until the surface is springy to the touch and a cocktail stick comes out clean when stuck in the centre of the cake.
  • Allow the cake to cool for 15 minutes before turning out and cooling completely on a wire rack.
  • When cold, level the cake by cutting off the dome, then cut in half into two layers. Spread a layer of apricot jam, roughly 4 tablespoons (60 millilitres), onto the bottom layer, then sandwich on the top layer. Turn the entire cake upside down, so the flat bottom of the cake is now the top. Chill for about 30 minutes.
  • Once the cake is chilled, trim the crusts off and cut into 8 small cakes. Spread a layer of apricot jam over the tops and sides of each cake. Return to the fridge for 30 minutes to an hour.
Now, make the ganache glaze to finish the masterpieces!

  • Break the chocolate up into small pieces, or cut up with a sharp serrated knife. Heat the butter and milk together in a jug in the microwave until the milk is hot and the butter is melted.
  • Add the chocolate to the jug and allow to sit for 3 minutes before mixing with a small whisk or fork. Beat vigorously until it becomes a thick ganache. If needed, heat in the microwave for about 20 seconds to help the chocolate melt.
  • Put the cakes on a wire rack and set the rack over a baking tray or large square cake tin. Pour the ganache over each cake, paying particular attention to the square corners.
  • While the ganache is still wet, decorate each cake with a gold chocolate seal, or coin. Allow to set completely in the fridge before serving.

STORAGE
Keep these cakes in an airtight container in the fridge for up to one week. Alternatively, freeze for up to 3 months.

Friday, 1 December 2017

メリークリスマス! Japanese Christmas Strawberry Shortcake


So, on my Facebook page, I recently announced that this December would be one without traditional dried fruit recipes: no mince pies, no fruit cake, no pudding, et cetera! This led me to do an awful lot of research into the Christmas food traditions of various nations from all over Eurasia, particularly Central Europe, and I was considerably educated!

However, before we delve into the Christmas traditional vitals of the central Europeans, here is an offering from the far East: Japanese Strawberry Shortcake!

From my superficial research, I was surprised to discover that mainstream Christmas celebrations weren't common in Japan until the American occupation after World War II, as such Japan doesn't have much of a Christmas food culture. Christmas is a primarily commercial affair to the mostly-Buddhist Japanese, and there aren't many particular foods that are associated with the event.


In all of my Pinterest surfing and Google searching had one cake in common, however: strawberry shortcake, called いちごのショートケーキ (ichigo no shōtokēki). This confection comprises of two light fluffy sponges (sometimes tinted pink) brushed with liqueur-scented syrup, sandwiching a sweetened whipped cream and fresh strawberry filling, iced with more cream and fresh strawberries.


While soaking cake in alcohol is very much a Christmas thing, the rest of it is something I'd associate more with a summer time dessert. And even the name is not fully correct, as the word "shortcake" refers to a cake which has a high butter or fat content, which this cake certainly does not as a (mostly) fatless sponge. Most articles say that this cake is a common generic celebration cake in Japan, and as such is eaten at Christmas as a celebratory food. I suppose this is a case of East is East, West is West, and ne'er the twain shall meet.

~~ ^ _ ^ ~~

DIFFICULTY
Each step is simple, but there are a lot of steps

TIME
About 2 or 3 hours

RECIPE RATING
Intermediate

~~ ^ _ ^ ~~

INGREDIMENTS

For one 7x11 inch (18x28 centimetre) rectangular cake

3 medium (US large) eggs
3 ounces (85 grammes) caster sugar
3 tablespoons (45 millilitres) sunflower oil
3 tablespoons (45 millilitres) milk, cream, or Baileys Irish Cream, or milk alternative
3 ounces (85 grammes) plain spelt flour
1 teaspoon (5 millilitres) vanilla essence
A few drops almond essence
Pink or red food colouring


Simple syrup

2 tablespoons (30 grammes) caster sugar
2 tablespoons (30 millilitres) water
Optional: 1 tablespoon (15 millilitres) liqueur of choice: Kirsch, rum, brandy, amaretto, Baileys Irish Cream
The liqueur can be replaced with a few drops of almond essence


Whipped cream and strawberry filling

3 ounces (85 grammes) strawberries, stems removed and cut into quarters
1 teaspoon (5 grammes) caster sugar
9 fluid ounces (250 millilitres) whipping cream
2 tablespoons (15 grammes) icing sugar
2 teaspoons (10 millilitres) vanilla essence
A few drops of almond essence
6 whole strawberries, stems removed and cut in half
Optional: 1 tablespoon (15 millilitres) Baileys Irish Cream

~~ ^ _ ^ ~~

FREE FROM
Wheat, yeast, nuts

CONTAINS
Eggs, spelt, dairy (dairy free option in italics), refined sugar

~~ ^ _ ^ ~~

METHOD

First, make the cake
  • Preheat your oven to 180°C (350°F, Gas Mk.4). Lightly grease a 7x11 inch (18x28 centimetre) rectangular tin, and line with non-stick baking paper.
  • Prepare the cake according to this recipe, adding the essences and enough food colouring to make a delicately pink mixture. Once baked, remove the paper and allow to cool completely.

Prepare the syrup


  • Mix the sugar and water together in a jug or mug, and heat in the microwave for 1 minute on high, until the sugar has dissolved completely in the water.
  • Mix in the liqueur, and allow to cool slightly until just warm. If you don't want to use alcohol, add in a few drops of vanilla and almond essences.

Prepare the strawberries and cream
  • In a bowl, toss the quartered strawberries with the caster sugar and allow to sit for 10 minutes. The sugar will transform into a delicious syrup and the strawberries will become juicy.
  • Whip the cream with the icing sugar, vanilla, and almond essences to soft peaks in a cold mixing bowl. Take about 3 ounces (85 grammes) of the cream and fold into the juicy strawberries.
  • Keep the remaining cream and the strawberry cream in the fridge while you prepare the cake for assembly.
Now, assemble the masterpiece!

  • Cut the cake in half to make two 7x5½ inch (18x14 centimetre) cakes. Brush liberally with the simple syrup to soak the surface. 
  • On a serving plate, sandwich the two cakes together with the strawberry cream, spreading the filling to the edges. Press together gently, and chill for an hour.
  • Take out of the fridge and trim the crusts; your cake will be reduced in size to roughly 6x5 inches (15x13 centimetre). Enjoy the cut offs!
  • Ice with the remaining cream, smoothing to your liking, and then decorate with the halved strawberries.
  • Chill for about 2 hours before serving. This cake can be cut into 12 little squares, or 6 fingers.

STORAGE
This cake will keep in the fridge in an airtight container for 3 days.

Monday, 20 November 2017

Cheesecake Raspberry Brownies (Wheat Free, with Dairy Free Option)


I absolutely love cheesecake, and I absolutely love brownies--so does my lovely companion--so what would be better than merging the two into one fabulous morsel? Fudgy, dense, dark brownie smothered in rich, thick, creamy cheesecake, swirled with tangy, fruity raspberry jam; what's not to like?

I've seen lots of recipes online for cheesecake brownies, but usually the brownie mixture and the cheesecake mixture are partially mixed together then baked simultaneously as one large confection; it's not common to see them cooked as two separate layers. This was a delicious experiment, which led to another trial with the ever illusive perfect brownie recipe.

This brownie recipe is another variation on my recent trials with replacing flour in cake recipes: by replacing two-thirds of the flour in a classic sponge cake with dark chocolate, and omitting the liquid, you get a deliciously dense brownie.

I thought this brownie recipe was so perfectly delicious that I actually retrospectively edited my previous blog post on fudgy brownies. I thought instead of muddying up the waters with lots of contradictory brownie recipes, I'd just update the one I wrote for Ice-Cream Month.

~~ ^ _ ^ ~~

DIFFICULTY
Simple techniques, but time consuming

TIME
2 hours, plus an overnight chill

RECIPE RATING
Intermediate

~~ ^ _ ^ ~~

INGREDIMENTS

Makes one 9 inch (22 centimetre) square cheesecake brownie

2 medium (US Large) eggs
4 ounces (115 grammes) unsalted butter, or baking margarine
4 ounces (115 grammes) plain or dark chocolate, 55%-70% cocoa, or dairy-free chocolate
3 ounces (85 grammes) soft light brown sugar
3 ounces (85 grammes) caster sugar
2 ounces (55 grammes) plain spelt flour
2 teaspoons (10 millilitres) vanilla
Up to 2 tablespoons (up to 30 millilitres) cocoa powder, to taste


Cheesecake topping

1 pound (455 grammes) full fat cream cheese, or silken tofu, or unsweetened coconut cream
6 fluid ounces (170 millilitres) Greek yoghurt, or sour cream, or soya yoghurt, or coconut yoghurt
4 ounces (115 grammes) caster sugar
2 medium (US Large) eggs
1 tablespoon (15 millilitres vanilla essence

Jammy topping

4 fluid ounces (115 millilitres) seedless raspberry jam
2 teaspoons (10 millilitres) cornflour
1 teaspoon (5 millilitres) lemon juice

~~ ^ _ ^ ~~

FREE FROM
Nuts, gluten, yeast

CONTAINS
Eggs, spelt, dairy (dairy free option in italics), maize, refined sugar

~~ ^ _ ^ ~~

METHOD

First, make the brownie layer


  • Preheat the oven to 170°C (325°F, Gas Mk.3), line a 9 inch (22 centimetre) square tin with tin foil, and lightly grease the tin foil.
  • In a microwave safe bowl, or heatproof bowl set over simmering water, melt the butter and chocolate together. Allow to cool slightly.
  • In a mixing bowl, beat together the eggs and sugars with an electric mixer until pale and thickened in consistency.
  • Beat in the vanilla, and then slowly add the melted chocolate in a stream, beating all the time with the electric mixer, until all the chocolate is incorporated.
  • Sieve in the flour, then fold through gently with a metal spoon or silicone spatula. Pour the mixture into the tin, and smooth out the top as much as you can.
  • Bake for 20 minutes on the centre shelf, or until the top is dry and a cocktail stick comes out clean when poked into the middle of the cake. Allow to cool completely in the tin on a wire rack.
Then, make the cheesecake layer

  • Place the jam in a saucepan and cook over medium heat until it melts and begins to simmer. Mix the cornflour, lemon juice, and a few teaspoons of water together in a cup to make a slurry.
  • Beat in the slurry and continue to cook for a minute or two, until the mixture thickens. Allow to cool completely before using in the cheesecake.
  • Preheat the oven to 150°C (300°F, Gas Mk.2)
  • In a mixing bowl, beat the cream cheese with a wooden spoon until smooth, and then beat in the yoghurt, or sour cream. Mix the sugar in gently until completely incorporated.
  • Gently mix in the eggs, one at a time, until completely blended. Try not to beat to hard, as beating the eggs can add in too much air and cause the cheesecake to crack.
  • Pour the mixture out onto the brownie layer, smooth out as well as you can, then dollop the jam on top in polka dots all over the top.
  • Using a cocktail stick or thin knife, swirl the jam into the cheesecake. I did this by running the cocktail stick back and forth in across, then up and down, then diagonally.
  • Bake on the centre shelf for 30 to 35 minutes, or until the outside edge of the cake is firm and set, but the centre is still a little jiggly. It shouldn't be liquidy, just jiggly like a firm jelly.
  • Open the oven door and turn off the oven, and allow it to cool to room temperature, about an hour or two. Transfer the cheesecake to the fridge and chill for at least 4 hours, or overnight.

STORAGE
Store in an airtight container in the fridge for up to 3 days.

Saturday, 14 October 2017

Gingerbread Skeletons (Egg Free) with Video!


About two or so years ago, a friend of mine came to visit me around Halloween time, and she brought to me a small gingerbread man with a skeleton iced onto it; it was branded as a "Jack the Skeleton" biscuit, which made me chuckle. Ever since then, I've been curious about making some myself, but have had difficulty finding a gingerbread recipe that mimicked the soft, chewiness of the Jack the Skeleton biscuit.


This recipe, unlike the usual recipe I use, has a high ratio of sugar and syrup to flour, which renders the need to use egg as a binder redundant. Also, if you replace the butter with some good ol' margarine this recipe can be completely vegan! The icing is a very simple mix of butter, icing sugar, and water, so this doesn't use the traditional royal icing decoration. 
~~ ^ _ ^ ~~

DIFFICULTY
Requires mixing, rolling out, and cutting shapes

TIME
About 3 hours

RECIPE RATING
Easy!

~~ ^ _ ^ ~~

INGREDIMENTS

Makes six 3 inch gingerbread men

4 ounces (115 grammes) white spelt flour
¼ teaspoon baking soda
2 teaspoons ginger
1 teaspoon mixed spice
One pinch to a ¼ teaspoon ground cloves, to taste
2 ounce (55 grammes) unsalted butter, or margarine
2 ounces (55 grammes) golden syrup
2ounces (55 grammes) dark brown sugar
1 teaspoon vanilla essence

To decorate

2 teaspoons (10 millilitres) melted unsalted butter, or margarine
2 ounces (55 grammes) icing sugar, sieved
Water, to mix

~~ ^ _ ^ ~~

FREE FROM
Eggs, nuts, wheat

CONTAINS
Spelt, dairy (italics show alternatives), refined sugar

~~ ^ _ ^ ~~

METHOD


First, make the biscuits
  • In a jug or bowl, heat the butter, syrup, and sugar in the microwave at 50% power for a minute at a time until the butter has melted and the syrup is runny. Mix well.
  • Sieve the flour, salt, spices, and baking soda into a mixing bowl, make a well in the centre, and pour in the melted butter and syrup mixture. Mix with a spatula or spoon until you have a very soft dough.
  • Pour the dough out onto a piece of cling film, and wrap it up. Pop it into the fridge for an hour, or until firm.
  • Preheat the oven to 180°C (350°F, Gas Mk.4), and line one or two flat baking trays with non-stick paper.
  • Roll the dough out on a floured surface to a quarter inch (5 millimetres) thick, and cut into gingerbread man shapes. Re-roll the scraps, trying not to mix in too much of the flour dusting.
  • Lie the gingerbread men out on the tray(s), and chill for about 10 minutes before baking on the centre shelf of the oven for only 6 to 7 minutes for soft chewy biscuits, or up to 9 minutes for crispy biscuits.
  • After the biscuits are baked, remove the tray(s) from the oven and cool the biscuits on the tray for about 10 minutes before moving to a wire rack to cool completely.
To decorate
  • Mix the icing sugar and melted butter together in a small bowl, adding only enough water to make a thickly flowing icing.
  • Make a small baking paper piping cone, and fill halfway with icing. Snip off the end, and pipe on the skeleton bodies.
  • Allow to set for about 30 minutes before serving.

STORAGE
These keep for up to 2 weeks in an airtight container at room temperature.

It's been a while! Happy 9th Anniversary!

  It's been a while. The past two years have been a helluva a ride. This year is gonna hold some big changes for this blog. I'm comp...