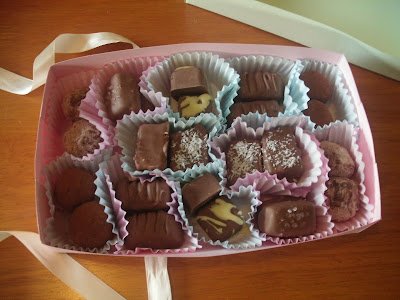
- Coconut ice (topped with little shreds of coconut)
- Chewy caramel (topped with a sprinkle of coarse salt)
- Creamy fudge (decorated with ridges made with a fork)
- Milk chocolate truffle (ball shaped with a dusting of dark cocoa)
- Praline truffle (ball shaped with pale cocoa dusting)
- Gooey orange fondant (drizzled with orange flavoured white chocolate drizzle)
For my first attempt at something like this, this turned out excellently! I'm so pleased with it, and am very proud of my efforts. Some didn't work, but those didn't go to waste as they were guzzled down by my siblings without any hesitation. It's all learning for next time... and there will be a next time.
I will upload all the recipes and make some photo tutorials for the dipping, and especially the moulded chocolates, which are the ones with orange drizzle. I used a silicone mould for those, in which I cast the melted chocolate. Weirdly enough, the casting technique is one I learnt from my time studying ceramic product design in college; the same principle, it turns out, can be used in chocolaterie.
The only change I would make is that I would spend a little bit more money on good quality chocolate for coating. The stuff I bought was cheap and wasn't tempered properly to start with, so tempering myself was almost impossible. I had to add some solid vegetable fat to make it flow and set nicer; don't worry, it can't be tasted.
The only change I would make is that I would spend a little bit more money on good quality chocolate for coating. The stuff I bought was cheap and wasn't tempered properly to start with, so tempering myself was almost impossible. I had to add some solid vegetable fat to make it flow and set nicer; don't worry, it can't be tasted.
I also made the box using a very simple technique.
- Take a piece of A4 card, coloured if you like.
- Using another piece of card cut to a 1½ inch (4 centimeter) width, draw a 1½ inch (3.8 centimeter) margin around all four edges of the card.
- Following the template below as a guide, cut along the red lines and fold along the dotted lines.
- Now, you have an A4 page with four little tabs. Fold up all four sides, folding the little tabs behind the short sides towards the middle. Glue together and allow to dry.
- To make the lid, follow the above instructions but make the margin around the page 1⅓ inches (3.5 centimeters) instead.
And now you have a lovely box to keep you chocolate in! Sit the chocolates in little cupcake cases and arrange inside.


No comments:
Post a Comment