Showing posts with label orange. Show all posts

Sunday, 3 December 2017

Buon Natale! Orange Amaretti: Italian Almond Macaroons (Gluten- and Dairy Free)

And thus, our Advent-ure (get it?) around Central Europe will begin with a trip to Italy! Here is my take on a simple Italian seasonal treat: amaretti, with a hint of orange!


Essentially, an amaretto is an almond macaroon and a lot of Central European countries have a version of nut macaroons and coconut macaroons. In Germany, there are kokosmakronen (coconut), mandelmakronen (almond), and haselnussmakronen (hazelnut); in France, you have the iconic macarons, which are much more delicate and technical than its cousins in other countries; and in Hungary, there are kókuszcsók (coconut). Here in Ireland, coconut macaroons are definitely more popular than the almond variety.

Making amaretti doesn't really need a recipe, as it's just a combination of egg whites, sugar, and almonds. To make them, simply make a stiff meringue with 3 ounces (85 grammes) of caster sugar for each medium (US large) egg white. Add in orange zest and almond essence to taste, and enough orange food colouring gel to get a nice pastel shade, and then fold in 3 ounces (85 grammes) of ground almonds for each egg white.

Fit a disposable piping bag with a half-inch (1 centimetre) round nozzle, and fill the bag with the mixture. Pipe the biscuits onto non-stick paper lined baking sheets, making each biscuit into a mound about an inch or so tall and wide.


Bake in an oven preheated to 150°C (300°F, Gas Mk.2) for 20 to 25 minutes, or until the biscuits are crisp and dry to the touch. Allow to cool slightly on the trays before gently peeling off and tranferring to a wire rack to cool completely. Dust with a little icing sugar to serve.

These keep very well in an airtight container for up to two weeks.

Wednesday, 25 October 2017

Pull-Apart Pumpkin Cake (Dairy-Free Sponge Recipe) with Video!


If you are planning a Halloween party for entertaining, you will always need some kind of cake as a centre piece for the party table. Layer cakes, like the Bat 'n' Burg, will always impress older kids and adults, but little children are much more easily impressed. So, if you're entertaining little ones, you don't need to go to so much bother: this pull-apart cake will make your life easier, and will make sure everyone has a piece of cake that's the same size.

This video demonstrates how to make a pumpkin themed cake, but you could do anything like a bat, or a ghost. It's completely up to you!


~~ ^ _ ^ ~~

DIFFICULTY
Requires mixing and piping icing

TIME
About 2 hours

RECIPE RATING
Easy!

~~ ^ _ ^ ~~

INGREDIMENTS

Makes 12 cupcakes

4 ounces (115 grammes) white spelt flour
½ teaspoon baking powder
1 tablespoon (15 millilitres) cocoa powder
2 medium (US large) eggs
2 ounces (55 grammes, 60 millilitres) sunflower oil
2 ounces (55 grammes) caster sugar
2ounces (55 grammes) soft light brown sugar
1 teaspoon vanilla essence

To decorate

Melted milk or dark chocolate, roughly 3 ounces (85 grammes)
12 ounces to 1 pound (340 to 455 grammes) buttercream icing, coloured orange, made using margarine for a dairy-free option

~~ ^ _ ^ ~~

FREE FROM
Dairy, nuts, wheat, yeast

CONTAINS
Spelt, eggs, refined sugar

~~ ^ _ ^ ~~

STORAGE
These keep for up to 2 weeks in an airtight container at room temperature.

Friday, 17 April 2015

Carrot and Orange Cake with Fresh Cream Icing (Wheat Free)

This Monday just past was my brother's girlfriend's birthday, and he managed to sneakily ascertain that her favorite cake is carrot cake. And as such, I delivered!


I made a carrot cake for my blog a while back, but since then I've honed the recipe. I made sure to grate the carrot more finely, and find a good balance of carrot to cake mixture, and it turned out really well. However, traditionally, carrot cake is traditionally decorated with cream cheese icing, made by mixing cream cheese, butter, icing sugar and lemon juice, but I personally find this a bit sweet and heavy for carrot cake. Instead this time, I opted for a lighter icing, made with cream cheese and whipping cream.

I took a leaf from the book of making a gelatine free set cheesecake, where cream cheese and whipping cream are beaten together and mixed with lemon juice to set it, the acid reacting off the dairy. I sort of made up an icing recipe using the same logic (except with orange juice, because orange in a carrot cake is good and traditional) and it worked really well! It set up a little, but still remained light and fluffy. A nice accompaniment to the denseness of carrot cake.

FREE FROM
☑ Soya (check for soya lecithin)
☑ Yeast
☑ Wheat

CONTAINS
☒ Eggs
☒ Dairy
☒ Gluten
☒ Nuts
☒ Refined sugar products

INGREDIMENTS:
For two round 8 inch (20 centimetre) sandwich cakes:
  • 2 ounces (55 grammes) cornflour
  • 6 ounces (170 grammes) white spelt flour
  • 2 teaspoons (10 millilitres) baking powder
  • 4 ounces (115 grammes) caster sugar
  • 2 teaspoons (10 millilitres) cinnamon
  • ½ teaspoon (3 millilitres) ginger
  • ¼ teaspoon (2 millilitres) coriander
  • 2 pinches ground cloves
  • Pinch of salt
  • 4 medium eggs
  • 4 ounces (115 grammes) sunflower oil
  • 2 ounces (55 grammes) brown sugar
  • 8 ounces (225 grammes) finely grated carrot
  • 4 ounces (115 grammes) raisins

For the fresh cream icing:
  • 9 ounces (250 grammes) cream cheese
  • 9 fluid ounces (250 millilitres) whipping cream
  • 2 ounces (55 grammes) caster sugar
  • 1 teaspoon grated orange zest
  • 1 tablespoon orange juice
  • 1 teaspoon vanilla essence

To decorate:
  • 18 whole or halved nuts, for example pecans, walnuts, or almonds

METHOD

First, make the cakes:
  • Preheat oven 180ºC (350ºF, Gas Mk.4). Grease two 8 inch (20 centimetre) round sandwich tins with a little butter or margarine. 
  • In large bowl, sieve the cornflour, spelt flour, baking powder, spices, salt, and caster sugar. Take a spoonful of this mixture and use it to dust the tins, returning the excess to the bowl.
  • In a jug, beat together the brown sugar, sunflower oil, and eggs until fully combined. Mixing the brown sugar with the wet ingredients makes it easier to dissolve out the lumps.
  • Make a well in the dry ingredients and pour in the wet mixture. Mix with a spatula or wooden spoon until it is half mixed, and then add in the carrot and raisins. Mix until completely combined and smooth.
  • Divide the mixture between the two tins and bake for 20 to 25 minutes, or until springy to the touch and a cocktail stick poked into the centre comes out clean.
  • Cool in the tins for about 10 minutes, then run a knife around the edges to loosen. Turn out the cakes and allow them to cool completely.

Then, prepare the icing and decorate:
  • In a mixing bowl, beat the cream cheese until smooth, then add in the cream, a third at a time,beating until smooth between additions.
  • Once all the cream is added, beat until the cream reaches soft peaks. This could take a while, especially if you're whisking by hand with a balloon whisk. I recommend a electric mixer for this.
  • Once it has formed soft peaks, add in the juice, zest and half the sugar. Beat until mixed in, then add the rest of the sugar. Continue beating until stiff peaks form, being careful not to over whip as the cream will split.
  • If the cakes have a big dome, cut them off before decorating. Put one cake on the serving platter, top with about a quarter of the cream. Then place the other cake on top, upside down. Ice with another two quarters, then use the last quarter for piping little rosettes along the top and bottom edges.
  • Place the nuts on top of the rosettes in a pretty pattern, spacing them evenly.
  • Chill for at least 2 hours to allow the icing to set, then allow to temper to room temperature before serving.


And here's the end result. It was very tasty, and not all heavy and sweet with too much cream cheese icing. I think this is a nice, fresh twist on a classic.

THIS TIME IN 2014: No blog
THIS TIME IN 2013: Pouring Fondant Done the Awkward Way

Monday, 19 January 2015

Orange Mocha Gâteau (Wheat Free)

This week's unusual cake concoction is: orange mocha gateau! I know a gateau has a specific definition, but I think cake is not an appropriate word for such a confection.


Sunday the 18th was my brother's 30th birthday, and every year my brother asks for one of two same things: either cheesecake, or coffee cake. There's nothing better than a classic coffee cake when the time is right, but sometimes I do get a little tired of eating the same cake every year. This time, I thought I'd shake things up a little.

Recently I was a frequent sipper at a local café in Limerick city called "The Cellar Door", but it unfortunately closed down just before Christmas due to circumstances out of their hands. One thing they served, which I always enjoyed, was hot chocolate made with Terry's orange chocolate bars, blended with steamed milk. Orange and chocolate are a wonderful combination to me. The woman who co-owned the business tried mixing it with a shot of espresso, and a beautiful thing was created. Despite the fact that the hot chocolate with the added double shot of espresso is €4.80 ($5.60, or £3.70), I buy one every time and I nurse it.

I had come across the concept of orange flavoured coffee before; when I was a little girl, my father had found these sachets of flavoured coffees: orange, raspberry, and mint. He used them to show me how to use a coffee filter machine, and to introduce me to coffee; at the time, I thought it was gross, but later in life I revisited the idea, and at first invented my Coffee Raspberry slices. I had never really got back around to something orange coffee flavoured, but I thought this would be the perfect opportunity, but with the added goodness of a dash of cocoa.

Now, unfortunately, this recipe is not free from very much, but substituting all the butter and milk chocolate products for margarine and dairy free chocolate alternatives will make it dairy free.

Also, this recipe makes a four layered cake. My one in the photos has three layers, but that was due to an error I made: I didn't run the knife flush against the side of one of the tins, meaning one cake came out with the sides cut at an angle. The only way I could fix it was by cutting it in half and using only the full side. Although unfortunate, it meant I had a lot of extra cake and some filling icing left over... yum!


FREE FROM
☑ Soya (check for soya lecithin)
☑ Yeast
☑ Wheat

CONTAINS
☒ Cocoa
☒ Eggs
☒ Gluten
☒ Dairy
☒ Refined sugar products


INGREDIMENTS:
For two 8 inch (20 centimetre) round sandwich cakes:
  • 4 medium eggs, room temperature
  • 4 ounces caster sugar
  • 2 ounces soft brown sugar
  • 2 ounces weight of sunflower oil
  • 2 ounces butter, or block margarine, or extra sunflower oil
  • 2 fluid ounces espresso, or 2 fluid ounces of boiling water mixed with 3-4 teaspoons of instant coffee granules
  • 6 ounces white spelt flour
  • 2 ounces cornflour
  • 1 teaspoon baking powder
  • 1 tablespoon ground coffee
  • Pinch of salt
  • Grated zest of 1 large orange

For coffee cream filling
  • 6 ounces white chocolate, or dairy-free white chocolate
  • 3 ounces butter, or margarine
  • 3 fluid ounces espresso, or strong coffee prepared as above
  • 9 ounces icing sugar, sifted

For orange chocolate fudge icing:
  • 9 ounces milk chocolate, or dark chocolate
  • 3 ounces butter, or block margarine
  • Juice of 2 large oranges
  • 6 ounces caster sugar


METHOD
First, bake the cakes:
  • Preheat your oven to 180°C (350°F, Gas Mk.4, or moderate). Grease and flour two 8 or 9 inch (20 or 22 centimetre) round sandwich tins.
  • Make the cake mixture according to this recipe, using the coffee in place of the water and adding the orange zest with the eggs at the beginning. Keep your orange to juice later. Divide the mixture between the two tins and bake in the centre of your oven for 20 to 25 minutes, or until a cocktail stick or knife comes out clean when poked into the middle of the cakes. You made need to rearrange your oven shelves to get both in near the oven's centre.
  • Once cooked, run a knife around the edge to loosen the cakes, then leave to cool in the tins for 10 minutes before turning out and cooling on a wire rack.
While cake is cooling, prepare the icing and filling.

For the icing:
  • For the chocolate icing, juice the zested orange and the second orange into a small measuring jug. Top the orange juice up with water to make 6 fluid ounces (180 millilitres) of liquid altogether.
  • Pour the diluted orange juice and the sugar into a saucepan and heat together gently until the sugar has melted. Bring to the boil, then simmer for two minutes. Keep an eye on the clock!
  • After two minutes, remove from the heat and stir in the chocolate and butter, or margarine, and stir until melted or almost melted.
  • Return to the heat and cook for another minute, stirring continuously, until you have a smooth, shiny mixture. Remove from the heat and allow to cool to room temperature before chilling in the fridge for at least 30 minutes, or until thick and spreadable.

For the filling:
  • Melt together the butter, or margarine, white chocolate, and coffee together gently. You can do this in a bowl set over a pan of simmering water, or in the microwave in an appropriate bowl for 1 minute intervals on "Defrost", stirring after each interval.
  • Once the chocolate mixture is smooth and combined, add in the icing sugar and beat until creamy and there is not a lump in sight. Allow to cool to room temperature before chilling in the fridge for at least 15 minutes, or until it is a soft and spreadable consistency, but still only holds soft peaks when dropped from a spoon.

To assemble:
  • Cut the domes off both cakes (if they have domes), then slice each cake in half horizontally. Decide how you will assemble the layers, making sure the bottom layer of one cake, bottom side up, is on the top of the pile to make a flat top.
  • Attach your bottom layer to its platter with a tiny smear of the filling. Spoon one third of the filling onto the bottom layer, spread out with a palette knife (or butter knife) until it's about half an inch (1 centimetre) from the edge.
  • Pop the next layer on top, pressing it gently to secure it. Spoon another third of the filling on top and spread as before. Repeat with the last third of filling, and top off with a cake layer. Allow to sit in the fridge for about 10 minutes to firm a little.
  • Spread about a third of the icing on top of the cake, making a swirling zig-zag pattern for decorative effect, then ice the sides with the remaining icing. 
  • If you always spread on the icing only and never allow the knife to touch the cakes' crusts, then you ideally don't need a crumb coat. If you get the odd crumb in, it's not the end of the world, but if you want absolute perfection crumb coat the whole thing first, set in the fridge for about 10 minutes, then ice completely.
  • Once the cake is completely iced, decorated how you like with sprinkles, coffee beans, or fine strips of orange zest (like I used), then chill the cake for about 30 minutes to firm up. It should be served and stored at room temperature, however, so let it sit on the counter (or hidden in a cupboard) for about 20 minutes before serving.


And there you have it! Something nice for your next big birthday bash.

THIS TIME LAST YEAR: Ginger Ale (No Brewing Required)

Monday, 5 January 2015

Chocolate Truffle Box: Dark Raspberry and Milk Orange

For my next trick, moulded chocolate shells filled with truffle and fruit jam! I made my Dad a box of these for his present, and he really appreciated them.


A few weeks ago, I was in Dealz (PoundLand) and I found a lovely sillicone mould with shapes of various tea time things, like cakes, teacups and teapots, and I thought this would be ideal to make some nice truffle filled moulded chocolates for Christmas. Over the next few weeks, I designed what would go into each chocolate.

Seeing as the mould had 15 holes, of 5 different designs, I thought I could do 5 different fillings, but in the end I thought of a better idea: to use the mould to make one whole batch of dark chocolate truffles, and one whole batch of milk chocolate truffles, then just make a box including one of each shape and colour, making a box of ten in total.

I filled the dark chocolate shells with raspberry jam and dark chocolate truffle, made with what I like to refer to as a faux-ganache, and then the milk chocolate shells where filled with orange marmalade and milk chocolate truffle. To make the chocolate shells, I needed 3 1/2 ounces (100g) chocolate per tray.

I melted the chocolate in a heatproof bowl over simmering water until almost completely melted, then I removed to bowl from the heat and continued stirring until fully melted; this is the lazy man's way of tempering, and has served me well so far. I put one teaspoon of chocolate into each shape in the mould, then using the tip of the teaspoon, spread the chocolate up the sides; if it spills out a bit, that's okay.

Put a sheet of non-stick baking paper underneath a wire rack, then put the mould upside-down on the wire rack; the chocolate will dribble out of the mould, through the rack, onto the paper. This will coat the sides completely. When the dripping stops, turn the mould right-side up again; scrape the excess chocolate off the surface of the mould with a palette knife, or the back of a normal knife. Put this in the fridge to set for about 10 minutes before filling. On removing from the fridge, fill each hole leaving a eighth inch (3 millimetre) gap at the top.


To make the fillings, you will need:

RASPBERRY DARK CHOCOLATE TRUFFLE
  • 2 ounces (55 grammes) chocolate, broken into pieces
  • 1 ounce (30 grammes) butter or margarine
  • 1 tablespoon (15 millilitres) raspberry jam
  • 1 ounce (30 grammes) raspberry jam, sieved


Heat together the butter (or margarine) with the tablespoon of jam until melted and just starting to bubble. Remove from the heat, and stir in the chocolate until smooth. Leave to cool slightly before using, so as not to melt the shells. Use the sieved jam and the ganache to fill each shell.

ORANGE MILK CHOCOLATE TRUFFLE
  • 2 ounces (55 grammes) milk chocolate
  • 1 ounce (30 grammes) butter or margarine
  • 1 tablespoon (15 millilitres) milk
  • 1 tablespoon (15 millilitres) caster sugar
  • 1/2 teaspoon vanilla essence
  • 1 ounce (30 grammes) orange marmalade, sieved.


Heat together the butter (or margarine) with sugar and milk until the sugar and butter have melted together and the mixture is just starting to bubble. Remove from the heat, allow to cool slightly, then stir in the chocolate until smooth. Leave to cool slightly before using, so as not to melt the shells. Use the sieved jam and the ganache to fill each shell.

I put a quarter teaspoon of jam (for dark) and marmalade (for milk) into each shell, then topped each one off with about a half teaspoon of ganache. Allow to stand for ten minutes. There should be some melted chocolate left over from making the shells, and the chocolate that dribbled onto the paper should be a little bit set by now, so take all the chocolate off the paper, add back into the heatproof bowl, and re-melt very gently over simmering water as before until almost melted.

Stir until completely melted, then spoon onto the tops of the filled chocolates, gently spreading it into the corners. Allow to set completely at room temperature for an hour, or pop into the freezer for 10 minutes. Gently turn each hole inside-out to get the chocolates out, and put into little paper cases.

These turned out really well for my first, and I hope that future attempts will only improve!

Wednesday, 15 October 2014

Orange Chocolate Fudge

When designing my second Halloween dessert, the concept of something orange just flew into my mind, as orange is a very Halloweeny colour: whether it's the imagery of stripy witch's tights, or a crispy fallen leaf, orange - along with green, purple, black, and grey - rank highly in my mind when it comes of Halloween colour associations.


Another inspiration that came to me was the idea of celebratory food. Halloween is Celtic new year's eve, and all the traditional celebrations we have as part of Halloween stem from ancient Irish new year's eve customs. Traditionally, a lot of nice food, beer and mead would be consumed as part of the festivities. Nowadays, celebration food looks very different to how it did in pre-Christian Ireland, but the vibe is still there.


To me, Halloween is all about sweeties, chocolate and autumn fruits and nuts, so I thought I'd design a sweetie worthy of any trick or treat bucket: Orange Chocolate Fudge.

There is no finer combination in the world than orange and chocolate: it's just a match made in heaven. The warmth of the orange oil lends itself as a perfect match for the dark earthy quality of chocolate, and when both are wrapped up in fat and sugar what's not to like?


FREE FROM
☑ Soya (check for soya lecithin)
☑ Gluten
☑ Wheat
☑ Nuts
☑ Eggs

CONTAINS
☒ Dairy
☒ Cocoa
☒ Refined sugar products

 INGREDIMENTS

For the orange chocolate layer:
  • 8 ounces (225 grammes) condesned milk
  • 8 ounces (225 grammes) light brown sugar
  • 4 ounces (115 grammes) butter
  • 2 fluid ounce (60 millilitres) milk
  • 1 teaspoon (5 millilitres) vanilla or other essence
  • 1 to 2 tablespoons cocoa powder, depending on how dark you want it
  • Zest of 1 orange
  • Pinch of salt

For the coloured topping layer:
  • 3 ounces (85 grammes) condensed milk
  • 3½ ounces (100 grammes) white chocolate
  • Pinch of salt
  • Orange food colouring


THIS TIME LAST YEAR: Wheat Free Ice Cream Cones

Friday, 18 July 2014

Lemon Meringue Tarts (Wheat Free)

My mother has been essentially locked in her office for the last week working feverishly on her Master's essays and assignments. I decided to make her a treat for finishing a successful week's work, and she does so love things that taste of citrus.

I thought I'd crack out the four-hole Yorkshire pudding tin that I inherited a few years back. It was in a box of things that my Grandma had left for my Mum and we received it when my Grandda died. About four years ago I claimed it as my own and assimilated it into my vast collection of cooking tins.


For this rendition of a classic, I used both orange and lemon juice for extra zing.

FREE FROM
☑ Soya (check for soya lecithin)
☑ Yeast
☑ Wheat
☑ Nuts

CONTAINS
☒ Gluten (unless you use gluten-free oats)
☒ Refined sugar products
☒ Eggs
☒ Dairy (check italics for alternatives)

INGREDIMENTS

For pastry:

  • 4 ounces (115 grammes) white spelt flour
  • 2 ounces (55 grammes)  cornflour
  • 4 ounces (115 grammes) butter or margarine
  • 2 ounces (55 grammes) caster sugar
  • Grated zest of 1 lemon
  • Pinch of salt

For curd filling:
  • 3 fluid ounces (90 millilitres) lemon juice (or a mixture of lemon and orange)
  • 3 ounces (85 grammes) caster sugar
  • 1 egg yolk
  • 3 teaspoons (15 millilitres) cornflour
  • 1 ounce (30 grammes) butter or just leave this out
  • Pinch of salt

For meringue:
  • 1 egg white
  • 3 ounces (85 grammes) caster sugar
  • 1 teaspoon (5 millilitres) vanilla essence
  • Pinch of salt

HOW-TO

For pastry case(s):
  • In a mixing bowl, beat together the butter or margarine until soft and creamy, then beat in the sugar and zest.
  • Sieve in the flours and salt and mix with a wooden spoon until a soft dough is formed. Gather with your hands, make into a disc approximately 1 inch (2.5 centimetres) thick and pop in the fridge for an hour.
  • Preheat the oven to 180°C (350°F, Gas Mk.4, or moderate). You will need an 8 inch (20 centimetre) tart tin or a Yorkshire pudding tin with four 4 inch (10 centimetre) holes. There is no need to grease them.
  • Roll the dough out to about a quarter inch (.5 centimetre) thick and cut 5 inch (12 centimetre) rounds to line each Yorkshire pudding hole. Alternatively, drape the rolled pastry into the large tart tin and gently press in, using the rolling pin to roll over the edges of the tin and cut off the excess.
  • Prick the case(s) all over with a fork and blind bake. To blind bake, line the case(s) with some scrunched up baking paper and fill with some coins; this stops the shell from rising too much.
  • Bake for about 15 minutes, remove the paper and coins, then return to the oven to cook for a further 5 to 10 minutes or until a gentle golden brown colour.
  • Remove from the oven and allow to cool for about 10 minutes before preparing the curd.

For the curd:
  • In a saucepan, blend the cornflour, egg yolk and about 2 tablespoons (30 millilitres) of the juice into a smooth paste. Add the rest of the juice and the sugar and stir until evenly combined.
  • Cook gently over a medium flame, mixing all the time with a whisk or rubber spatula, until it has thickened up into the consistency of... well, lemon curd. I don't really know how to describe it: a very gloopy, thick gel I suppose.
  • Take from the heat and stir in the butter.
  • Fill the pastry up to about an eighth inch (.3 centimetre) from the top of the shell(s).

For the meringue:
  • In a heatproof glass or metal mixing bowl, mix all the ingredients until evenly combined.
  • Put the bowl over a saucepan of simmering water and beat with an electric mixer on high speed until soft peaks form.
  • Remove from the heat and continue beating until stiff peaks are formed.
  • Cover the filled tart(s) with the meringue using either a piping bag fitted with a star tip, or just pile it in and smooth it out with a fork for texture.
I don't have any photographs yet of the cut open tart to show off the layered effect, but I will update you all very soon!

There was no blog this time last year.

Monday, 25 November 2013

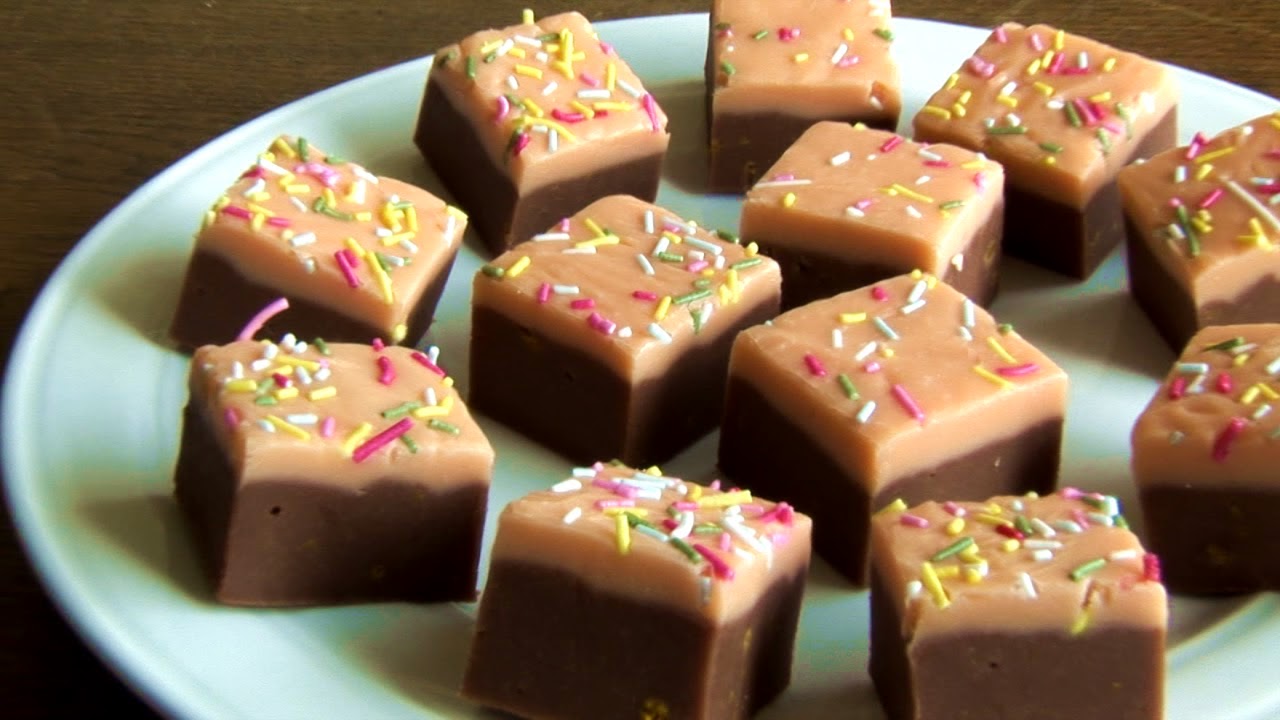
Orange Chocolate Fudge (Naturally Gluten-Free)

Want to know what the most delicious thing is in the world? Orange chocolate. I'll let the photo do the talking.


Let's move onto the recipe...

INGREDIMENTS
This is a large quantity that will make about 1¼ pounds (570 grammes) of fudge, but I've found it can be easily halved or even quartered. Just be really careful when making small batches because it can burn or crystallise easily.
  • 16 ounces (450 grammes) caster sugar
  • 4 fluid ounces (120 millilitres) cream
  • 4 fluid ounces (120 millilitres) milk
  • 4 ounces (115 grammes) butter
  • Finely grated zest of 1 orange or a few drops of orange essence
  • Orange food colouring
  • 6 ounces (170 grammes) milk or dark chocolate
  • 1½ ounce (40 grammes) sunflower oil
  • Optional: sugar strands, hundreds and thousands or coloured sugar

HOW-TO
  • Prepare an 8 inch (20 centimeter) square tin by either greasing it lightly or lining it with non-stick baking paper. You could also use a silicone baking tin, which needs no greasing or lining.
  • In a heavy-based large saucepan, heat the cream, milk and butter until the butter has melted.
  • Pour the sugar into the middle of the pan so that it forms a little mountain in the middle, then gently bring in the milk mixture from the edges. Your aim here is to get as little sugar as possible on the edges of the pan, as this can cause your fudge to go grainy.
  • Stir the mixture over medium-low heat until the sugar has completely dissolved. Using a pastry brush dipped in hot water, wash the sugar crystals from the side of the pan. Alternatively, you can just pop the lid on the pan for a minute to allow the steam to wash it all away instead.
  • Once the sugar has dissolved and there is no evidence of sugar crystals left, bring the mixture to the boil and once boiling clip a sugar thermometre to the side of the pan. Cook over medium-high heat until the whole thing reaches 118°C (245°F). Please don't stir!
  • While the fudge is cooking, fill your sink or wash basin with about 2 inches (5 centimetres) of cold water.
  • Once the fudge has reached temperature, take the pan from the heat and dip the bottom in the cold water to stop cooking immediately. Leave the mixture to cool for 12 minutes (a minute per ounce (28 grammes) of sugar).
  • Add the zest or orange essence and add enough food colouring to make it a nice pale orange. 
  • Beat vigorously with a wooden spoon until thick, creamy and opaque. The mixture will slightly lose its shine and become more matte, and the consistency will be like freshly made Mr Whippy soft serve ice-cream. 
  • Pour into your prepared tin and allow to cool at room temperature for about 30 minutes until cool to touch.
  • Melt the chocolate in a basin over simmering water or in the microwave and then mix in the sunflower oil. Pour this glaze over the top of the orange layer and shake until level. If you like, you can decorate with the sugar strands, hundreds and thousands or coloured sugar.
  • Allow to set for at least 6 hours or overnight.


Do not even think of setting it in the fridge: you can store it in the fridge once set, but setting the fudge in the fridge will cause crystallisation. Store in an air tight container to avoid it catching any unwanted odours or flavours.

Monday, 26 August 2013

Variations on a Theme: Chocolate Chip Cookies

As much as I love chocolate chip cookies, sometimes the same old recipe cooked over and over again can get a little tired, no matter how tasty. Knowing what I'm like, I like to give old favourites a new edge by adding something a little unusual or unexpected, and these are no exception.

The other day I experimented with some new ideas for the American classic by adding some flavours to my standard recipe.


Coffee and Cinnamon Chocolate Chip Cookies


Orange Chocolate Chip Cookies


Both these batches followed my American Style chocolate chip cookie recipe, but had a few little twists. I used caster and light brown sugar, instead of dark brown sugar, and used milk chocolate chips (which I made by chopping up a milk chocolate bar).

For the coffee and cinnamon ones, I added 2 tablespoons of coffee grinds, 1 teaspoon of malted drink powder and 1 teaspoon of cinnamon to the dry ingredients and sieved them all together. The malted drink powder isn't necessary, but I think it makes them taste a little more rich and full. If you are including it, however, be careful of the brand you buy and always check the label: some brands of malted drink powder contain wheat flour, so if you're wheat intolerant that just won't do.

Also, at the risk of sounding completely obvious, malted drink powder isn't gluten free. But then again, neither is spelt flour.

And for the orange ones, I simply creamed the grated rind of half an orange into the butter and sugars. That's all!

The above amounts apply to the ingredient quantities outlined in the original recipe, that is, 2 tablespoons of coffee grinds or the grated rind of half an orange to every 4 ounces (115 grammes) of butter and associated ingredients. If you were halving or doubling the original recipe, you would obviously have to halve or double the amount of extra ingredients.

Another variation I'd love to try when I next have the opportunity to bake up another batch of chocolate chip lovelies is replacing some of the chocolate chips with some dried banana chips. I love dried banana, and I've been told that banana and chocolate go really well together, and I'm willing to give it a go. The only time in my life that I've experienced chocolate and banana together is in a Chupa-Chup lolly, and it was a truly nasty synthetic experience which I wish never to repeat.

So, in the spirit of experimentation, what kinds of combinations would you like to try?

Monday, 29 July 2013

Homemade Box of Chocolates = WIN

So, as I mentioned in a previous post, it's my parents' wedding anniversary tomorrow and I decided to embark on a quest to make a selection box of chocolates from scratch. And here she is!!


The selection includes milk chocolate coated:
  • Coconut ice (topped with little shreds of coconut)
  • Chewy caramel (topped with a sprinkle of coarse salt)
  • Creamy fudge (decorated with ridges made with a fork)
  • Milk chocolate truffle (ball shaped with a dusting of dark cocoa)
  • Praline truffle (ball shaped with pale cocoa dusting)
  • Gooey orange fondant (drizzled with orange flavoured white chocolate drizzle)

For my first attempt at something like this, this turned out excellently! I'm so pleased with it, and am very proud of my efforts. Some didn't work, but those didn't go to waste as they were guzzled down by my siblings without any hesitation. It's all learning for next time... and there will be a next time.

I will upload all the recipes and make some photo tutorials for the dipping, and especially the moulded chocolates, which are the ones with orange drizzle. I used a silicone mould for those, in which I cast the melted chocolate. Weirdly enough, the casting technique is one I learnt from my time studying ceramic product design in college; the same principle, it turns out, can be used in chocolaterie.

The only change I would make is that I would spend a little bit more money on good quality chocolate for coating. The stuff I bought was cheap and wasn't tempered properly to start with, so tempering myself was almost impossible. I had to add some solid vegetable fat to make it flow and set nicer; don't worry, it can't be tasted.

I also made the box using a very simple technique.
  • Take a piece of A4 card, coloured if you like.
  • Using another piece of card cut to a 1½ inch (4 centimeter) width, draw a 1½ inch (3.8 centimeter) margin around all four edges of the card.
  • Following the template below as a guide, cut along the red lines and fold along the dotted lines.
  • Now, you have an A4 page with four little tabs. Fold up all four sides, folding the little tabs behind the short sides towards the middle. Glue together and allow to dry.
  • To make the lid, follow the above instructions but make the margin around the page 1⅓ inches (3.5 centimeters) instead.


And now you have a lovely box to keep you chocolate in! Sit the chocolates in little cupcake cases and arrange inside.

Monday, 27 May 2013

Orange Bourbon Creams (Wheat Free)

For those of you have been reading my blog so far, you’ll probably have absorbed the fact that I absolutely love Bourbon creams. But I don’t like them just because they’re chocolatey and creamy, but there’s a story.


When I was about five or six years old, my parents noticed that when I ate chocolate bad things happened: not only would I get hyperactive, but I would get very, very angry; the kind of angry that incited rock throwing and hair-pulling of older brothers. Behavioural difficulties aside, chocolate would cause me to have severe stomach upset. I have this very vivid memory – whether it’s faithful or a blend of several different instances, I’m not sure – of asking my father for a chocolate biscuit or something of the like, and the conversation went something like this:

“Anna, you know that when you eat chocolate you get upset and a sore tummy?”
“Yes, Daddy,”
“So, do you think eating chocolate is a good idea anymore?”
“Not really.”

And, I didn’t eat chocolate again. I didn’t eat it for about fifteen years; I did have a few lapses, I will admit, and every time I ate chocolate in those fifteen years it resulted in severe migraine headaches that would have me bedridden for at least a day, sensation loss in limbs and extreme endless nausea included.

However, one day, somewhere between being twenty and twenty-one, I was offered a chocolate biscuit by a work colleague. He was a nice guy, and his English wasn’t fantastic, and I didn’t want to offend him, so I took the biscuit; he walked away, happy in his work. I looked at the biscuit… it looked back at me… so I looked at it again… and played with the thought of what would happen; then ate it anyway, out of curiosity.

Nothing happened. Well, I probably digested it, but that’s not the point.

As you can imagine, I’ve been making up for a lot of lost time between now and then. Still, though, if I eat too much I get a little twinge in the top right corner of my head, and I get a little stomach upset, but it’s nothing compared to what used to happen.

So, now when I eat a Bourbon, which was one of my favourite biscuits as a little girl, I get this feeling of reunion with a long lost love: I thought I’d never be with it again when I left it, all those years ago, but when I returned it was still as sweet and chocolatey as it had always been. Dunk, bite, nom! And even though this darned wheat intolerance business has made enjoying the odd Bourbon a tad more difficult, it hasn’t stopped me yet. In fact, it is the wheat intolerance that spurred me into trying to make my own Bourbons. Even if I do say so myself, my version is just as awesome.

Here’s the biscuit recipe.

INGREDIMENTS
For the biscuits:
  • 2 ounces (55 grammes) butter, at room temperature
  • 2 ounces (55 grammes) caster sugar
  • 1 egg yolk, at room temperature
  • 1 teaspoon (5 millilitres) vanilla essence
  • ½ ounce (15 grammes) cornflour
  • ½ ounce (15 grammes) cocoa powder
  • 3 ounces  (70 grammes) white spelt flour
  • Pinch of salt


For the filling:
  • 7 ounces icing sugar
  • 1 ounce cocoa powder
  • 5 ounces butter
  • 1 teaspoon vanilla essence
  • Grated zest of ½ orange
  • 1 tablespoon milk


HOW-TO
First, make the biscuits:
  • Sieve together the cornflour, spelt flour, cocoa powder and salt into a bowl and set aside for later.
  • Cream the butter and sugar together using an electric hand mixer, wooden spoon, or rubber spatula, until pale and fluffy.
  • Beat in the egg and vanilla essence until fully combined. Try not to be too vigorous, as you’re not trying to incorporate much air, just mix the ingredients.
  • Add the sieved flour and cocoa mixture and mix with a wooden spoon, or just get in there with your hands. If you’re starting with the spoon, make sure you finish it with your hands so that it’s nice and smooth. Don’t use an electric mixer, as this will make the dough tough. 
  • Roll into a ball and flatten into a disc, 1 inch (2½ centimetres) in thickness. Chill in the fridge for about half an hour.
  • Preheat the oven to 160°C (320°F, Gas Mark 2½). Line one or two baking trays with non-stick baking paper.
  • Take the dough from the fridge and work a little with your hands to make it malleable. Roll out to an ⅛ inch (3 millimetre) thickness and cut out shapes. You could make them round using a 2 inch (5 centimetre) cutter, or just use a knife to cut squares or rectangles, like I did.
  • Arrange the biscuits 1 inch (2½ centimetres) apart on the trays. Bake for about 15 to 20 minutes. Obviously, with chocolate biscuits you can’t tell doneness by browning, so when the biscuits are set and firm to the touch around the edges, they’re done.
  • Remove from the oven and allow to cool on the trays for 5 or so minutes. Transfer to a wire rack and allow to cool completely.

Then fill them:
  • Make the buttercream using this method: of course, you need to add the orange zest in with the butter at the beginning, and then sieve the cocoa in with the icing sugar. Adding the orange zest at the beginning means that the friction of beating draws the oil out gradually over the whole procedure. 
  • Using a piping bad fitted with a ½ inch (1 centimetre) nozzle, pipe one half of the biscuits with the filling and sandwich with the remaining biscuits. 

As you can see, I’ve made them a little more exotic by adding some orange zest to make orange-chocolate cream, but you could just leave out the zest if you like and have plain Bourbons. The good thing about making them from scratch is that you can fill them with whatever.

As you can see in the pictures, I also made little patterns on the top. Because these biscuits don’t have any raising agent or liquid in them, they don’t spread that much or change shape a lot. This means, they hold onto imprints very easily. Use the tip of a small round piping nozzle to print patterns into the top, or you could use anything that you like to create any pattern you like; push them about half way in for the best-lasting pattern.

Unfortunately, homemade sandwich biscuits don’t stay crispy for as long as the shop-bought ones. Naturally, the moisture from the icing permeates into the biscuits and they go softer over time. They’re not stale, don’t worry, as these will keep for up to a week in an airtight container.

Thursday, 9 May 2013

A Cautionary Tale on the Dangers of Novelty Cakes: The Dinnersaurus


I’ve never been one for shaped cakes, or crafting novelty cakes of any kind really. As I mentioned in my previous blog, I made a cake for my mother’s birthday (which is today, incidentally) and I thought I’d take a leap of faith; I knew she would be happy with the usual cakey-cake cut in half with buttercream through the middle and sprinkles on top job, but I wanted – for my own pride – to try something a little different. Thus, the Dinnersaurus was born. And yes, not only have I been going through a biscuit phase, I've been going through a dinosaur phase.

When I was a little girl I had a book called Make a Monster, which was a book devoted totally the art of creating all kinds of representations of dinosaurs: from wooden models, to costumes, and – most importantly to me – food art. There were little ideas for making dinosaurs out of cake, and dinosaurs out of ice-cream, and the cake one has stuck in my mind until this day. It involved making a round cake and, using the first pattern, cut it into the appropriate shapes to arrange into a 3D dinosaur. Any unassigned bits of cake become chef’s perk, of course. My mother had asked specifically for an orange cake, so I obliged.

As you can see, it’s very simple. A lot of people, who probably have never heard of or read that book, do dinosaur cakes like this. The book instructed that one stick all the pieces together with jam, brush with jam, and then cover with marzipan; the decorative touches were added with nuts and dried fruit. But such a natural, ‘healthy’ attitude to this cake wouldn’t wash with me: I went ahead and stuck the whole lot together with buttercream, crumb coated it, and then covered it with luminous fondant icing.

I also used a slightly different template. Given that there would be a grand amassing of my family at this event, all of whom have an inhuman capacity for consuming cake, I made a dinosaur using two cakes. I arranged them like this:


Like was stuck to like, making everything twice the width, and twice the quantity. Each of the two cakes were split and filled with buttercream. I wanted to fill them with orange curd for a little extra richness and not so much toothache, but my mother prefers buttercream to curd when it comes to cake filling.

Of course, covering such a construction with fondant was exceptionally tricky: to make the fondant supple and mouldable enough to wrap around all the nooks and crannies, it needed to be quite thin, but in being thin it was very fragile. Needless to say, I put my finger through the fondant a few times, all of which were followed by a flurry of expletives. But, considering that this was my first proper, shaped novelty cake, I think I did very well.

Having been assembled and covered with fondant, it was time to decorate it and make it look more dinosaur-y. I had cut out some pentagonal shapes from teal fondant and left them to dry, and I used these to make the plates that ran down its back; I can’t officially say that is an exact representation of a stegosaurus, but it’s very heavily modelled on one. Steggies have always been my favourite dinosaur. Then I added some eyes, a smiley mouth, some blushed cheeks and painted on some eyelashes; I used the wide end of a piping tip to print scales all over the fondant. I then place it onto an impromptu cake board (a large piece of heavy cardboard covered with foil) that had been brushed with jam and sprinkled with green-tinted desiccated coconut. This, my friends, was a proper retro treat.


As you can see from the pictures, it was gobbled up in large amounts earlier this evening with great gusto. It’s backside is currently on top of the fridge.

It's been a while! Happy 9th Anniversary!

  It's been a while. The past two years have been a helluva a ride. This year is gonna hold some big changes for this blog. I'm comp...