Showing posts with label minature. Show all posts

Friday, 14 October 2016

Halloween 2016: Maple Peacle Tarts (Wheat Free)

Continuing in the vein of Halloween treats, here is a tasty American style morsel for you: maple peacle tarts!


Yes, before you correct me, I know it's a pecan, not a peacle. But, this recipe combines the powers of a maple pecan pie, and a treacle tart. It's a bit of a Transatlantic experience.

Here in Ireland, maple syrup is incredibly expensive, as I discussed in my post on a full sized maple pecan pie. Luckily though, maple flavoured golden syrup is a thing! I prefer using it because it has a stronger--albeit synthetic--flavour, whereas natural maple syrup's flavour is much more subtle

As you can see in the picture, I used the wrong kind of cutter for the tarts: I tried to be all artsy and use a flower shaped cutter, but it meant that the filling overflowed. Take it from me: do traditional cases with a round cutter.

This recipe could very easily be adapted for the good American Thanksgiving celebration coming u in November, as I understand maple pecan tart is something eaten at a holiday family meal in the States. Or it could be eaten pretty much anytime!

FREE FROM
☑ Soya (check for soya lecithin)
☑ Yeast
☑ Wheat
☑ Nuts

CONTAINS
☒ Eggs
☒ Dairy (dairy substitutes can be found in italics)
☒ Gluten
☒ Refined sugar products


INGREDIMENTS
For 12 tarts

For the pastry

  • 8 ounces (225 grammes) white spelt flour
  • 4 ounces (115 grammes) butter, at room temperature, or margarine
  • 2 ounces (55 grammes) icing sugar
  • Cold water, to bind
For the filling
  • 8 ounces (225 grammes) maple flavoured golden syrup
  • 3 ounces (85 grammes) ground almonds
  • 1 medium egg
  • 2 ounces (55 grammes) chopped pecan nuts
  • Zest of half a lemon
  • 1 tablespoon (15 millilitres) lemon juice
  • 12 full pecan nut halves

METHOD
  • Make the dough according to the instructions found here. Flatten the dough into a disc, wrap in cling film, and chill for an hour.
  • When chilled, preheat your oven to 180ºC (350ºF, Gas Mk. 4)
  • Roll out the dough to an eighth of an inch (3 millilitres) thick, and cut into 3 inch (8 centimetre) rounds. Line a 12 hole muffin tin with the rounds, and prick the bases with a fork. Crumple up squares of tin foil to fill each case, and cook for 15 minutes, or until golden.
  • While the cases are baking, prepare the filling. Mix all the filling ingredients except for the nuts in a mixing bowl until smooth.
  • When the cases are cooked, remove from the oven and reduce the temperature to 150ºC (325ºF, Gas Mk. 2). Remove the tin boil balls, and divide the chopped nuts between the cases. Divide the batter between the cases, filling almost to the top, and place a pecan half in each tart.
  • Tap gently on the work surface, and return to the oven for a further 20 to 25 minutes, or until the centres have set and they are golden and crusty on the top.
  • Allow to cool in the tin for 10 minutes before transferring to a wire rack to cool completely.


These tarts are super sweet, in true Halloween treat fashion! Enjoy with caution. These will keep in an airtight container for up to a week, if they last that long.


Friday, 7 October 2016

Halloween 2016: Toffee Apple Doughnuts (Wheat Free)

It's October! Or as I like to call it: Halloween advent. And here's a sticky treat: toffee apple doughnuts!


Since I discovered my inner darkness in my teen years, and also as a result of Mum and Dad making it into a fun event in the year, I've always been fond of Halloween. I like the early dark evenings, the turf fire on at night, and the get-togethers involving food and party games.

Moving into adulthood, unfortunately, Halloween parties become drinking fests, and I find myself yearning for the simpler childhood events that involved wearing a black bin liner (which could make you anything you ever wanted) and eating sweets until I was sick.

One of the sweets that rarely--if ever--graced the Halloween spread in our house was toffee apples. Apple made an appearance in the form of bobbing for them in a mixing bowl full of water, but they never appeared covered in toffee. And in a way that's a good thing, because generally speaking when kids eat them you end up with a house full of skinned, mauled apples with all the toffee eaten off.

As I got older, I experimented with toffee apples and I actually like them, but it's important to use very small, tart apples, which are hard to find. I used to use Pink Ladies, because they're slightly sour and very firm fleshed, but spending ages hovering over the loose apples looking for the smallest ones is time not worth spending.

I experimented with toffee dipping slices of apple, but the surface of the slices was too juicy and the toffee would either run off as I was applying, or melt off over the course of the day, leaving a sticky toffee puddle under the apple slice. Apple slices dip very well in chocolate, however.

So, I decided to try and do something to capture the essence of a toffee apple, but be a small treat that isn't overwhelmingly and insurmountably sickly. And who doesn't like doughnuts?

A little cake doughnut filled with stewed apple and wrapped in a creamy toffee layer provides that instant sugar hit and autumnal feel that you'd get with a toffee apple, but without it eating it being a monstrous task.

FREE FROM
☑ Soya (check for soya lecithin)
☑ Yeast
☑ Wheat
☑ Nuts

CONTAINS
☒ Eggs
☒ Dairy
☒ Gluten
☒ Refined sugar products


INGREDIMENTS


For about 16 mini filled doughnuts
  • 1 pound (455 grammes) doughnut dough (use your favourite recipe, or use this recipe)
  • 1 firm eating apple, like a Granny Smith, Pink Lady, or Gala
  • Two pinches ground cinnamon
  • 1 teaspoon white sugar
  • 2 teaspoons brown sugar
  • 1 teaspoon lemon juice
  • 2 tablespoons water
  • ½ teaspoon cornflour

For the crunchy toffee coating
  • 6 ounces caster sugar
  • 3 ounces golden syrup
  • 3 ounces evaporated milk, or cream
  • 16 wooden lolly sticks

HOW-TO

First, make the apple filling,
  • Peel and core the apple, and cut into half inch (1 centimetre) cubes. Put into a small saucepan with all the ingredients except the cornflour. Bring to the boil, then reduce the temperature to a simmer. Simmer for about 10 to 15 minutes until the apple is tender.
  • Put the cornflour in a small cup, and add a tablespoon of water. Mix into a slurry, then pour into the saucepan slowly, stirring all the time. Cook until the sauce goes back to being transparent, and it has thickened.
  • Once fully cooked, set aside until completely cool; about an hour.

Then, make the doughnuts,
  • Preheat the cooking oil to 180°C (350°F), either in a deep fryer or a heavy saucepan.
  • Roll out the doughnut dough to a quarter inch (5 millimetre) thickness. Cut into as many 3 inch circles as you can, and make pairs of circles. Put half a teaspoon of the apple filling on one circle, brush another circle with water, and make a sandwich. Press the edges together very well, then cut into a 2 inch (5 centimetre) circle, keeping the jam in the centre. This will keep them well sealed. 
  • Repeat until you have run out of circles, then gently mash together and re-roll the trimmings, Continue until you have used all the dough.
  • Cook the doughnuts in the oil, about 3 at a time so as not to overcrowd the fryer. Cook for about 2 or 3 minutes on either side, until golden brown and puffed. Drain on kitchen towel then allow to cool on a wire rack.

Finally, make the toffee and assemble,
  • Line a baking sheet with non-stick baking paper, or a silicone liner.
  • In a medium saucepan, combine all the toffee ingredients and melt together slowly over low heat, until every sugar grain has dissolved.
  • Increase the heat to medium, and cook at a slow boil for about 10 minutes. If you have a sugar thermometre, it should read between 146 and 154°C (295 to 309 °F). If using the cold water test, a small drop in a glass of ice-cold water should snap cleanly.
  • Immediately remove from the heat, and place on a folded tea towel to protect the work surface. Take a lolly stick, dip the very tip in the toffee, and stick it into a doughnut. Then dip the doughnut into the toffee, twirling it to cover it completely in toffee. Tap gently on the edge of the saucepan to drip off the excess, then place it on the tray, holding it for a few seconds untilit can stand upright by itself.
  • Repeat this process with the remaining toffee and doughnuts. If the toffee starts to set, put it over a low heat until it goes runny again.
  • If you have any toffee left over, you can pour it out on another baking sheet lined with non-stick baking paper, or a silicone cake tin.

This is a tasty alternative to a full toffee apple, and they have a lovely fluffy doughnut added to boot. This should be a delicious treat for Halloween, or indeed Bonfire Night on November 5th.

Friday, 10 June 2016

Another Cautionary Tale on the Dangers of Novelty Cakes: Super Goth Birthday Cake

Like what I said in my previous cautionary tale of novelty baking, I’ve never been one for crafting novelty cakes of any kind really. But following on from my enforced sedate celebrations of World Goth Day, I made up for it on returning to my Homeland my making a birthday cake for one of my closest friends.

My friend Caroline and I met in art college in 2008, and we've been good friends ever since. She likes dragons and heavy metal and black clothes, like I do, and in celebration of our shared gothy interests I decided to do something very, very different: a purple cake with black icing.


However, black icing is incredibly difficult to make and work with. The purple cake was simply a matter of adding some violet food colouring to my usual sponge cake recipe, but the icing was a completely different story altogether: you need a Hell of a lot of black food colouring.

In fact, I actually didn't have enough black colour. Even starting with buttercream icing that I had made using 80% dark chocolate to get a good, dark base, an entire tube of Dr Oetker gel still wasn't enough to get it jet black. I then had to start adding other colours from my inventory.

Eventually, I had used black, blue, green, and red to get it as dark as I needed. And using that amount of colouring has some unfortunate side effects: staining of the mouth, tongue, and teeth, and digestive upset.

Next time, I think I may just glaze the finished iced cake with black mirror glaze or something. But I don't think I'll be working with completely black icing anymore!

I would have got some photos of the inside of the cake too, to show off the lovely purple interior, however we all got so carried away with eating it that I forgot! Sometimes these things are better off enjoyed in the moment, I suppose.

The next major birthday I'll have to cater for will by my sister's in early August. She usually goes for cheesecake, or super chocolate cake. Like I've said in many blogs past, trying to come up with new ideas for birthday cakes gets very tedious!

Friday, 20 May 2016

Mocha Cupcakes: Chocolate and Coffee Join Forces (Gluten Free; Dairy Free Option)

Greetings from the UK!

I'm currently on holiday visiting relatives in Kent, so my recipes will be few and far between. My cousin has a fantastic new kitchen which is great to cook in... so I'll probably be experimenting a bit while I'm here...

Looking for a cutesy cupcake project? Look no further! I decided to make some of these little lovelies for a film night I was having at mine. I needed to stay up all night to be at a gig which started at 2:30am (it was for a worthy cause), so I made some snacks for the journey. I actually didn't last: I had to go to bed around 11:30pm. So, behold the mocha cupcakes!


It was actually last week that this happened, but I didn't get around to writing this post until now: things have been busy getting ready to go abroad, going to visit friends in Roscommon, and performing midnight gigs.

I was wandering through Tiger -- which is essentially a slightly posher and more Scandinavian discount shop -- and found these lovely dark chocolate 'coffee beans'. Originally, I thought they were chocolate coated coffee beans, which are the business, but they weren't: they were coffee infused 52% dark chocolate shaped in little bean shapes. And in fairness I think that's better.


I've also been practising my icing swirl technique recently, and felt like a bit of an eejit: I never really realised that to make tall icing swirls, you need to pipe a dollop in the centre of the cake, and swirl around it. Obvious when you think about it... but it had never occurred to me to do it like that.

To make these, I used my go to light and fluffy sponge cake mixture, as opposed to the slightly denser cake mixture I use for layer cakes. I replaced the cornflour with cocoa powder to make the cakes chocolate flavoured, and I also used gluten free plain flour instead of spelt flour. They worked out really well! Dare I say, that recipe works better with gluten free flour than with spelt or wheat flour. 

I then made some buttercream, using strong espresso to taste, then adjusting the consistency -- if needed -- with some milk. Swirling on the icing using a closed star nozzle, I topped it off with a coffee bean chocolate.


I think I might make some when my cousins come over for dinner on Thursday, if they're fans of coffee and chocolate.

Tuesday, 10 May 2016

Birthday Cupcakes and Centre Piece Cake: Wheat-Free Lemon Sponge

As I have mentioned in many, many, many blog posts before now, when one has made at least five birthday cakes a year for roughly eleven years, you run out of ideas after a while. Sometimes, you need to shake it up a bit.


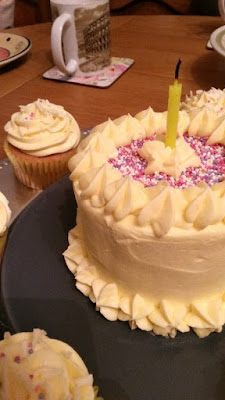
I decided this year to act on inspiration from a wedding I was at a few years ago: they had no big wedding cake, but they have a whole ream of little fairy cakes, iced with white buttercream and decorated with fondant shapes following the theme of Alice in Wonderland. They had a little centre piece cake that they could cut for the photos, but because the cakes were all individual there wasn't the hassle of cutting up a whole cake and serving it to all the guests.

I decided to take this inspiration and use it to make my mother's birthday cake this year: I made a small cake -- using the same tin as I used for the photoshoot cake -- and then made a load of little cakes to go with it, one for each guest at the birthday dinner.

The photos for this one aren't so great because it was the evening time when I got around to take them: my phone battery is cat these days, and that's what I use for my camera.

This was a lemon cake with nice zingy icing, like last year. My mother like lemon...

FREE FROM
☑ Soya (check for soya lecithin)
☑ Yeast
☑ Wheat
☑ Nuts

CONTAINS
☒ Eggs
☒ Dairy (dairy substitutes can be found in italics)
☒ Gluten
☒ Refined sugar products


INGREDIMENTS


For one 4 inch sponge cake:
  • 1½ ounces (40 grammes) white spelt flour
  • ½ ounce (15 grammes) cornflour
  • ½ teaspoon (3 millilitres) baking powder
  • Pinch of salt
  • 1 medium egg
  • 1½ ounces (40 grammes) caster sugar
  • 1 ounce (30 grammes) sunflower oil
  • 1 fluid ounce (30 millilitres) milk, or milk alternative
  • 1 teaspoon (5 millilitres) vanilla essence
  • Zest of half a lemon
  • Optional: 2 tablespoons of poppy seeds, or hundreds and thousands, for visual interest
Repeat this quantity of batter to make 6 individual fairy cakes, meaning you will need double the above recipe overall.

For the icing:
  • 6 ounces (170 grammes) butter, softened or margarine
  • 12 ounces (340 grammes) icing sugar
  • Juice of half a lemon
  • 1 teaspoon vanilla essence
  • 1 to 2 tablespoons (15 to 30 millilitres) milk or milk alternative,
     to adjust the consistency
  • Hundred and thousands
  • A bar of white chocolate

HOW-TO

First, make the centre piece cake,
  • Make the cake mixture according to this recipe, using a greased and floured 4 inch round cake tin. I use a tin from a shop-bought steamed pudding. Bake at the recommended temperature for about 25 to 30 minutes.
  • Bake according to the recipe, then once it is out of the oven immediately drop onto the work surface from a height of roughly a foot (30 centimetres); that will reduce the chances of it shrinking. Allow to cool completely.

Then, make the fairy cakes,
  • Repeat the above recipe, lining a muffin tin with 6 large cake cases. Use yellow ones if you can find them.
  • Divide the recipe between the cake cases, which should be at three-quarters full. Bake this time at 190ºC (375ºF, Gas Mk.5) for about 15 minutes.
  • Once cooked, drop them on the work surface also. Transfer to a wire rack to cool completely.

Now to decorate,
  • Make the buttercream according to this recipe, if you don't know how to make buttercream already, starting off with the lemon juice and only adding the milk if the consistency needs adjusting.
  • Use just under a half of the icing to decorate the fairy cakes. Sprinkle the tops with a small amount of hundreds and thousands, then shave some white chocolate onto them using a vegetable peeler directly on the chocolate bar.
  • Cut the dome off the cake, cut it in half, then place upside down on the serving platter so the base is now the top. Fill and crumb coat then chill for an hour, then coat with a second coat, leaving about 6 ounces (170 grammes) of icing to pipe the rosettes around the top and bottom.
  • Before you pip the rosettes, cover the top of the cake with the sprinkles, leaving about half an inch of a border (about a centimetre), then pipe the rosettes on top. Pipe on in the middle to hold the candle.
  • Allow to set completely, either in the fridge for up to an hour, or on the work surface for up to 3 hours.

Friday, 10 April 2015

Treacle Tarts, without Breadcrumbs (Wheat Free)

Last autumn, I tried my hand at making a treacle tart, but I shook it up by adding some apple to it to make something that was somewhat toffee apple inspired. I was delicious, but very much an experiment. I was going to try the recipe again, but then I just... forgot about it. Until this week, when my companion's mother invited me round for tea, and requested in jest some treacle tarts as payment for her company. So, here they are!


However, these are a little different to traditional treacle tarts, insofar as they don't use breadcrumbs. I used breadcrumbs the last time, and found it a little squishy, and I wanted something with a little more firmness. Also, I don't eat bread so I find buying bread just to make breadcrumbs is sort of backwards. So, I researched what I could use instead, on many a baking forum, and one forum user suggested ground almonds.


They turned out really well, and my companion's family liked them (so I think they think I'm good girlthing material for their child/sibling), the mother comparing them to something like a gingerbread tart. Generally speaking, treacle tart isn't spiced, but I like to add a little bit to mine just for flavour.

FREE FROM
☑ Soya (check for soya lecithin)
☑ Yeast
☑ Wheat

CONTAINS
☒ Eggs
☒ Dairy
☒ Gluten
☒ Nuts
☒ Refined sugar products

INGREDIMENTS
For four 4 inch (10 centimetre) tarts, or one 7 inch (18 centimetre) round tart

For the pastry:
  • 1 ounce icing sugar
  • 2 ounces butter, at room temperature, cut into pieces
  • 3 ounces spelt flour
  • 1 ounce cornflour
  • 1 tablespoon cold milk/water

For the filling:
  • 1 ounce treacle
  • 5 ounces golden syrup
  • 4 ounces ground almonds
  • 1 medium egg
  • 1 teaspoon lemon juice
  • 1 teaspoon lemon zest
  • ½ teaspoon ginger
  • ¼ teaspoon cinnamon 


HOW-TO
  • Preheat the oven to 180˚C (350˚F, Gas Mk.4).
  • Put the butter, sugar, flour and cornflour in a mixing bowl and rub together with your fingertips into a crumble.
  • Mix in about a tablespoon of milk (or water), mixing with your hand, until you get a nice smooth, pliable dough.  Roll out to a ¼ inch (0.5 centimetre) thickness.
  • This amount will line one 7 inch round tart tin, or 4 four-inch tarts, and you don’t need to grease them. Cut out rounds to fit the individual cases, or press into a round tart tin, using the rolling pin to trim the excess falling over the edges.
  • Gently heat the treacle and syrup together until warm and runny, either in a saucepan over low heat, or in a heatproof jug in the microwave for about a minute on medium power.
  • Remove from heat, and stir in the ground almonds, spices, lemon zest and juice and mix thoroughly. Allow the mixture to cool slightly, so the almonds can soak.
  • Once cool enough to touch add the egg and beat immediately until smooth and pourable. Divide the filling among the individual pastry cases, if using, or pour into the large pastry case.
  • Bake for 20 to 25 minutes for four individual tarts, or 25 to 30 minutes for one large tart.
  • Allow to cool completely in the tin before removing. The pastry will slightly shrink, making it easier to remove.

NOTES
You can use any leftover dough to decorate the tarts. Traditionally, treacle tarts are decorated with a lattice pattern, the weaves sometimes being twisted. I used some cut outs because I didn’t have enough left over dough to make lattices.

THIS TIME IN 2014: No blog
THIS TIME IN 2013: Gingerbread of the Gingeriest Proportions (Wheat Free)

It's been a while! Happy 9th Anniversary!

  It's been a while. The past two years have been a helluva a ride. This year is gonna hold some big changes for this blog. I'm comp...