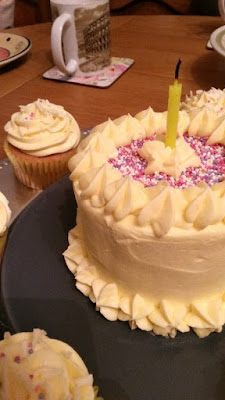
I decided to take this inspiration and use it to make my mother's birthday cake this year: I made a small cake -- using the same tin as I used for the photoshoot cake -- and then made a load of little cakes to go with it, one for each guest at the birthday dinner.
The photos for this one aren't so great because it was the evening time when I got around to take them: my phone battery is cat these days, and that's what I use for my camera.
This was a lemon cake with nice zingy icing, like last year. My mother like lemon...
☑ Soya (check for soya lecithin)
☑ Yeast
☑ Wheat
☑ Nuts
CONTAINS
☒ Eggs
☒ Dairy (dairy substitutes can be found in italics)
☒ Gluten
☒ Refined sugar products
☑ Yeast
☑ Wheat
☑ Nuts
CONTAINS
☒ Eggs
☒ Dairy (dairy substitutes can be found in italics)
☒ Gluten
☒ Refined sugar products
INGREDIMENTS
For one 4 inch sponge cake:
- 1½ ounces (40 grammes) white spelt flour
- ½ ounce (15 grammes) cornflour
- ½ teaspoon (3 millilitres) baking powder
- Pinch of salt
- 1 medium egg
- 1½ ounces (40 grammes) caster sugar
- 1 ounce (30 grammes) sunflower oil
- 1 fluid ounce (30 millilitres) milk, or milk alternative
- 1 teaspoon (5 millilitres) vanilla essence
- Zest of half a lemon
- Optional: 2 tablespoons of poppy seeds, or hundreds and thousands, for visual interest
Repeat this quantity of batter to make 6 individual fairy cakes, meaning you will need double the above recipe overall.
For the icing:
- 6 ounces (170 grammes) butter, softened or margarine
- 12 ounces (340 grammes) icing sugar
- Juice of half a lemon
- 1 teaspoon vanilla essence
- 1 to 2 tablespoons (15 to 30 millilitres) milk or milk alternative,to adjust the consistency
- Hundred and thousands
- A bar of white chocolate
HOW-TO
First, make the centre piece cake,
- Make the cake mixture according to this recipe, using a greased and floured 4 inch round cake tin. I use a tin from a shop-bought steamed pudding. Bake at the recommended temperature for about 25 to 30 minutes.
- Bake according to the recipe, then once it is out of the oven immediately drop onto the work surface from a height of roughly a foot (30 centimetres); that will reduce the chances of it shrinking. Allow to cool completely.

Then, make the fairy cakes,
- Repeat the above recipe, lining a muffin tin with 6 large cake cases. Use yellow ones if you can find them.
- Divide the recipe between the cake cases, which should be at three-quarters full. Bake this time at 190ºC (375ºF, Gas Mk.5) for about 15 minutes.
- Once cooked, drop them on the work surface also. Transfer to a wire rack to cool completely.
Now to decorate,
- Make the buttercream according to this recipe, if you don't know how to make buttercream already, starting off with the lemon juice and only adding the milk if the consistency needs adjusting.
- Use just under a half of the icing to decorate the fairy cakes. Sprinkle the tops with a small amount of hundreds and thousands, then shave some white chocolate onto them using a vegetable peeler directly on the chocolate bar.
- Cut the dome off the cake, cut it in half, then place upside down on the serving platter so the base is now the top. Fill and crumb coat then chill for an hour, then coat with a second coat, leaving about 6 ounces (170 grammes) of icing to pipe the rosettes around the top and bottom.
- Before you pip the rosettes, cover the top of the cake with the sprinkles, leaving about half an inch of a border (about a centimetre), then pipe the rosettes on top. Pipe on in the middle to hold the candle.
- Allow to set completely, either in the fridge for up to an hour, or on the work surface for up to 3 hours.


No comments:
Post a Comment