Showing posts with label cherry. Show all posts

Monday, 13 March 2017

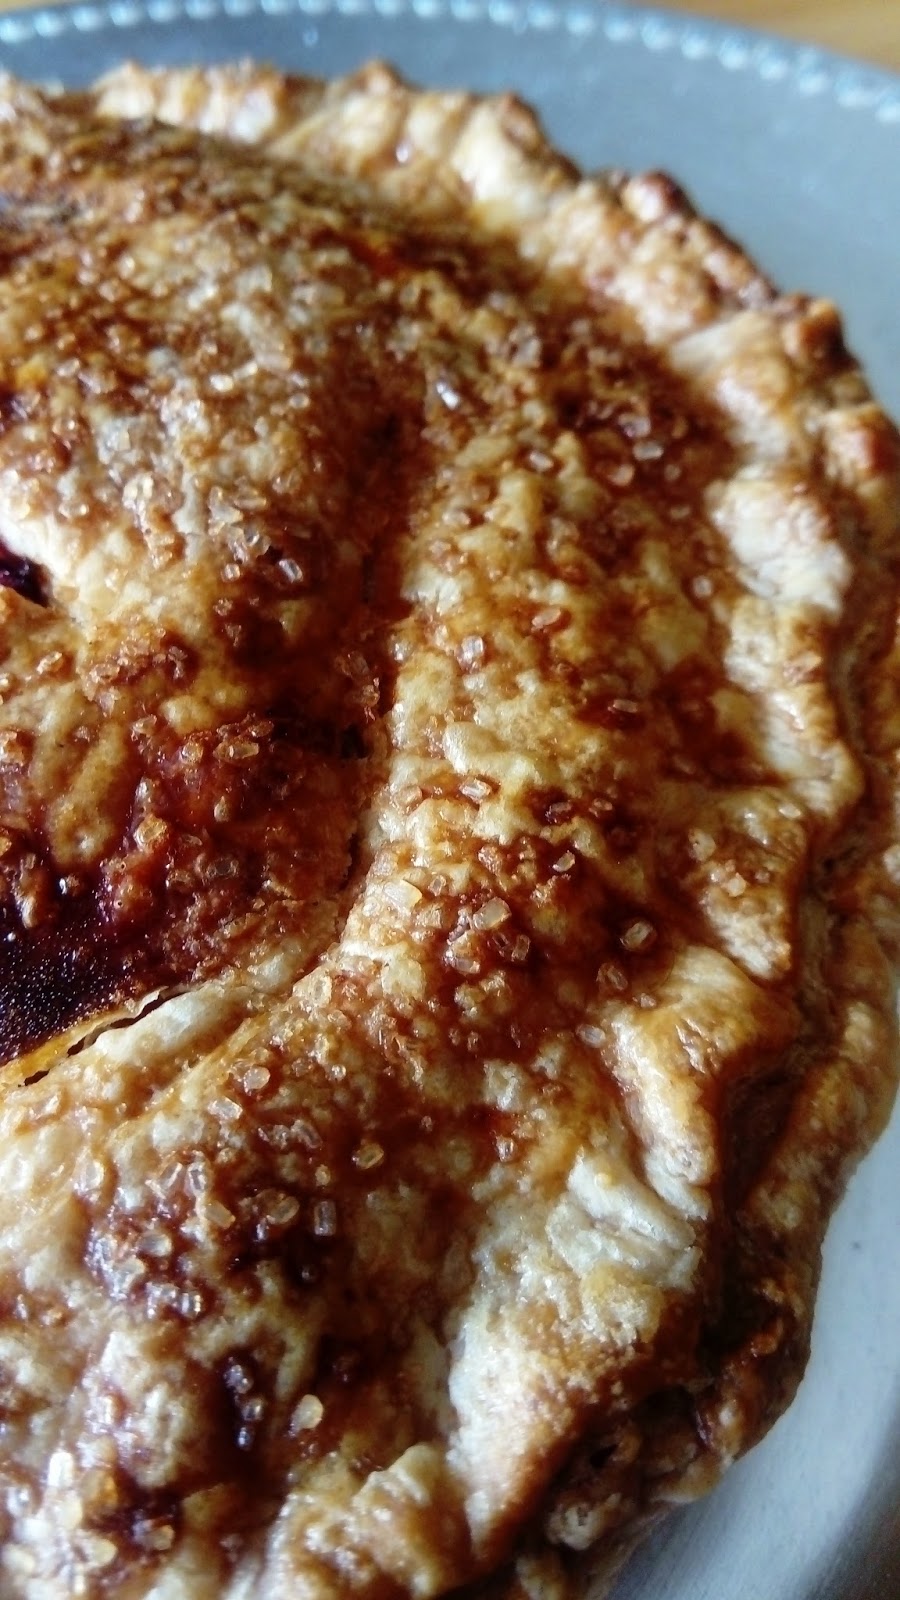
Pi Day Special: Cherry Pie (Wheat- and Egg Free, with Dairy Free Option)

Nothing can beat tender, crisp, flaky pastry wrapped a sweet and sour and slightly spicy fruity filling, and that's why this cherry pie is so delicious!


I love fruit tarts, particularly apple tart, but they can really be made or broken by their pastries: sometimes it can be too hard or too crumbly; too firm or too soft; too thick or too thin. It's a very subjective thing. Personally, I love a pastry that makes a fabulous crispy sound when you bite into it, and it firm enough to hold its shape when cut. This is such a pastry.

The trick to great pastry is to make sure everything is cold, cold, cold! You've seen it repeated in cookery blogs all over the internet, and cooking personalities on the telly say it over and over again, but they wouldn't say it if it weren't true. The trick to tender flaky pastry is cold dough, hot oven (this is also true of popovers and Yorkshire pudding), and there are a few ways of achieving this with very little effort.
1. Hands are warm, use them as little as possible
Hands generate heat, as does working the pastry too much. Try and be as cold and distant as possible with your pastry: use cold knives to mix, not your hands, and when you do use your hands, only use the very tips of your fingers.

2. Keep everything in the fridge, even the tools...
Like many people advise when whipping cream, it's wise to chill your tools: use a glass bowl if you can, and chill the knives, the box grater, etc.

3. ... and the flour...
Yes: chill your flour for at least half an hour beforehand. If you can freeze it, even better. Same goes for the butter and vegetable fat (I use a combination for maximum flakiness); and make sure the water is as cold as you can get it without it turning into ice cubes.

4. ... and the filling.
Make sure whatever filling you're using it also cold. If you put warm, or God forbid hot, filling into the cold pastry, it will melt all that fat that you've been trying so hard to keep cold all this time; you'll undo pretty much all of your hard work.

5. Chill between steps
After making the dough, chill it. After rolling the dough, chill it. After lining the dish, chill it. If at any point you see the butter or fat softening in the dough, chill it. Heck, even if you can chill the pie after it's fully assembled for a few minutes, do so. Obviously, this is best case scenario, so in the recipe I have outlined chilling only where completely and utterly necessary.

Keeping that in mind, making the dough it really simple. No rubbing of fat into flour necessary: the box grater does all the hard work for you!

So, without further ado, let's get baking...

INGREDIMENTS
For one 9 inch (22 centimetre) round pie

For the pastry
  • 12 ounces (340 grammes) white spelt flour, preferably cold
  • 3 ounces (85 grammes) butter or margarine, very cold
  • 3 ounces (85 grammes) white vegetable fat, very cold
  • 1 ounces (30 grammes) caster sugar
  • A few drops of lemon juice, or white vinegar
  • Up to 5 fluid ounces (150 millilitres) very cold water, to bind
  • Good pinch of salt
  • 1 egg, beaten with 1 tablespoon (15 millilitres) of water, or use all milk for an egg free version
  • Coarse Demerara sugar, for sprinkling
For the filling
  • Two 14 ounce (400 gramme) can of cherries in syrup, I used black cherries but you can use whatever canned cherries you want
  • 4 teaspoons (20 millilitres) cornflour
  • 1 tablespoon (15 millilitres) lemon or lime juice
  • 1 tablespoon (15 gramme) sugar, white or brown
  • ¼ teaspoon (1 millilitre) mixed spice
  • Generous pinch of salt

HOW-TO
To make the filling,
  • Empty one can into a saucepan, and drain the other can. Add the drained cherries to the pan, and save the syrup for another project. In a small bowl, mix the the cornflour, sugar, lemon or lime juice, mixed spice, and salt with a little water until it becomes a slurry.
  • Add in the slurry, stir through thoroughly, and then cook over medium high. Bring to the boil, and boil continuously for about 3 to 4 minutes.
  • Pour immediately into a shallow bowl, and cover the surface of the filling directly with cling film. Allow to cool to room temperature before chilling until completely cold, about 2 hours.

To make pastry,
  • In a large mixing bowl, add the flour and salt, then grate in the butter and the fat on the coarse side, dipping the grating side in the flour between strokes to prevent clumping.
  • Very gently rub and break up the strands of butter and fat between your fingers to make the pieces smaller, about the size of peas.
  • Add in the lemon juice or vinegar, then add in a tablespoon or two (15 or 30 millilitres) of the water. Use the tip of a table knife to mix the water through. Continue this until you get a nice soft dough. It shouldn't be sticky. I added about 8 tablespoons in total myself, but it depends a lot on humidity and flour quality.
  • Make the dough into a disc, wrap in clingfilm, and chill in the fridge for an hour, or the freezer for half an hour.
To assemble the pie
  • Preheat the oven to 180°C (350°F, Gas Mk.4) and lightly (and when I say lightly, I mean it) grease a 8 or 9 inch (20 or 22 centimetre) pie dish.
  • Take the dough out of the fridge or freezer, then cut into two pieces, roughly two-thirds and one third. Wrap the smaller piece and return to the fridge.
  • Roll out the larger piece to about quarter of an inch thick (5 millimetres) on a flour surface. Drape into the pie dish and press into shape. Trim the overhang.
  • Pour in the completely cooled filling into the pastry, then wet the edges with some egg wash or milk.
  • Take the remaining dough out of the fridge, and place it on the work surface on top of the trimmings. Roll out as before, then drape over the topping, pressing onto the wet rim of the base layer. If you want the Pi symbol cut into it like I have, do that before draping and lift it very carefully.
  • Once again, trim the overhang with a straight cut, or a crimped cutter, or in whatever way you want. Brush the top with eggwash or milk, and sprinkle with the coarse Demerara sugar.
  • Pierce the top of the pie if you've not done the Pi symbol to allow steam to escape.
  • Place on the centre rack of the preheated oven, and bake for 40 to 50 minutes, or until golden brown. The filling is precooked, so you're just cooking the pastry. If it browns too quickly on top, cover with foil to allow the bottom crust to fully cook (don't make my mistake and let the top get a sun tan!)

No blogs on this day in previous years.

Friday, 12 August 2016

Cherry Chocolate Fairy Cakes

Whether it's black forest gateau, liqueur chocolates, covered berries, chocolate bars, or biscuits and cakes, chocolate and cherries belong together. Forever, and always.

I've done the black forest thing a few times, but this time I thought I'd try something a little bit different. In the traditional gateau, it's chocolate cake, fresh cream, and fresh cherries and cherry jam, whereas this time I thought I would try mix the cherry and the cream together, in a cherry butter cream.

However, here in Ireland, cherries are incredibly expensive. Because they have to be imported from southeastern England or the continent, they can be up to €13 ($14.50, £11.30) per kilogram. Also, there's no such thing as cherry essence in the shops. So, I had to improvise.

Here, we can buy cherry juice drink. It's generally in the fruit juice and juice drink section of the supermarket. The one I buy is 25% cherry juice. Of course, you can't add cherry juice directly to the buttercream, otherwise it'll be too runny, but if you reduce it to a syrup it works just as well.

If you have access to cherry essence or flavour oil, you can just use that instead.

FREE FROM
☑ Soya (check for soya lecithin)
☑ Yeast
☑ Wheat
☑ Nuts

CONTAINS
☒ Eggs
☒ Dairy (dairy substitutes can be found in italics)
☒ Gluten
☒ Refined sugar products


INGREDIMENTS


For 12 standard fairy cakes
  • 3 ounces (85 grammes) white spelt flour
  • 1 ounce (30 grammes) cocoa powder
  • ½ teaspoon (3 millilitres) baking powder
  • Pinch of salt
  • 2 medium eggs
  • 4 ounces (115 grammes) caster sugar
  • 2 ounce (55 grammes) sunflower oil
  • 2 fluid ounces (30 millilitres) warm water
  • 1 teaspoon (5 millilitres) vanilla essence

For the icing:
  • 3 ounces (85 grammes) butter, softened or margarine
  • 3 ounces (85 grammes) block vegetable fat, softened
  • 12 ounces (340 grammes) icing sugar, sifted
  • 4 fluid ounces (120 millilitres) cherry juice drink, at least 25% fruit juice content, like this one
  • 1 teaspoon (5 millilitres) vanilla essence
  • Red and blue food colouring

To make the chocolate coated cherries,
  • 12 glacé cherries (choose the roundest, prettiest ones from the tub)
  • 1 ounces (30 grammes) dark chocolate
  • 2 teaspoons (10 millilitres) sunflower oil

HOW-TO

First off, make the chocolate cherries,
  • Wash and dry the glacé cherries to remove all the excess syrup.
  • To make the coating, melt the chocolate and oil together in a cup or small bowl, either in the microwave in 30 second increments, or over a pan of simmering water.
  • Line a small tray or chopping board with a sheet of non-stick baking paper.
  • Using a cocktail stick, pick each cherry up through the hole in the top and dip in the chocolate. Slide each cherry off onto the paper lined tray. Refrigerate for about an hour.

Then, prepare the syrup for the icing,
  • In a small saucepan, boil the cherry juice until reduced by half. It should be slightly syrupy.
  • Leave the syrup aside to cool completely

Then, make the cakes,
  • Make the cake mixture according to this recipe, using a 12 hole muffin tin lined with pink cake liners (or white, if you can't get green). Divide the mixture between all the cases, and bake at 180ºC (350ºF/Gas Mk. 4) for about 20 minutes. Once cooked, transfer the cakes to a wire rack and cool completely.

Now, assemble the masterpieces,
  • To make the icing, beat the butter and fat together with an electric beater, or with a wooden spoon and a lot of elbow grease, until light and fluffy and well combined.
  • Add in the vanilla essence, and about 3 tablespoons (45 millilitres) of the cooled cherry syrup and half the icing sugar and beat again until fully combined.
  • Add the rest of the icing and continue to beat until you get a nice smooth and creamy icing. If you think the icing is too stiff, add cherry syrup until it's the right conistency.
  • Add the red colouring a drop at a time until it's a deep pink colour, then add a drop or two of blue colouring to give it a slightly darker, more cherry like shade.
  • Fit a piping bag with a medium or large star nozzle, and pipe swirls on top of each cake. I start in the centre of the cake, swirl around the edge, then continue to swirl upwards to have two layers and a peak on top.
  • Pop a chocolate glacé cherry on the top of each cake. You could add some sprinkles if you like, too.


The cherry taste in the buttercream is nice and subtle, and a lot more natural than the intense -- almost synthetic -- taste of a flavour oil or essence. And the chocolate coated glacé cherries are a nice touch, and I think I'll be repeating that in the future.

Friday, 27 March 2015

Bakewell Tart Slices (Wheat Free)

Recently I've been feeling a little lacking in inspiration in the kitchen, as I've just been baking the same old things for months. So, I thought I'd try something completely new and different, and try my had at making some Bakewell tart, and here's the result!


Bakewell is a town in County Derbyshire (pronounced DAR-bi-shur, for those who take that first letter E literally), and this confection is said to have been made there as far back as the mid 1800s. Nowadays, it is best known as a little individual cake manufactured by Mr Kipling, which has fondant icing and a glacé cherry on top.

Although the original Bakewell tart recipe doesn't include the aforementioned icing and cherry, the combination of pastry crust, raspberry jam, and almond sponge (also known as frangipane) is absolutely delightful. It's one of my Dad's favourite things.
Usually the name Bakewell tart conjures up the image of individual tarts in foil cases, but it is traditionally baked as a large round tart. However, I decided to go tray bake on it and make Bakewell slices.
FREE FROM
☑ Soya (check for soya lecithin)
☑ Yeast
☑ Wheat

CONTAINS
☒ Gluten
☒ Refined sugar products
☒ Dairy
☒ Eggs
☒ Nuts (Almonds)

INGREDIMENTS:
To make one 4x8 inch (10x20 centimetre) tart, which yields eight decent slices

For the base:
  • 3 ounces (85 grammes) white spelt flour
  • 1 ounce (30 grammes) cornflour
  • 2 ounces (55 grammes) butter or margarine, at room temperature
  • 1 ounce (30 grammes) icing sugar
  • 4 tablespoons (60 millilitres) raspberry jam
For the filling:
  • 1 ounce (30 grammes) ground almonds
  • 1 ounce (30 grammes) white spelt flour
  • 1/2 teaspoon baking powder
  • Pinch of salt
  • 2 ounces (55 grammes) butter or margaine
  • 2 ounces (55 grammes) caster sugar
  • 1 medium egg
  • Several drops of almond essence
  • 1 fluid ounce (30 millilitres; 2 tablespoons) milk, or water or milk alternative
For the topping:
  • 4 ounces (115 grammes) icing sugar
  • 1 tablespoon (15 grammes) butter, or margarine
  • Water, to mix
  • 4 whole glacé cherries, halved

METHOD
  • Preheat your oven to 180°C (350°F, Gas Mk.4, or moderate).
  • In a small mixing bowl, beat together the butter and icing sugar until fluffy with an electric mixer or wooden spoon. Add in the two flours and mix into a soft but crumbly dough.
  • Tip the dough into an ungreased loaf tin and press down into a smooth and even layer. To make it easier, moisten your fingertips to stop the dough sticking to your hands.
  • Spread the raspberry jam over the base in an even layer, like you were putting jam on toast. You don't want it too thick. Set aside.
  • In the same bowl, beat the butter and caster sugar until fluffy with the same beaters or wooden spoon. Beat in the egg until fully mixed, then then the almond essence. Different brands have different strengths, so go by taste if you don't have an issue with raw egg: it should have a good almondy taste that's not offensively strong.
  • Put the almonds, spelt flour, salt, and baking powder in a sieve. Sieve in half the ingredients into the bowl, mix in, then add the milk, mix in, then add the last of the dry ingredients and beat to a smooth batter.
  • Spoon the mixture carefully over the jam in blobs, and then smooth out without disturbing the jam too much. Even out the surface, and then put in the centre of the preheated oven and bake for 25 to 30 minutes.
  • Once removed from the oven, cool fully in the tin on a wire rack.
  • When your tart has completely cooled, make the icing. Melt the butter in a small bowl, and add in the icing sugar and mix until the icing sugar is moistened with the melted butter. Add water, a teaspoon at a time, until it is a thick but spreadable icing. Spread all over the top of the tart, and press 8 glacé cherry halves into the top of the tart, spaced evenly. 
  • Allow to set for at least 3 hours. Cut unto eight even slices, trimming the sides if you like to make it neater.

The combination of crumbly, butter pastry, with the moist soft almondy sponge, and the tartness of the fruity jam, topped off with the campness of fondanty icing and glacé cherries, is absolutely wonderful; and quintessentially English. This turned out so well, and it went down very well with the family.


THIS TIME IN 2014: Spanner in the Works: White Spelt Flour No Longer Exists
THIS TIME IN 2013: Basic Sponge Cake (Wheat Free)

Friday, 6 February 2015

Mini Black Forest Cheesecakes (Wheat Free)

As I mentioned in my last post, Sunday just passed was my 482nd birthday, give or take, and I celebrated it in true Sweetie Pie style: with lots of different kinds of cake. I already wrote about my birthday strawberry cream gateau, so today I'm writing about my latest cheesecake experiment: the black forest cheesecake.


The idea for this just sprung into my mind when I was trying to devise some nice Valentine desserts, and also I just like merging dessert ideas. This one is fairly simple: chocolate biscuit base, vanilla filling with cherry jam, topped off with chocolate glaze and a fresh cherry.


 I was originally thinking I'd put glacé cherries and cream swirls on top, to make it extra retro kitschy, but fresh berries were on offer in Dunnes stores so I bought a pack of strawberries and cherries for a fiver. Next time I make these, I'll use glacé cherries; and I will also not take them out of the oven five minutes early (whoops....)

Yes, these sunk a little bit in the middle, unfortunately. I removed the tray from the oven a few minutes too early and it shocked the mixture. But I fixed it with chocolate glaze and a cherry, in the true spirit of my mother's teaching, who told me as a child to fix sunken cakes by "covering them in custard".

The chocolate glaze was also a little firm, in retrospect. I should have used butter in addition to sunflower oil; I have included the altered glaze recipe. All in all, there are many ways I could have made these even more awesome than they already are.

INGREDIMENTS
For 12 muffin case sized cheesecakes

For the base:
  • 1 ounce (30 grammes) icing sugar
  • 2 ounces (55 grammes) butter, at room temperature
  • 3 ounces (85 grammes) white spelt flour
  • 2 teaspoons (10 millilitres) cocoa powder

For the cheesecake mixture:
  • 8 ounces (225 grammes) cream cheese, room temperature
  • 2 ounces (55 grammes) caster sugar
  • 1 medium eggs, separated
  • 2 tablespoons (30 millilitres) whipping cream, or plain yogurt
  • 2 teaspoons (10 millilitres) vanilla essence, or the seeds of 1 vanilla pod
  • Pinch of salt
  • 6 fluid ounces (180 millilitres) cherry jam, or mixed fruit jam

For decoration:
  • 3 ounces (85 grammes) dark chocolate
  • 1 ounce (30 grammes) sunflower oil
  • 1 ounce (30 grammes) butter
  • 12 fresh or glacé (candied) cherries

METHOD

  • Preheat your oven to 150°C (300°F, Gas Mk.2, or very moderate). Line a 12 indent muffin tin with large cake cases (muffin cases).
  • Make the base by mixing the butter and icing sugar together with a wooden spoon, then work in the flour and cocoa until it becomes crumbly. Divide the crumble between the 12 cases and press down gently with the back of a teaspoon.
  • Prepare the cheesecake filling using this recipe, omitting the coconut milk, replacing the lime zest and juice with the whipping cream (or yogurt), and adding the vanilla with the cheese mixture before mixing with the egg whites.
  • Put a tablespoon of cherry jam in the centre of each cake atop the biscuit base, and then divide the mixture between the cases, making sure to cover the cherry jam.
  • Bake the cakes in the oven for 20 to 25 minutes, or until set around the edges but still slightly jiggly in the centre. Remove from the oven and cool completely in the tin on a wire rack.
  • Once cooled, make the topping by melting the chocolate, butter and oil in a bowl over simmering water, or in the microwave for 1 minutes intervals on the "Defrost" setting. Once melted, pour about 2 teaspoons of the topping onto each cake. Swirl the cake around the coat the entire surface.
  • Put a cherry on the top of each cake, sitting it into the chocolate. Put in the fridge to cool and set for at least 4 hours, or overnight.

This is actually a recipe I hope to make a how-to video of sometime soon, so keep your eyes peeled! I like the daintiness of the cherry on top, but overall the dessert is quite tasty.


Monday, 15 April 2013

Black Forest Gâteau: a Retro Classic? (Wheat Free)


I was researching the old Black Forest Gateau recently as a friend of mine - who was celebrating her birthday yesterday - told me it was her favourite cake. Chocolate, cherries and cream: what's not to like? I always thought it was more finicky and complex than chocolate cake, cherry jam and sweetened cream, but I was wrong, it seems. But in my research I came across loads of recipes that quoted the Black Forest Gateau as a 'retro classic', which I thought was odd. Surely, people still eat Black Forest Gateau, it's not like a by-gone thing: my corner shop's bakery makes a mean Black Forest Gateau, and has several on display every day; in fact most bakeries do. Am I missing something?

Anyway! I decided to bundle together the ingredients needed for the cake, but it turns out that Lidl, who used to sell cherry jam, has realised people don't like it and has stopped selling it. If a shop near you sells cherry jam, by all means use it instead of the cherry filling I've devised.

INGREDIMENTS:

For cherry filling:
  • 2 x 15 ounce (425 gramme) cans of black cherries in light syrup (or Morello cherries, if you can get them)
  • 2 teaspoons cornflour
  • 1 tablespoon caster sugar
  • Optional: 1 tablespoon lemon juice

For two 9 inch (23 centimeter) round sandwich cakes
  • 5 ounces (140 grammes) spelt flour
  • 3 ounces (85 grammes) cornflour
  • 2 ounces (55 grammes) cocoa powder
  • 2 teaspoons baking powder
  • 5 medium eggs, at room temperature
  • 2½ ounces (70 grammes) soft brown sugar
  • 5 ounces (140 grammes) caster sugar
  • 1 teaspoon vanilla essence
  • 2½ ounces (70 grammes) sunflower oil
  • 2½ ounces (70 grammes) butter or block margarine
For cream icing/filling:
  • 15½ fluid ounces (445 milliliters) whipping cream
  • 4 ounces (115 grammes) soft cream cheese
  • 3 tablespoons icing sugar
  • Optional: 1 teaspoon vanilla essence
For ganache topping:
  • 2 fluid ounces (55 milliliters) whipping cream
  • 2½ ounces (70 grammes) dark chocolate
For assembly (optional):
  • 1 tablespoon kirsch
  • 1 teaspoon cocoa powder
  • 1 teaspoon icing sugar

HOW-TO:

First, prepare the cherry filling (it's best to do this the day before):
  • In a saucepan, empty one of the cans of cherries. Bring to the boil, then allow to cook for 10 minutes. If you could only find black cherries, but like the tartness of Morello cherries, add the lemon juice here. If you like the syrupy sweetness of black cherries, leave it out.
  • Using a potato masher or fork, gently squish the cherries. You want this to be like jam, so make sure it still has a little texture.
  • Take about 1 tablespoon of the cooking liquid and put into a glass. Add the cornflour and sugar and mix into a paste.
  • Add the cornflour and sugar mixture back into the saucepan and cook the jam until thickened, about 2 or 3 minutes. Remove from the heat and pour into a bowl; allow to cool.
  • Once cooled cover with cling film, making sure the cling film touches the surface of the jam, and put in the fridge until set for at least 4 hours, or overnight.
Second, prepare the cakes:
  • Preheat your oven to 180°C (350°F, Gas Mk.4, or moderate).
  • Prepare the cake mixture as per the basic sponge recipe, and pour into two greased and floured 9 inch (23 centimeter) cake tins. Cook for 20 to 25 minutes until ready. Allow to cool complete in tins.
  • Once cold, cut each cake in half horizontally, and cut the dome off one of them. Decide how you will assemble the layers, making sure the top-with-the-dome-left-on is always the top layer.
Then, prepare the cream icing/filling:
  • A note on whipping the cream: to make sure the cream whips nicely and doesn't split, put the mixing bowl, preferably made of glass, and whatever you will be beating the cream with - whether it be a balloon whisk or the beaters of an electric hand mixer - into the fridge for 1 hour or the freezer for 15 minutes.
  • Put the whipping cream, cream cheese, icing sugar and vanilla essence into the chilled bowl and whisk together until the mixture holds stiff peaks. This is the ideal spreading consistency.
  • Put one third of this mixture into a bowl and set aside for decorating.
Next, prepare the ganache:
  • In a bowl over a saucepan of simmering water, combine the chocolate (broken up, of course) and the cream. Whisk together until smooth and shiny, then allow to cool to spreading consistency while you assemble the cake.
Assemble the masterpiece:
  • Take the cake layers: put the bottom one on the plate you intend to serve the gateau on, set aside the top one for later, and put the middle two on their own plates. This makes the assembling easier, as each piece will be filled and iced individually.
  • Take the remaining can of cherries and drain the liquid into a bowl, keeping the cherries in the sieve to drain fully. Take half of the cherries (keeping the rest for another time) and cut each of them in half, bar 12 for decoration.
  • Take 9 tablespoons cherry liquid (reserving the rest for another time). If you want, you can mix the kirsch with the cherry liquid, but I don't take alcohol so I leave it out. Sprinkle the liquid evenly across the three cake layers and watch the sponge drink it right up.
  • Divide the cherry jam across the three cake pieces and spread in an even thin layer.
  • Divide the remaining two-thirds of cream mixture across each cake, spreading around to about an inch (2 centimeters) away from the edge of each cake. This stops the filling squidging out the sides when you put all the layers together.
  • Divide the sliced cherries across the three cakes and sprinkle them over the cream.
  • Now, here's where you need to take care. Take the two middle cakes cakes and stack them on the bottom cake on the serving platter. Take the topmost layer, which you set aside, and put it on top of all the cakes. Gently press down to cement all the layers together, put not so hard as to squeeze all the filling out of the sides. And there, pretty much, is your Black Forest Gateau, the next steps are for frills.
Decorate the masterpiece:
  • Spread the cooled ganache over the top of the cake with a palette knife. You can make swirls if you want, but I like to make streaks.
  • Take the cream you set aside and put into a large piping bag fitted with a large closed-star nozzle. Pipe rosettes along the top of the cake, between the layers, and where the cake meets the serving platter, as shown in the photo. Or, you could decorate it whatever which way you want.
  • Use the cherries you kept earlier and put between the rosettes. For that extra element of kitch, you could use red glacé cherries instead of the canned black cherries for this bit.
  • Dust the sides with cocoa powder, and the top with icing sugar.

And there she is, in all her glory. Of course, you can choose to decorate it however you like, and you may elect to use just plain whipped cream, without the cream cheese, sugar and vanilla, and you could use shop-bought cherry jam if you can get your hands on it. This is just how I've made it, and dayum... it tastes delicious!

This is an awful lot of effort, in fairness, but it really pays off in the end because it looks and tastes amazing! I don't have any photos of the inside because a) I'm not the best at slicing cakes, and b) I didn't bring a camera to the birthday party, like a big silly. Next time!

It's been a while! Happy 9th Anniversary!

  It's been a while. The past two years have been a helluva a ride. This year is gonna hold some big changes for this blog. I'm comp...