Showing posts with label breakfast. Show all posts

Thursday, 8 June 2017

Crumpets (Wheat- and Egg Free)

Readers of Sweetie Pie Bakes Stuff, I present to you a project I have always thought about since I was very young: crumpets!


When I was much younger, I was given a book called The Book of Afternoon Tea by Lesley Mackley, which I'm sure I've mentioned many times in the past. In this book, is a recipe for crumpets. Now, if one is a half-English person living in Ireland, there are some creature comforts of England that are kinda misunderstood here: one of which is crumpets. They go in and out of the supermarkets every so often, but don't have much staying power. I don't think the locals quite understand them.


Not only are regular crumpets widely unavailable, wheat- or gluten free ones are unheard of all together. You can buy them at great expense in Marks and Spencer, but it turns out that making them at home is much cheaper, even if spelt flour has risen to an eye-watering €3.80 per kilogram (ouch!). But to make them at home you need a specific piece of kit: a crumpet ring.


Recently, as I mentioned in my last post, I was in England with my companion to collect a car from his friend. While I was there, I went looking in a local kitchen supply shop and found just the thing I was looking for: crumpet rings! I bought two in a pack for about £4.50, which isn't too bad. And on my return home, I couldn't wait to use them!


I did a little research online for the best recipe, and many recipes advise to add some bicarbonate of soda to help a) the production of the little holes, and b) neutralise some of the acidifying nature of yeast. I don't know if there's any science behind this, but I trusted the advice. As such, this recipe is basically the same one as found in the Afternoon Tea book, with the addition of bicarb.

INGREDIMENTS

  • 8 ounces (225 grammes) white spelt flour
  • 1 tablespoon (15 millilitres) caster sugar
  • ½ teaspoon (3 millilitres) salt
  • One quarter-ounce (7 gramme) sachet of dry active yeast
  • Half a UK pint (285 millilitres) milk, lukewarm
  • 2 fluid ounces (60 millilitres) water
  • ½ teaspoon (3 millilitres) bicarbonate of soda

METHOD
  • In a medium mixing bowl, mix 2 ounces (55 grammes) of the flour, the salt, the sugar, the yeast, and half the milk until is is a well combined, thin mixture. Allow to sit for 10 to 15 minutes until all the little yeast particles dissolve.
  • Mix in all the remaining ingredients, using a balloon whisk, until you get something like a thin pancake mixture.
  • Cover the bowl with cling film or a clean tea towel, and allow to rise in a warm place for 45 minutes to one hour, until doubled and bubbly.
  • Once it has risen, grease a heavy frying pan and two to three crumpet rings. Preheat the pan over medium-low heat for 5 to 10 minutes.
  • Place the rings onto the pan, and fill each one halfway full, about half an inch (1 centimetre), being careful to keep all the lovely bubbles in the mixture. Cook until the tops are pitted and dry, about 6 minutes. If the bottoms are browning too quickly, turn down the heat.
  • One the tops are pitted, dry, and nicely full of holes, flip over and cook for a further minute. Serve immediately with butter, or jam, and any left overs can be cooled on a wire rack and stored for three days.
Bibliography: Mackley, L. The Book of Afternoon Tea. HP Trade. July 1992

No blogs on this day in 2014 or 2016

Saturday, 6 May 2017

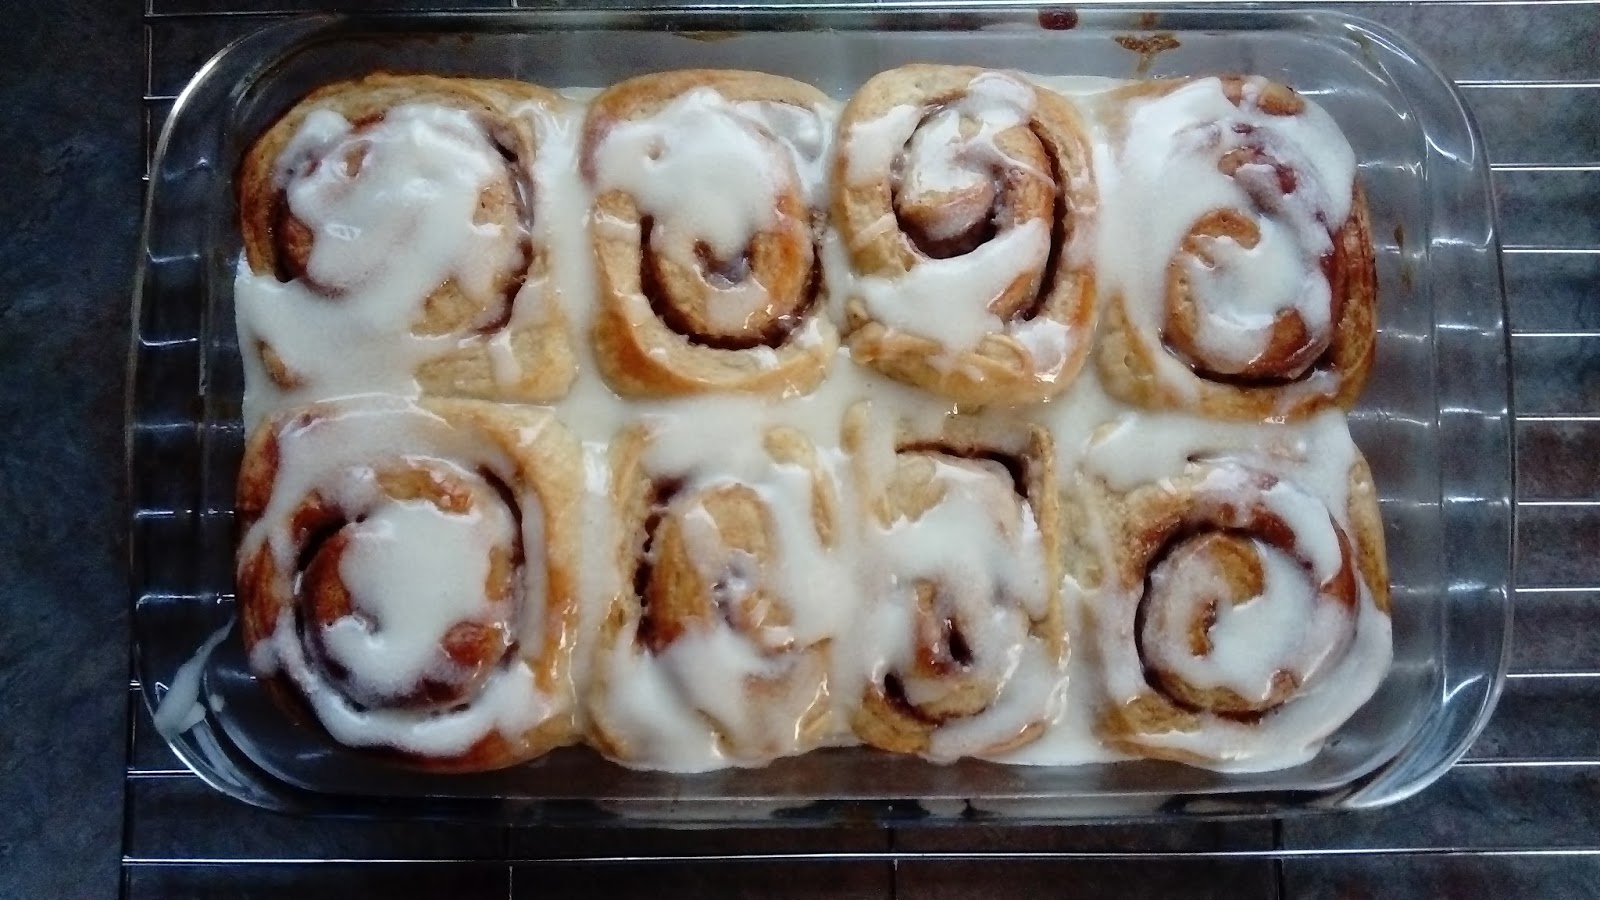
Yeast Risen Cinnamon Rolls (Wheat Free)

Fancy a lazy weekend breakfast treat? Here are some deliciously spicy, soft, and rich cinnamon rolls!


I really, thoroughly enjoy the combination of yeasty, doughy, extra light and fluffy dough and squishy gooey spicy centres found in cinnamon rolls: it's such a pleasing thing to eat. They look really pretty too, and the fluffy sides revealed by breaking the rolls apart is one of the best parts.


In the UK, these buns usually have some dried fruit along with the sugary spicy filling and are called Chelsea buns, but my companion really doesn't like dried fruit. So, this American style take on the spiral bread roll is much more likely to be eaten in our household!


To be honest, I prefer them too: the dried fruit kind of gets in the way of enjoying that ooey-gooey middle bit, especially is it's slathered in buttery, creamy, yet tart icing, like a yoghurt or cream cheese glaze.

INGREDIMENTS 
For 8 cinnamon rolls 

For the icing
  • 4 ounces (115 grammes) icing sugar
  • 1 ounce (30 grammes) very soft butter
  • Plain natural yoghurt, buttermilk, or milk to mix

METHOD 

  • Prepare the dough as instructed, and allow to rise. Grease a 11 by 7 inch (28 by 18 centimetre) rectangular dish, or any other similar size.
  • When the dough is nicely puffed up and doubled in size, roll it out on a lightly floured work surface until it becomes a rectangle just under half an inch (1 centimetre) thick. 
  • Spread the soft butter over the whole surface of the dough, except for an inch (2 centimetres) on one of the long sides. Butter it like you'd be generously buttering toast, but don't drown the surface in it: you don't want the rolls to be greasy, there should just be enough to allow the sugar to stick.
  • In a cup or bowl, mix up the sugars and cinnamon. Sprinkle the sugar over the buttered surface until it forms a sandy surface. Make sure the sugar distribution is nice and even.
  • Slightly wet the un-sugared long side of the dough, and roll from the fully sugared long side to the wet long side, making a loose but snug roly-poly: if you roll it too tightly, the buns will grow noses in the oven, because the tightly rolled middle will have nowhere to go but up! Pinch the join well.
  • Cut the big cinnamon sausage into 8 pieces, and then place cut side up into the dish, only barely touching each other.
  • Cover, and leave to rise for about 20 to 30 minutes, or until increased by a half or so. In the meantime, preheat the oven to 180ºC (350ºF, Gas Mk.4). 
  • Once they are puffed, and the oven preheated, place the dish in the oven on the centre shelf for 30 minutes, or until deliciously golden brown.
  • While the buns are cooking, make the icing. Cream together the butter and the icing sugar until smooth and clump free. Mix into a glaze with some yoghurt, buttermilk, or milk to make a thick but running glaze.
  • Remove from the oven, and cool for 5 minutes before drizzling the glaze over the buns while still warm.
TIP
If you want to eat these first thing in the morning, but don't want to get up early to make the dough, you can make these the night before. Prepare the cinnamon rolls right up to the point that you arrange them in the dish, and then wrap tightly with cling film. Pop in the fridge overnight, and then in the morning put them straight from the fridge into the cold oven, then turn it on. The buns will rise while the oven is preheating, and in 40 to 45 minutes you'll have delicious breakfast cinnamon rolls!


Best eaten on the day they are made. If there are leftovers, eat within three days, or freeze for up to 2 months.

THIS TIME IN 2016:  Milky Ice Pops: Chocolate Flavour (Naturally Gluten Free; Dairy-Free Option)
THIS TIME IN 2015: Battenberg Birthday Cake (Wheat and Dairy Free)
THIS TIME IN 2014: American Style Pancakes... also known as drop scones, ssh. (Wheat Free)
THIS TIME IN 2013: Cake Pops, a Maiden Voyage: Jaffa Cake Pops

Monday, 24 April 2017

Simple Danish Pastries (Wheat- and Yeast Free)

Kan du lide at wienerbrød? Continuing with my Central European vibe this week, I present the Danish Pastry!


These crispy treats are known as wienerbrød in their native land. It literally means 'Vienna bread', because all of the yeast risen laminated pastries we know and love, such as croissants and Danish pastries, were originally developed in Austria.

I, however, don't use a yeast risen puff pastry, I just use normal puff pastry. I tend to make my own, which is time consuming, but it means my mother can eat them when they're made from scratch with spelt. If you want the pastry to taste yeasty, however, you can bind the dough with beer instead of water. It's a neat trick.

Danish pastries look a little different in the United States, using fresh berries and sweetened cream cheese fillings. British style Danish pastries, which I'm used to, use more traditional fillings like jam, apple, apricot, and baker's custard, called crème pâtissière.

My pastries didn't rise as much as I'd have liked, because the pastry was warm before cooking, so PLEASE make sure the pastries are nice and cold before baking.

And don't be intimidated by the ingredient list, not by the seemingly complex construction: they're very, very simple, especially if you use shop bought ingredients.

This will be my last entry for this month, because my thesis proposal is due this week. Wish me luck!

INGREDIMENTS
For about 12 pastries, depending on size
  • Double quantity of puff pastry, alternatively you can buy a pound (455 grammes) of premade puff pastry
  • 1 egg, mixed with a tablespoon of milk
  • Flaked almonds, to decorate
  • Demerara sugar, to decorate
For the gluten free crème pâtissière,
  • 6 fluid ounces (180 millilitres) whole milk
  • 2 teaspoons (10 millilitres) cornflour
  • 1 egg yolk
  • 1 tablespoon (15 grammes) sugar
  • Pinch of salt
  • About a teaspoon (5 grammes) butter
  • 1 teaspoon (5 millilitres) vanilla essence
For the apple filling,
  • 1 eating apple, something firm and tart like a Granny Smith, or Pink Lady, or you could use 4 ounces (115 grammes) of any other firm fruit, or berry
  • 1 tablespoon (15 millilitres) cornflour
  • 2 tablespoons (30 grammes) brown sugar
  • ¼ teaspoon (1 millilitre) salt
  • 1 teaspoon (5 millilitres) ground cinnamon
  • ¼ teaspoon (1 millilitre) ground cloves
Other fillings,
  • Brown sugar and cinnamon
  • Nutella
  • Jam
  • Tinned apricots or plums
  • Dried mixed fruit

HOW-TO

To make crème pâtissière,
  • In a small saucepan, mix together the sugar, cornflour, egg yolk, salt, and two tablespoons (30 millilitres) of the measured milk to make a smooth paste.
  • Add the rest of the milk, stir well, and place over medium heat. Bring to the boil, mixing all the time, and boil for about 2 minutes to fully activate the starch.
  • Remove from the heat and pour immediately into a bowl. Cover with clingfilm, touching the surface directly, and cool to room temperature. It will thicken as it cools.
To make the apple filling
  • Peel, core, and chop the apple into half inch (1 centimetre) pieces. Place in a bowl or jug, and add the other ingredients.
  • Mix very well until the mixture becomes wet and saucy: the starch will draw the water out of the apple and mix it with the other ingredients.
To make the pastries,
  • Prepare the pastry, which will take about two or three hours.
  • Roll the pastry out to a rectangle measuring 12 by 16 inches (30.5 by 40.5 centimetres), cut into twelve 4 inch (10 centimetre) squares.
  • Use each square to make a pastry following the instructions: braids, windmills, turnovers, or crowns. You can use the fillings as instructed above, or you can use shop bought fillings.
  • To make the spirals, you need a 4 by 8 inch (10 by 20 centimetre) rectangle, so just keep two squares stuck together for the spirals. Follow the illustration below to make the spirals.
  • Lie the pastries on the baking sheets, about two inches (5 centimetres) apart, brush the tops with eggwash, and decorate with flaked almonds or Demerara sugar if you like.
  • Place the pastries into the fridge to chill for 30 minutes before cooking. While they're chilling, preheat the oven to 200°C (400°F, Gas Mk.7), and flour two large flat trays.
  • Bake for 15 to 20 minutes, then transfer gently to a wire rack to cool completely before serving. The apple ones are nice warm, though.

HOW TO MAKE THE SHAPES

Spiral


Take the 4 by 8 inch (10 by 20 centimetre) piece of pastry, and brush with egg wash. Sprinkle generously with brown sugar, brushing it around with your hand to get it all to stick. Sprinkle generously also with ground cinnamon, Rolling from the short end, roll it up like a Swiss roll. Wrap up in cling film, and then chill for 30 minutes before cutting into half inch (1 centimetre) slices. Brush each slice with egg wash if you like.

Apple Turnover


Take a square, and place about a rounded teaspoon of apple filling in the centre. Imagine the square cut in half diagonally, and brush the edges of one diagonal side with eggwash to help stick. Fold over diagonally, and press the edges together firmly with a fork. Brush the top with eggwash and sprinkle with Demerara sugar.

Braid


Take a square, and visualise it divide into three. Cut the outer two thirds with slightly angled lines, and fill the centre third with whichever filling you like. Working top to bottom, alternately fold the pastry strips over the filling in the middle. Slightly pinch the open ends to close them up.

Windmills (Pinwheels)


Take a square, and cut diagonally into quarters, making sure not to cut all the way though the middle. Fill the centre part that isn't cut, and then take a corner of one pastry flap and fold it up into the middle, over the filling. Work around the pastry until all flaps have the same corner folded into the middle.

Crown


This is the easiest one. Take a square, and fold each corner down into the middle, but not all the way. Place the filling on in the centre, on top of the folded corners.

These are best enjoyed on the day they're made, but if you have any left overs keep in an airtight container for 3 days. These can freeze for up to a month, too.

Nothing on this day in 2016
THIS TIME IN 2015: Tiramisù Mini Cheesecakes (Wheat Free)
Nothing on this day in 2014
THIS TIME IN 2013: Dinosaur Kimberleys (Wheat Free)

Monday, 6 March 2017

Yeast Spelt Doughnuts (Wheat Free)

I couldn't stay away from yeast doughs for long! And today's offering is doughnuts....


 In Germany, they are called berliner. In Portugal, they are called malasadas. In Italy, they're called bomboloni. In French, they're called beignets. In Irish, they're called taoschnó.  In Lithuania, they are called spurgos. In Poland, they call them pączki. Whatever you call them, they're delicious.

As someone with who was socialised in English culture, I believe that Great Britain is built on stodge: heavy, doughy, bready, oily foods are part and parcel of what it is to be an Englishman, it seems.Although I understand that doughnuts are a mainland European concept that was introduced to England and the rest of Britain, they have been fully embraced as part of the pastry culture of the island nations.


One of my guilty pleasures is buying iced ring doughnuts from the bakery section of my local supermarket, and over the past four or so years of my blog I have experimented with many different cake doughnut recipes. Cake doughnuts are risen with baking powder or soda, whereas traditional doughuts are risen with yeast. Now that I've got the hang of making yeast risen dough, I can try making traditional doughnuts.


To make these, I use the same dough as I used to make the iced buns and burger buns, and rolled it out the a half inch (1 centimetre) thickness. I then cut out 3 inch (7½ centimetre) circles. Using my fingers, I pinched a hole in the middle of each circle and stretched it out to make an inch (2½ centimetre) hole in each one.

I laid them out on a well floured (and I mean well floured) surface and allowed them to rise for 20 odd minutes, flipping half-way, until increased in size by about a half. Over rising the doughnuts will make them collapse when you pick them up.

Had I had access to my deep fryer, I would have fried them in 180°C (350°F) oil for two minutes on either side. However, I didn't: I'm in Roscommon, but my deep fryer is in my Mum's house. So, I had to use a saucepan with about two or three inches of oil in it, heating it on medium heat. As such, they got a little sunburnt, and because the oil was too hot, there were air pockets under the crust in some of them. But they still tasted fabulous...


If you want, toss them immediately after frying in caster sugar and cinnamon, to taste. I use a tupperware box and do one at a time, but you can use a brown paper bag, too. Or, you can ice them with a simple icing of 4 ounces (115 grammes) icing sugar, 1 tablespoon (15 grammes) butter, melted, and mix in enough water to make an icing. Don't make it too thin, though, otherwise it'll dribble all down the sides. You can colour the glaze if you like, or make it chocolatey by replacing 1 teaspoon or so of the icing sugar with cocoa powder. Decorate with sprinkles, desiccated coconut, grated chocolate, flaked almonds, or whatever you like!

I enjoyed this project, but there are a few things I would change for the next time:

  1. I'll use a proper fryer, to avoid burnt outsides and raw insides.
  2. Cut the middles out instead of pinching them: pinching them made the dough tighten up, and made some of the doughnuts come out in funny shapes.
Roll on the next batch of delicious fried oily cakey yeasty doughnuts....

No blogs in 2015 or 2016

Friday, 12 February 2016

Yeast and Wheat Free Cinnanomnom (or just plain Cinnamon) Rolls

In the aftermath of the weekend of revelry, I decided to do something that I've wanted to do for quite some time: yeast free buns of some kind. This time, it's cinnamon rolls!


I have a few friends who are not only uncomfortable with wheat and gluten, but also with yeast. I've heard of a few people of late with yeast sensitivities or intolerances, and for the last year or so it's been a constant trial and error process of finding the best way of baking traditionally yeast leavened recipes without using yeast.

Spelt and yeast have a fraught relationship too, in my experience, so for my own peace of mind finding a way of making things without it would be just great. Last year, I attempted hot cross buns without yeast, but it was less than successful.

As such I took to the world wide web. I googled things like 'yeast free bread', or 'yeast free Chelsea buns' or 'hot cross buns', et cetera. However, the thing that brought the most promising results was searches for yeast free cinnamon rolls: apparently, Americans seem to want to have a yeast free life too.

This research brought up a few recipes that centre around the kind of dough used to make Southern American style 'biscuits'. What is called a biscuit over there seems to be something of a bready savoury scone, kind of like soda bread. Obviously, 'biscuit' over here means a little crunchy flat cake that you dip in your cup of tea, so this was a word I never considered googling to find a recipe for bread.

I compared a lot of recipes for 'biscuits', and found that overall it's a combination of flour, butter, buttermilk, and raising agents. The recipes all depend heavily on buttermilk, which makes designing a dairy free version kind of, well, impossible, unfortunately. But I will be developing that in the future.

Once I had compared and contrasted the recipes, I used the following recipe and it turned out very well! I will definitely convert this recipe into something suitable for a hot cross bun for Good Friday, and I'll also being having a go at something I personally feel a little more familiar with: a Chelsea bun.

IMPORTANT NOTES

  • Use a soft touch with the dough: the more you work it, the tougher it will be when it's cooked: treat it like moose meat, or Swedish ladies.
  • You need to use all spelt flour, just like you would when making bread: the whole spelt/cornflour mix just doesn't cut it like it does in cake.
  • The trick to lovely fluffy and light no-yeast bread is the adage "cold dough, hot oven": all the ingredients must be cold, and the oven must be as hot as you can get it. My oven gets to about 220*C (450*F, Gas Mk.9), which is just about right. 250*C (500*F) would be better.
  • Bake them so that they're nice and tightly packed: this ensures that they'll rise nicely and get the height they need.
So, let's get cracking!

INGREDIMENTS:
For 12 cinnamon rolls
  • 12 ounces (340 grammes) white spelt flour, refrigerated for 20 minutes
  • 2 teaspoons (10 millilitres) baking powder
  • 1/4 teaspoon (2 millilitres) bicarbonate of soda
  • 1 tablespoon (15 millilitres) caster sugar
  • Pinch of salt
  • 3 ounces (85 grammes) cold block butter, preferably frozen for 20 minutes
  • 8 fluid ounces (240 millilitres) cold buttermilk

For the filling,
  • 1 ounce (30 grammes) soft butter, for spreading
  • 2 tablespoon (30 millilitres) soft brown sugar
  • 1 tablespoon (15 millilitres) caster sugar
  • 1 teaspoon (5 millilitres) ground cinnamon
  • Optional: 1/4 teaspoon (2 millilitres) ground cloves

To glaze,
  • 4 ounces (115 grammes) icing sugar
  • Milk, to make up the glaze

METHOD
  • Preheat the oven to as hot as you can, about 220*C (450*F, Gas Mk. 9), and grease a 9 inch (22 centimetre) round tin.
  • In a mixing bowl, sift together the flour, baking powder, bicarbonate of soda, sugar, and salt. Mix to combine fully, then grate the butter in with the wide side of your box grater, dipping the butter in the flour after each grate.
  • With your fingers, gently toss and break up the butter in the flour until you get a coarse crumbly mixture.
  • Using the tip of a knife, stir in the buttermilk. The dough will be completely uneven: sticky in some places, dry in others, etc., but don't worry.
  • Lightly sprinkle the work surface with flour, then turn out everything in the bowl. Gently flatten the dough, and fold it over, and flatten and fold until it becomes a smooth dough. This should take about 5 folds, and all the flour and buttermilk will be nicely brought together. Do not knead under any circumstances: the dough will get tough.
  • Roll out the dough into a rectangle about half an inch (about a centimetre) in thickness.
  • In a bowl, mix together all the ingredients for the filling to make a paste. Spread the paste out on the dough rectangle, spreading all the way out to each short end, but leaving a border of about an inch (2 centimetres) at each wide side.
  • Roll the dough into a sausage, wide side to wide side, keeping the dough roll nice and tight. Cut into 12 slices with a sharp knife.
  • Arrange the slices, neatly packed, into the tin, and put in the centre of the preheated oven for about 20 minutes,or until nice and brown on the top. I actually took mine out a little too early because I was afraid of them being too crunchy.
  • Mix the icing sugar with enough milk to make a thick but still running icing: it should coat the back of the spoon, but it should be able to run off.
  • Take the buns out of the oven and, while still hot, spread the icing over the top of the buns. It will melt, but that's part of the charm.
  • You can turn them out all in one big piece, allowing people to tear and share themselves, or you can cut around the edges and take each one out. Allow to cool for about 10 minutes before eating freshly baked.

These are lovely and doughy, having the texture of a fluffy bread, but without the hassle of yeast. It's obviously not exactly the same as bread, but it's close enough!


Monday, 24 August 2015

Mini Apple Pies (Wheat Free with Dairy Free Option)

Apologies for the lack of updates last week. My life is a mess at the moment: I never know where I'm going to be or when I'm going to be there, and have a terrible time remembering what the Hell I'm supposed to be doing when I get there... if this is the life of a young professional then I firmly believe I have made a terrible decision.

However! Here is my most recent creation: little apple pies!


I had a few apples in my fruit bowl, languishing, not really fresh enough for eating out of hand anymore. So, I turned them into a nice compote, and put them into tasty, crispy, flaky pastry. I thought of making some puff pastry, but life got in the way.


The recipe was very simple: I cut up 2 firm fleshed apples and 1 soft fleshed apple into little pieces, about a quarter inch (5 millilitres) across. Firm fleshed apples in this case could be Bramley, Granny Smith, or Pink Lady; soft fleshed apples could be Braeburn, McIntosh, or Discovery. Keep the pieces in a bowl of water with a dash of lemon juice while cutting to stop them from browning.

Melt about 1 ounce (30 grammes) of butter or margarine in a saucepan, and then cook the apples on medium until the firm apple pieces have softened and the soft apple pieces have started to break down. Add in brown or white (or both) sugar to taste; I added about 3 tablespoons (45 millilitres). Add about half a teaspoon (3 millilitres) of mixed spice, and top up with enough cold water to nearly over the apples. Cook on low, uncovered, for about 15 to 20 minutes, until the apples are fully tender and the mixture is like jam. Leave to cool.


To make the pastry, mix 8 ounces (225 grammes) of white spelt flour with 4 ounces (115 grammes) of melted butter or margarine until blended and a little sandy. Add enough water to make a soft dough, without handling too much. Roll out thinly, and cut into rectangles that are about 4 by 6 inches (10 by 15 centimetres). Wet the edges of one side of each rectangle, put in about a heaped teaspoon of filling, then fold over. Crimp with the tines of a fork, then use scissors to snip in the 'V' shaped vents. You should get about 12 pies.


Line on a lightly greased baking sheet, and brush with milk or eggwash, and sprinkle with caster sugar. Cook in the oven, preheated to 200ºC (400ºF, Gas Mk.6) for 20 to 25 minutes, or until golden brown and crispy. These can be eaten after about 5 minutes of cooling, and are also lovely if eaten cold. They will keep in an airtight container for about a week.


THIS TIME IN 2014: No blog this time last year

Friday, 14 August 2015

Something Different: Koeksisters (Wheat- and Dairy Free)

This time, I thought I'd try something completely different and unusual. My culinary explorations lead me to South Africa, where they make these delicious doughnut like confections soaked in syrup: Koeksisters.


For some reason, my family has had a lot of interaction with South African people: both my brothers have dated South African women, and I have had a few South African friends over the course of my school and college life. I think Ireland had some sort of connexion to the country, through hiring people to work for Intel in Leixlip, but I don't exactly know the details. Either way, it's a big migrant group here in Ireland.


Recently, I invited a friend around for dinner (who helped me out with the videos) and she told me she hadn't had a doughnut in years since going off dairy and wheat, so I promised her that I'd make some for her. I made the dough and thought, while I have it, I'll do a little experiment: another friend reminded me of the existence of koeksisters, which are braided doughnuts (sometimes flavoured with nutmeg and cardamom) that are deep fried and soaked in a simple syrup flavoured with cinnamon, ginger, and more cardamom.

The process was very simple: I used my new doughnuts recipe, adding ¼ teaspoon of ground nutmeg and the crushed seeds of 2 cardamom pods to the dry ingredients, and replacing the butter with block margarine. I then split the dough into eight equal pieces and then began the rolling and braiding process.
  1. Take each eighth of the dough and roll it into a ball.
  2. Use a rolling pin to flatten each ball out into a long oval.
  3. Make a mark a little bit down from the top end of the oval, and cut the oval into three legs up to the mark.
  4. Pinch each of the three legs into ropes.
  5. Braid the legs together.
  6. Pinch the loose ends together and fold them behind.


 My technique improved while I has braiding: my first two were a little loose and mental, but the third and all thereafter were much better and neater. My advice is don't be afraid to pull on the legs a bit to keep them tight.


I then fried them like normal doughnuts for about 6 minutes per batch, flipping each side twice to make sure even cooking. If you leave them too long on one side, it actually causes the braids to unravel a little, so turn a few times during the cooking process to make sure each side rises slowly.

Once each batch cooks, take each cake out of the oil and wrap in a piece of kitchen roll and leave on a wire rack to drain and cool slightly. Once all eight are cooked, allow them to cool enough to handle, then make the syrup.

In a saucepan, heat together 6 ounces (170 grammes) of caster sugar with 6 fluid ounces (180 millilitres) of water, along with some spices: 1 cinnamon stick (or a sprinkle of ground cinnamon), 2 whole cloves, the crushed seeds of 4 green cardamom pods, and a teaspoon of vanilla essence. Bring to the boil and cook until the mixture thickens and becomes syrupy like warm honey.


Lay the koeksisters in a dish and pour the syrup out of them, liberally dousing each one. Allow to soak for a while, then flip them over to allow the other side to soak.

These are very heavy going, and very similar to gulab jamun, which I made for one of our Indian themed tea parties. These are best kept in an airtight container and eaten within 3 days.

THIS TIME IN 2014: Honey and Cinnamon Popcorn (Gluten Free)
THIS TIME IN 2013: Minty Millionaire's Shortbread (Wheat Free)

Monday, 27 July 2015

Danish Pastries: Dinosaur Paws (Wheat Free with Dairy Free Option)

Having learnt how to make fairly decent puff pastry, I think it may be my new favourite thing. There are so many things I want to try out using it; it's a shame it takes so long to make! However, for now, I will show you all my most recent adventure in the land of laminated pastry: cinnamon Danish pastries!


In a lot of bakeries here in Ireland, there are a few varieties of puff pastry snacks available: maple pecan plaits, apple turnovers, croissants, and cinnamon spirals. The cinnamon ones are my favourite, and for those who have never seen one before, it looks like a slice of Swiss roll (roll cake) made with puff pastry and cinnamon sugar, and I love pulling off the pastry following the spiral around to the middle... because I'm strange like that.


This time, though, I decided to do a different shape, using the same combination of things. From researching, I've found no name for this kind of folding technique other than "Turkey Feather", which a few North American bloggers have used, and I've also seen it referred to as a "Tulip Fold"; I, however, think it looks like a dinosaur footprint.


To make these pastries, I used the same puff pastry dough I used to make the croissants, doubling the ingredient amounts to make a bigger batch of pastry. It also needs an extra 5 to 10 minutes freezing time between folds. You will also need about 4 teaspoons of light brown sugar or caster sugar mixed with a half to full teaspoon of ground cinnamon, depending on how strong you want the cinnamon flavour.

Without the aid of a video, I have drawn a little diagram of how I folded it and then took a photograph:

  1. Roll the puff pastry into a rectangle roughly 14 inches (35½ centimetres) wide; trim the edges if you want it to be nice and neat, but it's not necessary. Wet the surface with a little water and sprinkle on some cinnamon sugar to make a nice covering.
  2. Working with the long sides, fold each long side into the middle, using a technique called a book fold.
  3. Wet the new plain surfaces of puff pastry and sprinkle on some more cinnamon sugar.
  4. Fold in half, short end to short end.
  5. Fold in half again, long side to long side.
  6. Pop in the fridge for about 20-30 minutes (or the freezer for about 10-15 minutes) before cutting into 8 equal portions.
Arrange these on a baking tray which has been lightly floured, about 2 to 3 inches (5 to 7½ centimetres) apart from each other and the side of the tray, and bake in an oven preheated to 220ºC (450ºF, Gas Mk.8) for 10 to 15 minutes, or until fully expanded and have a nice golden brown colour around the edges. Use a fish slice to move the pastries from the tray to a wire cooling rack and eat cool, and preferably on the day they are baked.

These are super cute, and quite tasty! I thought they were just fine the way they were but you can also, for a more Scandinavian style cinnamon pastry, use some ground cardamom in addition to your cinnamon. 

Stay tuned for more adventures in the land of laminated pastry!


It's been a while! Happy 9th Anniversary!

  It's been a while. The past two years have been a helluva a ride. This year is gonna hold some big changes for this blog. I'm comp...