Showing posts with label experiment. Show all posts

Wednesday, 24 July 2019

Sweetie Pie's Perfect Scones! Part 2: Written Recipe


After experimenting over the course of a few days (which you can read all about here) I found what I consider to be the perfect scone: light and fluffy with pale sides and a brown top, with only a little hit of sweetness. I like my scones very plain.

To get the consistency of texture, the dough has to be worked through properly. This is tricky with something like scones, which need to be handled as little as possible before baking so they don't get tough. The way around this is to add some extra starch to reduce the overall amount of gluten in the flour. With a higher percentage of starch, the scones are lighter, fluffier, and easier to work with.

Split these beauties in half and enjoy with jam, butter, or cream. Or maybe all of the above, if you're feeling indulgent....

~~ ^ _ ^ ~~

DIFFICULTY
Very simple! 

TIME
1 hour

RECIPE RATING
Easy!

~~ ^ _ ^ ~~

INGREDIMENTS

6 ounces (170 grammes) white plain flour: spelt or wheat
2 ounces (55 grammes) cornflour
1 tablespoon baking powder, or 1 teaspoon of baking powder with 1/2 teaspoon of baking soda for Irish style scones
1/4 teaspoon salt
2 ounces (55 grammes) butter, room temperature
2 tablespoons (28 grammes) caster sugar
4 fluid ounces (115 millilitres) milk, room temperature
1 teaspoon lemon juice, if using baking soda
Eggwash, made with an egg and a pinch of salt, or you can use milk to omit the egg


METHOD
  • Preheat the oven to 200°C (400°F) and preheat a flat baking tray also.
  • Sieve the flours, baking powder (and baking soda, if using), and salt twice, making sure to hold the sieve high. I like to sieve the mixture out onto a piece of baking paper, then back into the mixing bowl.
  • In a mixing bowl, rub the sieved ingredients with the butter until it's like fine breadcrumbs. It doesn't matter what temperature the butter is, as long as it's very well rubbed in. Stir in the sugar.
  • Add the milk (and lemon juice, if using baking soda) and mix quickly and throroughly with a metal spoon until just mixed.
  • Turn out onto a floured work surface and chaff six times: chaffing is the process of flattening the dough by hand, folding in half, turning through 90 degrees, and then repeating. This is a much gentler process than kneading.
  • Cut out scones using a cutter, shape the dough into a rectangle and cut squares, or shape into a round and cut into wedges. You can gather the remaining dough and re-roll, but the second rolling won't be as even as the first.
  • Sprinkle flour onto the preheated tray and arrange the scones about half an inch apart from each other: if they're a little huddled together, they will rise straighter. Eggwash the tops, making sure it doesn't dribble down the sides. If you like, you can baste the tops with eggwash another two times during cooking for an even richer colour. You can also sprinkle the tops with coarse sugar or salt.
  • Bake near the top of the oven for 15 minutes. This can depend on the size of the scones: when they've risen high and have turned a rich brown on top, they're ready.

These are best eaten the day they are made, but they freeze very well. Freeze any leftovers on the day of baking for best results.

Sweetie Pie's Perfect Scones! Part 1: Experiments


Ah, the humble scone. So many varieties, so many styles, and so many shades of deliciousness. And as such, so many challenges.

What somebody considers a perfect scone is polarising and subjective. I'm sure we can all agree that a Victoria sponge should be light, fluffy and sweet. I'm sure we can all agree that a piece of shortbread should be sandy and buttery. But, I'm not sure we will all agree on what we like about scones.

From my observation here in Ireland, there are three main families of scones: ones eaten in England, ones eaten in America, and the ones that every Nana knows how to make here at home.


  • English scones are more cake-like: sweet, light and fluffy, and are usually quite small. The ingredients are typically cold, and the butter is rubbed in fully to make them fluffy.
  • American scones are like giant chunks of sweetened shortcrust pastry: the butter is left in small pieces in the dough and not rubbed in fully, and everything is ice cold, making them flaky more so than fluffy. There is also a very high percentage of butter.
  • Irish scones are more like sweetened buns of soda bread: bready, not very sweet, and rough on the outside. They are very plain, and often quite dense.


My personal preference is an English style scone: light, fluffy, breaks apart easily for buttering, and is usually small. Achieving this without using shop bought self-raising flour nor butt-tonnes of baking powder is quite a challenge, though.

I did four experiments in the kitchen, which will be presented to you in note form with elaboration as needed. Every single recipe added the ingredients in the same order: butter rubbed into flour and raising agent, sugar added, followed by the liquid mixed in quickly with a knife before finishing the mixing on the work surface. Every mixture was rolled to an inch thick (2.5 centimetres) and baked at 200°C (400°F) for 15 minutes.

NOTE: Chaffing is a procedure where the dough is folded and flattened repeatedly. It's often used for delicate pastries that shouldn't be handled much, and is also used in traditional bread making for doughs which are very wet.


From the top to the bottom: Batch 1, Batch 2, Batch 3, and Batch 4

Batch 1

8oz flour
2 tsps b powder
Pinch of salt
2oz butter, cold, or margarine
1oz sugar
4floz milk


Mixed in the machine. Not chaffed. Broke when baking: poor crust colour. Eggwashed once.

I got a Kenwood mixer as a wedding gift, and tried making scones in it. Would not recommend!


~ * ^ _ ^ * ~


Batch 2

8oz flour
1 tablespoon b powder
Pinch of salt
2oz butter, cold, or margarine
1oz sugar
4floz milk, slightly warm
1 tsp lemon juice


Lemon juice mixed with milk at the last second before adding to dough. Mixed by hand, chaffed four times. Cut into wedges. Rose nicely, but cracked on top slightly and caught too much colour on the sides. Eggwashed once.


~ * ^ _ ^ * ~


Batch 3

4oz flour
1/4 tsp b powder
1/4 tsp b soda
Pinch of salt
1oz butter, cold, or margarine
1 tablespoon sugar
2floz milk, slightly warm
1/2 tsp lemon juice


Lemon juice mixed with milk at the last second before adding to dough. Mixed by hand, chaffed four times. Cut into rounds. Rose sideways, and coloured too much. Crust too thick. Distinct taste of b soda, though not overwhelming. Egg washed once before cooking, and again a minute before finished in oven


~ * ^ _ ^ * ~

It was at this point that I nearly gave up and realised why I've never done a scone recipe on this blog before. It seems my tastes in scones are very specific! I delved back into the history of my blog and found that I had, in fact, done a scone recipe. It was a quick mention in a recipe I'd done for tomato soup, and I remember eating those scones and thinking they were delicious. Turns out, the issue I was having with overworking the flour was very easily solved by adding in cornflour. The addition of extra starch reduced the overall amount of gluten, and meant that the dough could be easily and thoroughly mixed without exercising the gluten too much. Turns out I was trying to reinvent the wheel.

~ * ^ _ ^ * ~


Batch 4

3oz flour, with 1oz cornflour
1/2 tsp b powder
1/4 tsp b soda
Pinch of salt
1oz butter, cold, or margarine
2 teaspoons sugar
2floz milk, slightly warm
1/2 tsp lemon juice


Lemon juice mixed with milk at the last second before adding to dough. Mixed by hand, chaffed five times: withstood chaffing more because of high starch content. Cut into fluted rounds. Rose well -- cleanest cut ones rose the best. Coloured nicely: sides nice and pale, and top well browned. Distinct taste of b soda, though not overwhelming. Eggwashed three times: once before baking, once halfway through -- turning the tray through 180 -- and again a minute before finished in oven.


~ * ^ _ ^ * ~


Batch 5

3oz flour, with 1oz cornflour
1.5 tsps baking powder
Pinch of salt
1oz butter, cold, or margarine
1 tablespoon sugar
2floz milk, slightly warm
1/2 tsp lemon juice

Made in exactly the same way as Batch 4. No noticeable visual difference. Slightly fluffier, lacking the characteristic moisture and flavour of b soda. Suitable substitute for those who dislike b soda.


So, I can conclusively say, that cornflour is the magic ingredient. Whether you use baking soda or powder doesn't seem to matter that much, but what does it that the overall gluten is reduced by adding starch. Read all about the final recipe here!

Tuesday, 26 February 2019

Kitchen Experiment: "White Velvet" Cake

One of my personal favourite recipes on this blog is the red velvet cake I made back in 2017 when living in Roscommon with my fiancé. It's my go to recipe for chocolate cake, but normally when I want a plain cake I use my normal sponge recipe or the super fluffy sponge I used in the Japanese shortcake. So, I wondered: can I use the red velvet recipe for plain cake?


From my superficial research on Pinterest (which, to be fair, is all the research I have time for these days) American bakers make something called white cake, which essentially has the same constituent parts as the red velvet (without the cocoa and red colouring, obviously) but added together slightly differently. The main difference is that white cake uses only egg whites.

I tried making this cake the American way without egg yolks, but it always turned out too gummy. I think one needs the emulsifying nature of yolks to keep everything together. So, this is essentially the same as my red velvet recipe, only the butter is replaced entirely with oil and the egg whites are whipped separately for lots of volume.


I made a small rectangular cake by whipping 1 egg white with 1½ ounces (40 grammes) of caster sugar to medium peaks. In another jug, I mixed another 1½ ounces (40 grammes) of caster sugar with the egg yolk until smooth, then mixed in 2 ounces (55 grammes) sunflower oil, 1 teaspoon of vanilla essence, and a few drops of almond essence until evenly blended. I folded the yolk mixture into the white mixture gently until fully mixed. I then alternately added 3 ounces (85 grammes) of sifted white flour and raising agents with 2 fluid ounces (55 millilitres) of buttermilk. For this amount of cake, I added ¼ teaspoon baking powder, ⅓ teaspoon baking soda, and ¼ teaspoon of fine salt. I then baked it in a 180C oven for 20 minutes.

After baking and cooling, I filled and iced the cakes with the same kind of cooked milk frosting as the red velvet cake. This time, however, I made it by cooking half a pint of milk, 5 teaspoons of cornflour, and 8 ounces of sugar into a custard. I then whipped the custard with 8 ounces of unsalted butter. Cooking the sugar into the custard made for a much nicer mouthfeel. I only used half of this amount of icing for this small cake, before packing the sides with slivered almonds.

Now, was this cake any fluffier than just using the regular recipe and swapping out the cocoa and food colouring? No. Even though this was paler than a normal vanilla butter cake, I have other recipes that would be just as good for making a pale, fluffy sponge.

Tuesday, 1 January 2019

Kitchen Experiment: Esterhazy Torta, a First Attempt

Happy 2019, everyone! I hope that 2018 treated you well, and that 2019 will be even better to you. And for my first offering of 2019, I present to you a little kitchen experiment: Esterhazy Torta!


I thought I'd kick off the year with someone I've been wanting to try ever since I did the Doboš Torte in 2017. Decadent confections of Central Europe hold a lot of fascination for me, and this delight from the former Austro-Hungarian Empire is quite an unusual treat. A good start to what I hope is a year of shameless experimentation.

2018 was my least prolific year on this blog since 2016, which makes sense as 2017 was the most prolific year of my blog ever. I suppose I used up all my ideas in 2017! And this year had a punishingly long hot summer, which curbed the baking output somewhat. But I have a lot of good plans for this year, including more videos (I got a nice bit of practise in last year, and learnt from a multitude of mistakes) and designing a cookery book for my own personal entertainment. Who knows, I might release it some day.

But in my own real life outside of the blog, I already know that 2019 will bring at least two wonderful things to my family. Firstly, I'm getting married in June to my best friend and the love of my life, which will be the best thing to happen to me in my life so far. And secondly, I will be an aunt! My oldest brother's daughter is due at the end of April, or the beginning of May, and she will be born in Cavan, where my brother and his wife will be living from February onward.

Once the Christmas feasting is over and forgotten about, I will start on my wedding cake trials. I will try a cupcake wedding cake, and a traditional tiered cake.

But, back to the cake!


Esterhazy Torta is a dacquoise cake, which is basically a fancy French term for a layered cake made from nutty meringues, sort of like macaroons. Dacquoise cakes can be layered with all sorts of things, like creme patissiere, whipped cream, melted chocolate, or buttercream. This cake is made of delicate walnut dacquoise layers, sandwiched with vanilla and amaretto flavoured French buttercream, which is a style of buttercream that uses an egg yolk custard. It's very, very similar to Ermine buttercream, like in my red velvet cake.

Having made this cake, I can assure you it's absolutely not my thing at all. It sounded great on paper, but in reality it was far too rich and sickly. Nuts, vanilla, eggs, butter, and amaretto together is just unrelentingly sweet. If you like sugarbombs, then this is for you.


How I Made this Cake


To make the dacquoise layers, I made a simple French meringue with one egg white and one ounce (30 grammes) caster sugar. I folded in an ounce of ground walnuts, which had been lightly toasted in a dry frying pan. I divided the mixture in four (although, in retrospect, in three would have got nicer, thicker layers) and spread it out thinly into four 4 inch circles. I baked them at 180C for 6 minutes.

To make the buttercream, I gently cooked the egg yolk, an ounce of sugar, and an ounce of milk in a heatproof bowl over simmering water until I had a nice, thick custard. I allowed this to cool completely before whipping in two ounces of room temperature butter to make an icing.

To assemble, I brushed the cake layers with amaretto, and layered the cake and iced the outside. I packed chopped walnuts onto the sides, and feathered the top with some dark chocolate.

How I Would Do This Cake Differently in Future

I think in future to take the edge off the sweetness, I would use some cream cheese in the icing to add a note of tanginess. I would also use dark rum in place of amaretto, which has a much harsher quality. I would also make the dacquoise layers thicker and the icing layers thinner, more like a glue to hold it together. I would also use a traditional glacé icing topping, maybe made with a little lemon juice, to balance the sickliness with some more tang.

Keep your eyes peeled for further experiments!

Wednesday, 3 October 2018

Crystalised (Candied) Chili Peppers

I said that this October I was going to try some unusual recipes in search of more grown-up, sophisticated Halloween treats. This was one of my first experiments: crystalised (candied) chili peppers!


This idea came out of a conversation that I was having with my brother's girlfriend. She is originally from Ecuador, and has a much, much higher spice threshold than I do. She was eating some ginger nut biscuits and wondered if a chili and chocolate version could exist.

I wondered if you could hide little heat bombs inside the biscuits with some pieces of pepper. However, putting fresh chili into the biscuits would compromise their shelf-life. It was then I thought about candying them.

Candying fruit is a very simple process: essentially, you poach the fruit in simple syrup until fully cooked and tender. The sugar in the syrup permeates the fruit and preserves it from the inside out. It's important to cook the fruit until it's translucent and well soaked in the syrup.


When the fruit is candied, it can be dried and tossed in sugar, as shown here. Or, it can be stored in the delicious leftover spicy syrup. The syrup itself is fantastic in cocktails and--oddly enough--as an extra warmth factor in mulled wine. Don't knock it 'til you've tried it!

This recipe also includes bonus lemon slices, but if you want to properly candy lemon slices you have to blanch them first in boiling water for 1 minute to remove the bitterness.


INGREDIMENTS

Roughly 4 ounces (115 grammes) medium or mild chilli peppers
12 fluid ounces (340 millilitres) water
8 ounces (225 grammes) caster sugar
One 2 inch (5 centimetre) piece of cinnamon stick
3 peppercorns
3 slices of lemon, roughly a ¼ inch (5 millimetres) thick


METHOD
  • Cut the chilli peppers in half lengthwise and scoop out the seeds. Cut each half into four pieces.
  • Put the chilli pieces in a small saucepan and add in the water, sugar, cinnamon stick, peppercorns, and lemon slices.
  • Bring to the boil, stirring to dissolve the sugar. Once boiling, reduce the temperature to a very gentle simmer and cook for about an hour to 90 minutes, until the pieces of chilli are tender and translucent. Make sure the simmer is gentle, otherwise the syrup will thicken too quickly and the peppers won't cook through fully.
  • Remove the chilli peppers and lemon slices from the syrup, but don't throw the syrup away. It can be kept in a glass jar and used for cocktails and chilli sauces.
  • Lie the pieces on a wire rack and allow to dry for a day if you want to toss in sugar, or you can store the chilli peppers refrigerated in the strained syrup in a glass container.

Saturday, 28 July 2018

I've Got OCD: Obsessive Cupcake Disorder!

I've made about four dozen fairy cakes over the past few days, possibly more because I've been sending the excess cakes to work with my fiancé.

I'm going a little mad in the search for the perfect fairy cake: fluffy yet moist, tall and rounded, and deliciously sweet but not sickly.

However, the oven in my current house has become my worst enemy: recipes that worked like a treat in my mother's and two of my previous homes' ovens are routinely failing in my current oven. I think all my experiments are to be done anymore in my mother's oven because I no longer have access to the ovens in my previous rental homes, obviously!


Here is a batch of cupcakes using the traditional pound cake recipe: a quarter pound each of sugar, flour, eggs, and butter. I'm not a fan of pound cake, personally, but normally it turns out nicely in my mother's oven. These however were simultaneously peaked and flat, and dense in texture.


This batch was made using my Madeira cake recipe. These too had noses, which I couldn't work out how to prevent.


On the right hand side is a batch of cakes using the light sponge cake recipe that I normally use for fairy cakes, which normally works in my mother's oven, but in my oven they were dry, dense, and flat.


This final batch is the same recipe, however the baking powder in the recipe was replaced with a quarter teaspoon of baking soda for every quarter pound of flour. The rise on these cakes was much more even, but in fear of the cakes deflating after coming out of the oven I overcooked them and they were dry.

I think I'll have to redo all my tests in my mother's oven and see what the issue is because I'm at my wit's end. I cannot find a way to prevent my cakes from:

  • Either rising flat, or peaking and growing 'noses'
  • Being too dense, or too dry
  • Shrinking or flattening after cooking.
The tests continue......

Wednesday, 25 July 2018

Wedding Talk: Making My Own Cake!

My wedding is happening in less than a year! Wow. When I was a little girl, I had imagined being married but it was always "away in the future"; that future is now, and it's surreal!

I never imagined my wedding in great detail when I was younger: I never imagined a dress or a cake or a ceremony or anything, I just imagined having a husband. To be completely honest, I'm not really a weddings person: I don't really like going to other people's weddings, and I find them mostly perfunctory for social expectation. Every single wedding is the same white-dress-and-dinner thing, and sometimes the weddings are just put on to keep the family happy, and don't seem genuine to the couple.

I don't want that kind of wedding; to be honest, I just want a husband: having a small church ceremony with about 30 guests who are in Halloween costumes and then go home afterwards for a family dinner. However, I'm not the only one getting married of course! My fiancé's dream wedding has to be taken into consideration!

So, we'll be having a hotel reception but with our own twist: we're going for a red and black palette with a kinda spooky vampire theme. I want to look like a pretty vampire bride. Fancy dress will be very much encouraged.

But the main thing of interest for this blog is of course the cake, which I will be making myself! Yes, I have decided to put my baking skills to the final test and make a cake for about 100 to 120 guests, and I'm extremely excited about it.

At the time being my plan is to make a cupcake wedding cake with a small cake at the top for cutting with my brand new husband. The colour themes is black and red, with white, and so the cakes will be a selection of flavours decorated with red and white icing. I thought decorating them with little superhero royal icing run-outs would be a nice touch for my fiancé's interest in geeky stuff.

I'll be keeping a record of all my experiments and sketches on this blog as I develop my concept and practise making lots of fairy cakes!

I'm super excited to do this, and I hope you'll all be excited to follow my progress!

Friday, 6 July 2018

2018's Annual No-Machine Ice-Cream Experiments: We're Here Again!

 Once again it's time to experiment with ice-cream creations as July, which is International Ice Cream Month, rolls around.

This year's trials have been broad and involved a lot more research and experimentation that in previous years, because nowadays as the Internet grows and information is more widely and readily available, research is easy to conduct from the comfort of your own living room.

The biggest research resource these days is YouTube, where you can find a video on nearly anything you can imagine and there are hundreds of thousands of aspiring cooking-show hosts who have taken the brave step of setting up a camera in their kitchen for the whole world to see.

Unfortunately, pointing a camera at what you're doing is as good as useless if you don't thoroughly and adequately explain what you're doing, and this is something I've discovered on my educational travels around YouTube.

Here are a few things I tried from online videos, and what the results were like for me. Spoilers: only one of them worked, and I already knew it worked.


Homemade Salt and Ice Churn

I found this video by an Italian man and it was very convincing and I gave it a try, but when I actually did I found that there was a lot of missing information:


In the video, the presenter:

Makes a simple vanilla custard in the traditional way with cream, milk, eggs, sugar, and vanilla
Chills the custard to be frozen later.
Prepares a bowl full of ice and salt in a rough proportion of 1 part salt to 4 parts ice
Places a metal bowl on top of the ice and adds in the custard
Mixes the custard with a wooden spatula as it freezes from the coldness of the ice

Now, making ice-cream with ice and salt is nothing new—kids have been doing this for as long as I can remember, including when I was a kid myself—but there are several things missing from this video:
  1. How long does the whole churning process take?
  2. Does it have to be fine salt, or will any salt do?
  3. Does the ice and salt mixture need refreshing at any point in the process?
  4. Can this ice-cream be stored in the freezer in a tub, or must it be eaten immediately?
When I tried this myself, these are all problems I encountered and my ice-cream never actually froze and all the ice melted before anything happened. I used coarse salt, and maybe that was an issue, but it was all very disappointing.


Food Processor Trick

Another trick I see frequently online is using a food processor to make ice-cream in a similar way to an ice-cream churn. Most people have a food processor, and this means you don't need to buy another kitchen gadget when you already have one that'll do.


In this video, the presenter:

Takes an ice-cream base and freezes it into a thin sheet in a freezer bag
Breaks up the frozen sheet
Blitzes the frozen pieces into a smooth soft serve ice-cream
Pours it into a tin to freeze for 2 hours before eating

This one works quite well, however the ice-cream freezes into a solid lump the longer it stays in the freezer: not enough air is incorporated to keep it fluffy over long storage times. Also, I found that pouring the ice-cream base directly into the food processor bowl, popping that into the freezer, and taking it out and blitzing it every 30 minutes in the same way an old fashioned make-at-home ice-cream would be made worked a whole lot better. It was still a big frozen lump after 5 hours, though.


Semifreddo, not Ice-Cream

This one has no video, but I remember seeing Nigella Lawson do this kind of thing on one of her programmes once. In this recipe, you mix eggs and sugar into a fluffy sabayon before folding with softly whipped cream and freezing into a loaf. This loaf is then sliced up and served with fresh fruit and sauce.

I tried this and it was quite tasty, but definitely not ice-cream: it's mouthfeel was more like a frozen mousse, and as it thawed and melted it produced a thick bubbly mixture all over the plate. Like the food processor ice-cream, it too freezes completely solid if left for too long.


Cream and Condensed Milk Old Favourite

This method is the one I have used on here for about 4 years at this point, and it still works fabulously. My only tiny issue is that if you over whip the cream the resulting butter-fat can leave an oily film on the roof of your mouth that makes for quite an unpleasant mouthfeel. In comparison to the other methods, however, that's only a tiny gripe.

It has the richness of a luxury ice-cream, like Haagen-Dazs or Ben and Jerry's, so if you're looking for something a little lighter like a French ice-cream or a gelato this really isn't the recipe to use. That's why I was experimenting with the other methods to see if I could make something a little lighter and a method that could be used to make sorbet too.


In conclusion, I really think if you want to make traditional ice-cream, you need a churn, or you've simply got to accept that no-churn ice-cream will be fiddly, time consuming, and hard to store longterm. Happy ice-creaming!

Monday, 30 April 2018

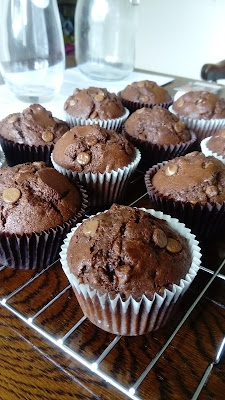
Schoko-Nuss Muffins: Double Chocolate and Pecan Muffins (Wheat Free, with Dairy Free Option)

Today is the last day of (Irish) spring, and before the summer recipe collection starts, here is my final springtime offering: chocolate and pecan nut muffins!


Apologies for the poor photo quality: I'm due a phone upgrade, and as my phone ages (for the whole two or so years I've had it) the camera quality has slowly degraded. The levels and contrast are all over the place. Hopefully, with my new odd job doing homework tutoring, I can save up for a new one!

But anyway, back to the recipe.


It's been a while since I did a muffin recipe: the last one was nearly eighteen months ago back in the September of 2016, where I was introducing my companion to the wonderful world of baking. I don't think I've done many muffin recipes at all on this blog, because I'm not a big lover of muffins, truth be told.

However, I was moved to try a new muffin recipe with inspiration from the Whoopie pie recipe. When I was eating a whoopie pie, I thought they tasted very muffin-like, which made me wonder if the recipe could be adapted. I took the whoopie pie recipe, and simply added an extra medium egg, 4 ounces (115 grammes) of chocolate chips, and 2 ounces (55 grammes) of pecan nuts. I divided the mix among 12 large muffin liners, and baked at the same temperature for 20 to 25 minutes.

They worked really well! Although, next time I think I'll try adding a little extra sugar because they were a little more bready than cakey. They turned out well for an experiment!

THIS TIME IN 2015: Tiramisù Mini Cheesecakes (Wheat Free)
THIS TIME IN 2013: Dinosaur Kimberleys (Wheat Free)
There were no blogs on or around this day in 2014, 2016, nor 2017.

Wednesday, 17 May 2017

Kitchen Experiment: DIY Bundt Tin

Time for another one of my kitchen experiments, and this time it's an equipment trial. This was my last minute fix for a DIY Bundt tin.


 You can't move a pace on Pinterest without running into a ring shaped cake. Some of them are plain with straight sides, some are even square, and then others are made in beautifully ornate tins, some of which are heirloom items. Once the Germans brought the ring cake to America, it took on a whole life of its own.

However, the rung shaped cake tins can be incredibly expensive, or difficult to find. Especially here in Ireland, where the only walk in cake supply shops are in major cities, or sometimes not at all; for example, there isn't one in Limerick since it closed down in February.


So, what's a girl to do?

I thought'd I'd experiment with ways of making a traditional round cake tin into a ring tin by putting things in the middle. The first thing I tried was a glass, but it wasn't very effective: the crust from inside the hole came off on the glass.

I then tried an empty can, washed and dried thoroughly with all labels removed, and filled it with rice to hold it in place. I greased everything really well, and this method worked much better. Even though the inside crust still didn't fully form, it was much straighter and easier to get out.


In both attempts, the hole never properly crusted. I wonder if it has something to do with the rice weights: maybe the heat can't flow through the centre tube well enough when it's full of rice. A quick trip onto the aforementioned Pinterest shows that a crustless hole is no big deal: there's many a Bundt and tube cake without an interior crust.


Eating a cake in the shape of a ring is a novelty, but it doesn't really change the flavour or texture than much. I do understand that some kinds of cake mixture bake better in a tube pan, where the centre doesn't stay soggy. But, to me, this is merely a novelty.


Maybe I'll try this technique to make a nice German kugelhopf, which is a yeast risen ring shaped cake.

No blogs on this day in previous years.

Friday, 17 March 2017

St Patrick's Day 2017: Royal Icing Biscuits, attempting a new technique

 Lá Féile Pháraic shona daoibh!
(Law Fay-luh Faw-rick hun-na yeev)


St Patrick's Day is upon us, and I coincidentally wanted to make some biscuits, so I thought I'd make some and ice them accordingly! But a little differently this time...

Usually when I do royal icing I do the usual pipe a dam around the edge of the biscuit and flood fill it using a small greaseproof piping bag. However, I was surfing on Pinterest, and found a pin where someone had done flood 'filled' biscuits by dipping the biscuits in flood consistency icing. So I thought I'd give it a try.


I baked some nice little shortbread biscuits by mixing 1½ ounces (40 grammes) of very soft butter, 3 ounces (85 grammes) of icing sugar, 4½ ounces (125 grammes) of plain flour, with a dash of vanilla essence by hand in a mixing bowl until it became a nice soft dough. I rolled it to about a quarter inch (5 millmetres) thick, and it made 12 biscuits, four of each of the three shapes I had chosen. I baked them at 150°C (300°F, Gas Mk.2) for I think about 25 minutes. To be completely honest, I was doing the washing up and not watching the clock, and judged the doneness by eye and by feel: they should be a very delicate golden brown and set just around the edges. This shortbread recipe works a treat as it doesn't lose its shape and stays nice and evenly coloured.


I made some royal icing (I cheated and bought a bag of instant) and divided it into two to colour one portion green, and leave the rest white. To dip the biscuits, I scooped a spoonful of the icing out onto a plate, and dipped the biscuit face down, and used a knife to remove any excess. I dipped two of each of the four shapes into the white, and two of each into the white.


I had also made some small cone piping bags using greasproof paper, and filled them with some green and some white icing. While the dipped biscuits were still wet, I piped on the designs, using the tip of a knife to do some marbling. Now, usually I would use a cocktail stick, but I didn't have any, so I used the tip of a sharp knife, like a paring knife.


VERDICT: Personally, I actually prefer the traditional pipe and flood method: the dipping method was messy, and the icing ran incorrectly and didn't settle properly. Some of the marbling lines stuck rather than melting back into the surface, which bothered me. Maybe I just need to practise this method, or just stick to my usual pipe and flood method.

No blogs on this day in previous years.

Monday, 6 March 2017

Yeast Spelt Doughnuts (Wheat Free)

I couldn't stay away from yeast doughs for long! And today's offering is doughnuts....


 In Germany, they are called berliner. In Portugal, they are called malasadas. In Italy, they're called bomboloni. In French, they're called beignets. In Irish, they're called taoschnó.  In Lithuania, they are called spurgos. In Poland, they call them pączki. Whatever you call them, they're delicious.

As someone with who was socialised in English culture, I believe that Great Britain is built on stodge: heavy, doughy, bready, oily foods are part and parcel of what it is to be an Englishman, it seems.Although I understand that doughnuts are a mainland European concept that was introduced to England and the rest of Britain, they have been fully embraced as part of the pastry culture of the island nations.


One of my guilty pleasures is buying iced ring doughnuts from the bakery section of my local supermarket, and over the past four or so years of my blog I have experimented with many different cake doughnut recipes. Cake doughnuts are risen with baking powder or soda, whereas traditional doughuts are risen with yeast. Now that I've got the hang of making yeast risen dough, I can try making traditional doughnuts.


To make these, I use the same dough as I used to make the iced buns and burger buns, and rolled it out the a half inch (1 centimetre) thickness. I then cut out 3 inch (7½ centimetre) circles. Using my fingers, I pinched a hole in the middle of each circle and stretched it out to make an inch (2½ centimetre) hole in each one.

I laid them out on a well floured (and I mean well floured) surface and allowed them to rise for 20 odd minutes, flipping half-way, until increased in size by about a half. Over rising the doughnuts will make them collapse when you pick them up.

Had I had access to my deep fryer, I would have fried them in 180°C (350°F) oil for two minutes on either side. However, I didn't: I'm in Roscommon, but my deep fryer is in my Mum's house. So, I had to use a saucepan with about two or three inches of oil in it, heating it on medium heat. As such, they got a little sunburnt, and because the oil was too hot, there were air pockets under the crust in some of them. But they still tasted fabulous...


If you want, toss them immediately after frying in caster sugar and cinnamon, to taste. I use a tupperware box and do one at a time, but you can use a brown paper bag, too. Or, you can ice them with a simple icing of 4 ounces (115 grammes) icing sugar, 1 tablespoon (15 grammes) butter, melted, and mix in enough water to make an icing. Don't make it too thin, though, otherwise it'll dribble all down the sides. You can colour the glaze if you like, or make it chocolatey by replacing 1 teaspoon or so of the icing sugar with cocoa powder. Decorate with sprinkles, desiccated coconut, grated chocolate, flaked almonds, or whatever you like!

I enjoyed this project, but there are a few things I would change for the next time:

  1. I'll use a proper fryer, to avoid burnt outsides and raw insides.
  2. Cut the middles out instead of pinching them: pinching them made the dough tighten up, and made some of the doughnuts come out in funny shapes.
Roll on the next batch of delicious fried oily cakey yeasty doughnuts....

No blogs in 2015 or 2016

Tuesday, 6 December 2016

I've Finally Cracked It! Working with Yeast and Spelt: Iced Finger Buns (Wheat Free, with Dairy Free Option)

UPDATE 05/05/2017: I slightly altered the dough preparation method, introducing a sponge technique to help dissolve the yeast, and properly gauge the amount of flour and liquid needed.

I've done it. I've finally done it. I have succeeded after years of trying: I have at long last cracked the code to making dough with yeast and spelt! So many years of failed attempts... I'm so relieved.

So, I decided to celebrate by making a tasty batch of lovely iced finger buns! A little taste of childhood for my siblings and I.


There is nothing quite as English as spreading a load of icing on top of a piece of bread. I don't quite know why, but it fairly accurately sums up the spirit of the British approach to eating. And to make them, you need a nice, soft, pillowy bread recipe.

So what has my difficulty been with spelt and yeast? I've mentioned many times over the years, more than I can count at this stage, that spelt and yeast don't mix well. This was a believe I had formulated as a result of countless failed attempts at making yeast leavened dough with spelt flour instead of wheat flour. I thought the problem was the flour. Turns out the problem has been the yeast and the fermentation process all these years.

Ireland doesn't have a very warm climate: it has a wet, damp, humid, mostly freezing cold climate. None of these is conducive to:

1. Fermentation
Yeast needs a nice warm environment to grow in. It is indeed a living organism, a tiny little mushroom creature, that needs to be warm, well fed, and hydrated to perform like it should. I obviously haven't been getting my dough proving at the right temperature of humidity all these years, because the dough has never risen.

or 2. Yeast Lifespan
Cold damp houses aren't nice places for yeast to live. I'd say more times than not over the last few years, I've used yeast that has probably already perished under such inhospitable conditions.

I bought some new yeast, some new flour, and attempted to make yeast dough again. I summed up the courage to attempt it again, even though it may have failed miserably. This time, I was not disappointed.

I had formulated the recipe by cross referencing a load of recipes together, inspired mostly by the Korean doughnuts and dinner rolls of Maangchi, and by the iced bun recipe of The Great British Bake Off's Paul Hollywood. I also followed some recommendations online about how liquid behaves differently with wheat flour and spelt flour. Armed with this knowledge, I formulated the recipe below.


I made sure the dough had a lovely house to live in while fermenting: the oven, with the heat turned off but the light left on, with a bowl of boiled water on the bottom shelf to make it nice and steamy. This made the dough rise perfectly! I was amazed: the dough looked, and smelled, incredible. Look at all those bubbills!!


Although I had a little hiccup with the oven, where the element was broken and I had to improvise with the fan assisted grill setting, they baked wonderfully! The rolls were exquisitely soft and springy on cooling, and had a deliciously present yeasty flavour. 


The butter, sugar, and eggs keep the bread soft, but not too sickly sweet or rich. In fact, I think they'd make nice hot dog rolls if the mixture were slightly re-purposed.


See the lovely soft sides, and delicious texture within? I know I'm totally fangirling over this bread right now, but I cannot tell you how happy I am to finally have a successful spelt bread attempt.


So, without any further ado, after almost four years of blogging, I present to you a recipe for soft spelt bread.

FREE FROM
☑ Soya (check for soya lecithin)
☑ Wheat
☑ Nuts

CONTAINS
☒ Eggs
☒ Dairy (dairy substitutes can be found in italics)
☒ Gluten
☒ Yeast
☒ Refined sugar products


INGREDIMENTS
For 16 small buns, or 12 large buns
  • 1 pound (455 grammes) white spelt flour, plus some for dusting
  • 2 quarter-ounce (7 gramme) packages of dry active yeast
  • ½ teaspoon (3 millilitres) salt
  • 2 ounces (55 grammes) caster sugar
  • 2 medium eggs, room temperature
  • 6 fluid ounces (180 millilitres) hand-hot milk
  • 2 or 3 tablespoons (30 to 45 millilitres) warm water, to adjust the texture if needed
  • 2 ounces (55 grammes) butter, at room temperature, or margarine
For icing,
  • 1 tablespoon (15 grammes) butter, or margarine
  • 3 ounces (85 grammes) icing sugar
  • 2 to 3 teaspoons (10 to 15 millilitres) hot water
  • Optional: Food colourings and essences

METHOD

First, prepare the yeast dough.
  • In a large bowl, mix together the sugar, milk, salt, and eggs. Mix in the yeast, and then add in half of the flour to make a paste. If it is too dry, add more milk or water, and if it is too wet, add some more flour. It should be like a gluey paste, not a cake or pancake mixture.
  • Allow this mixture to sit for about 20 minutes, or until it starts to rise and bubble. If you like, you can allow to it rise until doubled, which will save kneading time.
  • Add in rest of the flour, a little at a time, to form a dough. You can use your hands, or a wooden spoon. You may not need to add all the flour, or you may need to add some more. Bread making is not an exact science: sometimes room humidity, or even the brand of flour, can change the consistency.
  • Once you achieve a dough, turn out onto a floured work surface and knead for 5 minutes. The dough should be soft and tacky, almost sticky.
  • Then, knead in the soft butter. It will take another 3 or 5 minutes to knead in the butter, and once you're done it should be a lovely soft, supple, tacky (but not sticky) dough.
  • Clean out the bowl and grease it lightly. Roll the dough into a ball and put in the bowl, tossing a few times to coat it in oil.
  • Cover with clingfilm, then a tea towel, and leave to rise in a warm place for 1 to 1½ hours to at least double in size. I put mine in the oven, turned off, with the oven light on, and a bowl of hot water on the bottom shelf to make a nice warm, humid atmosphere. 

Now, make the fingers.

  • Grease and flour a 13 by 9 inch (33 by 22 centimetre) flat baking tray.
  • Once risen and puffed full of air, gently deflate and turn out onto the work surface. Only use a dusting of flour if it's sticking.
  • Divide the dough into 16 pieces, and roll each piece into a rectangle about 4 inches (10 centimetres) wide; the length doesn't matter. Roll them up like little Swiss rolls.
  • Place the rolls on the baking tray about an inch (2 centimetres) apart to allow for rising. You want them to rise into each others' sides to get nice soft sides.
  • Drape a clean tea towel or the clingfilm from earlier over the rolls and place back in the warm place and leave for 45 minutes to an hour, until once again at least doubled in size.
  • Preheat your oven to 220ºC (425ºF, Gas Mk.7 or 8), then bake the rolls on the centre shelf for 10 to 12 minutes, or until golden brown on top and well risen.
  • Turn the buns out, still attached to one another, onto a wire rack to cool completely before pulling apart.
I used two trays because I didn't have one big enough. 
And yes, there are 14. I miscounted my doughballs.

Once fully cool, ice the fingers.
  • Mix together the icing sugar, butter, and half of the water until a smooth icing is formed. You may need to add more water to make it nice and spreadable.
  • Spread about a rounded teaspoon of icing onto each roll and spread it across the top with the blunt side of a table knife, or a palette knife.
  • If you like, you can decorate the tops with sprinkles, hundreds and thousands, sweets, or grated chocolate.
I decorated mine with some coffee flavoured icing, and some plain icing in white and pink. Look forward to more experiments with spelt bread in the future, but for now make these and enjoy them for up to two days, as long as they're kept airtight.


It's been a while! Happy 9th Anniversary!

  It's been a while. The past two years have been a helluva a ride. This year is gonna hold some big changes for this blog. I'm comp...