Monday, 29 July 2013

Homemade Box of Chocolates = WIN

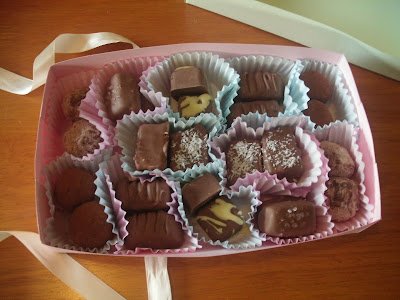
So, as I mentioned in a previous post, it's my parents' wedding anniversary tomorrow and I decided to embark on a quest to make a selection box of chocolates from scratch. And here she is!!


The selection includes milk chocolate coated:
  • Coconut ice (topped with little shreds of coconut)
  • Chewy caramel (topped with a sprinkle of coarse salt)
  • Creamy fudge (decorated with ridges made with a fork)
  • Milk chocolate truffle (ball shaped with a dusting of dark cocoa)
  • Praline truffle (ball shaped with pale cocoa dusting)
  • Gooey orange fondant (drizzled with orange flavoured white chocolate drizzle)

For my first attempt at something like this, this turned out excellently! I'm so pleased with it, and am very proud of my efforts. Some didn't work, but those didn't go to waste as they were guzzled down by my siblings without any hesitation. It's all learning for next time... and there will be a next time.

I will upload all the recipes and make some photo tutorials for the dipping, and especially the moulded chocolates, which are the ones with orange drizzle. I used a silicone mould for those, in which I cast the melted chocolate. Weirdly enough, the casting technique is one I learnt from my time studying ceramic product design in college; the same principle, it turns out, can be used in chocolaterie.

The only change I would make is that I would spend a little bit more money on good quality chocolate for coating. The stuff I bought was cheap and wasn't tempered properly to start with, so tempering myself was almost impossible. I had to add some solid vegetable fat to make it flow and set nicer; don't worry, it can't be tasted.

I also made the box using a very simple technique.
  • Take a piece of A4 card, coloured if you like.
  • Using another piece of card cut to a 1½ inch (4 centimeter) width, draw a 1½ inch (3.8 centimeter) margin around all four edges of the card.
  • Following the template below as a guide, cut along the red lines and fold along the dotted lines.
  • Now, you have an A4 page with four little tabs. Fold up all four sides, folding the little tabs behind the short sides towards the middle. Glue together and allow to dry.
  • To make the lid, follow the above instructions but make the margin around the page 1⅓ inches (3.5 centimeters) instead.


And now you have a lovely box to keep you chocolate in! Sit the chocolates in little cupcake cases and arrange inside.

Thursday, 25 July 2013

Sweeties Make Great Gifts, Hopefully

As I said in my previous post, next week I have two family events: my parents' thirtieth wedding anniversary and my sister's sixteenth birthday. I love family gatherings and events because it's a chance to get the family all in one place and have fun, but I dislike them due the the expectation of gift-giving.

The reason I dislike gift-giving isn't because I don't like spending money, but I don't like the concept of a contrived event where you are expected to give someone something they most likely don't want or won't use. Why can't you give people presents for no reason at any other time of the year? I also dislike Valentine's Day greatly for this reason: it's just forced and cold. Why can't I give my man-friend a nice present and a have a nice meal with him at any other time of year to celebrate our togetherness like, oh I dunno, our anniversary?

Because of this, I quite like giving people things they can eat as presents, because they're guaranteed to get use out of it or them; and people always like to eat sweeties! So, I'm guaranteed to please by giving someone a selection of sweeties for their birthday, or savouries if they don't like sweeties. I'm thinking maybe for my parents I'll make a selection of chocolate truffles and package them in a box, and for my sister a selection of bon-bons and package them in a jar. It's little effort for maximum result.

A side effect of this idea is that it has reignited my love of sweetie making and sugarcraft. Maybe you'll all be seeing tonnes more sweetie recipes and ideas after this! I may need to get one of these made...


Monday, 22 July 2013

No Money = No Baking

Sadly, this week is a no money week for me; therefore, there shall be limited baking. As in, there will be no baking at all. I just died a little on the inside in admitting that...

However, there is a good reason that I'm strapped for cash. I'm saving my pennies for three separate events of great importance next week: my parents' thirtieth wedding anniversary, my sister's sixteenth birthday, and a long overdue visit from my man-friend. I have to save the pennies for gifts for my parents and sister, and anything that myself and the fellow might like to do.

Sorry for the brevity of this post, but there's not really much more to say than this. I just try to make sure that I post at least something every Monday and Thursday, even if it's not a baking post, so I stay in the habit of regular posting.

Thursday, 18 July 2013

Ginger Nut Biscuits (Wheat Free)

As far as I'm aware, ginger nuts in the States are known as ginger snaps, and are traditionally eaten around Christmas time. Here however, they are basically a staple of any household's biscuit barrel, and are cursed for tainting nearly every other biscuit therein with a slight gingery hue. They also are rock hard when bought from the shop, and do well to be left to go a little stale deliberately to prevent broken teeth.


I remember making ginger nuts when I was a little girl: I'd help my mother make a batch every now and then, and I was always fascinated by the biscuits going into the oven as balls and coming out flat and round. The hardest task was waiting for them to set before eating, so they wouldn't just fall apart in your hands.

Having designed a pretty fail safe recipe for the chocolate chip cookies, I decided to move onto other kinds of 'drop biscuit'. Drop biscuits are those that aren't rolled out and cut, like shortbread or gingerbread. Drop biscuits are ideal for those with limited kitchenware, as all you need is a mixing bowl, a mixer and/or wooden spoon, and a baking tray; and of course an oven. That's essential.

As you will see, this is very, very similar to the chocolate chip cookie recipe except for a few little differences.

INGREDIMENTS:
Makes 25 to 30, depending on size

  • 8 ounces (255 grammes) spelt flour
  • 1 teaspoon baking soda
  • Pinch of salt
  • 1 tablespoon ground ginger
  • 1 teaspoon ground cinnamon
  • ½ teaspoon ground coriander
  • ¼ teaspoon ground cloves
  • 4 ounces (115 grammes) butter, at room temperature
  • 3 ounces (85 grammes) caster sugar
  • 3 ounces (85 grammes) brown sugar
  • 2 ounces (55 grammes) golden syrup, or treacle for the adventurous
  • 1 medium egg


HOW-TO:
  • Preheat the oven to 180°C (350°F, Gas Mk.4, or moderate). Line one or two baking trays with non-stick baking paper, depending on how big your oven is. Make sure the shelves are in the middle of the oven.
  • Sieve together the baking soda, spices, salt and flour together onto a piece of greaseproof paper and set aside.
  • In a large mixing bowl, beat the butter until creamy with a wooden spoon or electric hand mixer. Once creamy, add the two sugars and continue to beat until fully combined.
  • Add in the egg and beat until just mixed in. Here is where usage of the electric hand mixer ends.
  • Using a wooden spoon, mix in the sieved flour mixture, and gently work in with the wooden spoon until all the flour has disappeared into the mixture. This dough doesn't need to chill, so you can use it straight away.
  • Scoop rounded teaspoonfuls of the mixture and roll into balls between your hands. Put on the trays 2 to 3 inches (5 to 6.5 centimetres) apart, and place the tray(s) on the middle shelf(ves) of your oven. 
  • Bake the biscuits for 14 to 16 minutes, or until a rich golden brown. They will puff up during cooking, but then start to crisp and crack on the outside. This is what you want.
  • To ensure consistent and even baking, turn the trays around through 180° half way through baking, and swap the shelves if you have two trays.
  • When the baking is up, remove from the oven immediately. Take the trays out and leave them on the work surface, biscuits still on, for another minute until they sink back into flat rounds.
  • Remove the non-stick paper, biscuits still attached, and place on the cold work surface for a further minute. Then remove the biscuits and cool completely on a wire rack.
These are best enjoyed dipped into a hot cuppa schkald.

Monday, 15 July 2013

Chocolate Chip Cookies, finally! (Wheat Free)

I must apologise for my lack of update last Thursday: I have been ridiculously all-over-the-place over the last fortnight or so. I took an impromptu trip to visit a friend up the country in Roscommon, and as such had no access to my kitchen to bake something. I also am pleased to announce that from now-on (as far as I know) I won't be using crappy mobile phone photos, as my camera seems to have recovered from whatever ailment was preventing it from taking pictures. Now, back to business.

If any of you read my previous post on my somewhat obsessive quest for the perfect chocolate chip cookie, you will know that finding the secret has been trickier than I first anticipated. However, after months of experimentation, many rubbished batches of innocent little biscuits, annoyance at cup-to-ounce conversions, and temperamental ovens, I have finally achieved what I consider to be the perfect American style chocolate chip cookie:

They're thick enough but flat -- not puffy -- having spread from a ball into a perfect round during cooking; it should be crispy around the edges, but chewy and soft in the middle; it has a slightly cracked surface like a ginger nut,  and has an even distribution of chocolate chips throughout.


I found that my mildly O.C.D nature of having whole ounces was standing between me and my goal: changing the measurements by half an ounce was sometimes all I needed to do, but half ounces kind of upset me. I like whole numbers, and usually whole numbers that have a common factor, like two or three. I get a little odd about numbers having a logical sequence, but it seems that baking is not as exact a science as I thought after all!

Now my search has ended, what will I search for now? I think my next challenge will be finding the best way to make ice-cream with no ice-cream churn; that certainly seems to be very difficult.

So here's the grand unveiling!

INGREDIMENTS:
Makes 25 to 30 biscuits, depending on size

  • 7½ ounces (215 grammes) white spelt flour
  • 1 teaspoon baking soda
  • Pinch of salt
  • 4 ounces (115 grammes) butter, at room temperature
  • 2½ ounces (70 grammes) caster sugar
  • 3 ounces (85 grammes) light brown sugar
  • 1 medium egg
  • 1 teaspoon vanilla essence
  • 7 ounces (200 grammes) chocolate chips of your choice, I personally like a mix of white and dark


HOW-TO:
  • Preheat the oven to 170°C (325°F, Gas Mk.3, or very moderate). Line one or two baking trays with non-stick baking paper, depending on how big your oven is. Make sure the shelves are in the middle of the oven.
  • Sieve together the baking soda, salt and flour together onto a piece of greaseproof paper and set aside.
  • In a large mixing bowl, beat the butter until creamy with a wooden spoon or electric hand mixer. Once creamy, add the two sugars and continue to beat until fully combined.
  • Add in the egg and vanilla essence, and beat until just mixed in. Here is where usage of the electric hand mixer ends.
  • Using a wooden spoon, mix in the chocolate chips. Adding in the chips before the flour means the chips get even mixed through, and that the flour doesn't get over worked, leading to tough biscuits.
  • Mix in the sieved flour mixture, and gently work in with the wooden spoon until all the flour has disappeared into the mixture. This dough doesn't need to chill, so you can use it straight away.
  • Scoop rounded teaspoonfuls of the mixture and roll into balls between your hands. Put on the trays 2 to 3 inches (5 to 6.5 centimetres) apart, and place the tray(s) on the middle shelf(ves) of your oven. Bake the biscuits for 10 to 12 minutes, or until slightly golden around the edges, but still slightly gooey and un-set in the middle. They will puff up during cooking, but this is what you want for the cracked surface.
  • To ensure consistent and even baking, turn the trays around through 180° half way through baking, and swap the shelves if you have two trays.
  • When the baking is up, remove from the oven immediately. Don't look at them and think 'they don't look very done yet': their slight un-done-ness is part of the process. Take the trays out and leave them on the work surface, biscuits still on, for another minute until they sink back to being thick yet level biscuits.
  • Remove the non-stick paper, biscuits still attached, and place on the cold work surface for a further minute. Then remove the biscuits and cool completely on a wire rack.

Witness perfection (i mo thuaraim, pé scéal é). Four months of relentless experimentation and finally I have it. Of course, you can put any filling you want in here, or even flavour the base biscuit with spices or citrus zest; I personally like flavouring the biscuits ever so slightly with cinnamon, or even adding in some chopped crystallised ginger with the chocolate (but then again I do have a fascination with mixing ginger and chocolate at every available opportunity). Experiment, enjoy yourself! That's what baking is all about!

Monday, 8 July 2013

My Search for the Perfect Chocolate Chip Cookie Continues

For about 4 months, I have been experimenting with many different recipes and methods for making American style chocolate ship cookies. To me, the ideal chocolate chip cookie is should be thick enough but flat -- not puffy -- having spread from a ball into a perfect round during cooking; it should be crispy around the edges, but chewy and soft in the middle; it should have a slightly cracked surface like a ginger nut,  and have an even distribution of chocolate chips throughout.

It seems in the wheat-free world, this is a big ask.

I used to make these kinds of cookies when I could eat wheat and they turned out perfectly every single time, and now I just can't seem to achieve it anymore. I've tried well over a dozen recipes at this stage, and none have worked, and I've even put a considerable amount of time into studying the behaviour of certain ingredients in the cookies by altering them deliberately to see if I can predict any kind of effect: what happens if there's too much fat? What happens when there's too much sugar? What happens when the oven temperature is too low, or the cooking time too long?

At this time, I'm beginning to feel the burn of utter frustration. Part of me is thinking that maybe I'm just a perfectionist and every batch I've made so far has in actual fact been okay: they've never tasted bad, they've just never been aesthetically pleasing, or had a good texture or crumb. I have found, however, that this is a recipe that needs all spelt flour, and no substitution of cornflour. We need all the gluten we can get here without wheat, guys!

Here's a picture of my last batch:


They tasted amazing, but still didn't look right! One or two in this batch had that perfect cookie shape and cracked surface, but these were too thick. I suppose it's back to the drawing board.

Any suggestions?

Thursday, 4 July 2013

Soda Bread with Oats and Sunflower Seeds (Wheat Free)

Soda bread is ever so simple, and is the perfect bread for a beginner as it needs no yeast. This kind of bread recipe, known as a quick bread, relies on the very basic principle of acid + base = gas for leavening, and as this is an instant reaction it can be cooked straight after preparation. It has been a staple of Irish kitchens for many a year, and its stale crusts has teethed many an Irish country toddler.

However, as nice and easy as it is, it can be really boring if made with plain old flour (even if it is wholemeal, which is flavourful and complex), so to spice things up a bit it's nice to add seeds, herbs and spices, other grains, or even finely chopped nuts. My cousin visited recently and left behind a packet of sunflower seeds, which I found add such a delicious flavour, and bring life and colour to an otherwise visually boring.

Also, soda bread is traditionally made with buttermilk: the acidity of the buttermilk reacts with the bread soda causing lift, and it gives the bread richness. However, if you don't plan on making soda bread often, it would be impractical to keep buttermilk in he fridge, as it would go off before you used it all. If you want to make your own buttermilk, simply add 1 tablespoon (15 millilitres) of lemon juice to every 8 fluid ounces (240 millilitres) of normal milk, stir and allow to rest for 10 minutes, stirring every little while.

Let's get onto the recipe itself.

INGREDIMENTS:
This will yield one 8x4 inch (21x10 centimeter) loaf.

  • 1 pound (455 grammes) spelt flour, white or whole meal
  • 1 teaspoon (5 millilitres) bread soda (bicarbonate of soda)
  • ½ teaspoon salt
  • 2 ounces (55 grammes) rolled oats
  • 2 ounces (55 grammes) sunflower seeds 
  • 12 fluid ounces (340 millilitres) buttermilk
  • 2 or 3 fluid ounces (60 or 85 millilitres) water, if needed

HOW-TO
  • Preheat the oven to 180°C (350°F, Gas Mk.4, or moderate). Grease and flour a loaf tin.
  • In a large bowl, mix the flour, bread soda, salt, oats, and sunflower seeds until fully blended. Make a well in the middle.
  • Pour the buttermilk into the well, and using your hand (don't use any tools for this, soda bread needs a sensitive hand only) and gently mix together the wet and dry ingredients until just brought together. 
  • This mixture should not be like usual bread dough, or even like biscuit dough, it should be  sticky and make an absolute mess of your hand; imagine the texture of thick porridge. If you need to add the water to get the right consistency, add it an ounce (30 millilitres) at a time.
  • Pour into the tin and put into the oven. Bake for about 40 minutes, or until a skewer inserted into the centre comes out with one or two crumbs clinging to it, and the loaf sounds hollow underneath.
  • Once removed from the oven, wrap in a clean, damp tea towel.

Simple as that! Slice thick, slice thin, eat toasted, eat straight, with butter, jam peanut butter, whatever! This is perfect student food, as it is cheap, keeps well and freezes better. Store in an airtight container, and cut as needed to prolong the shelf-life.


Incidentally, the green bits are sunflower seeds, not mould, before you ask!

It's been a while! Happy 9th Anniversary!

  It's been a while. The past two years have been a helluva a ride. This year is gonna hold some big changes for this blog. I'm comp...