Showing posts with label loaf. Show all posts

Friday, 3 May 2019

Banana Cheesecake Bread: Another Way to Use Up Overripe Bananas

What happens when you have too many bananas left over to simply make a banana bread? Then you crack out the big guns and make banana cheesecake bread! 


I bought an entire bunch of bananas, and completely forgot about them: they sat in my fruit bowl until they went brown and spotty. Now, I like spotty bananas, but even for me these went too far: they had got to the powdery stage of ripeness. 

So, I didn’t really want to make a load of banana bread because a) I’m not really banana bread’s biggest fan, and b) I already have a problem with baking more than can be eaten at home. But, I do have a friend who adores cheesecake in all its manifestations! I thought I’d make him a nice treat. 


This is an extremely banana-y dessert that’s sickly sweet, so I heartily recommend that it’s served with a dark chocolate, or mocha, sauce, or dusted liberally with a good quality deep, rich cocoa powder. The bitterness is key to mellowing out the sweetness. Alternatively, you can go all-out sugar-fest and eat with a delicious caramel sauce and some chopped pecans. 

The trick is to add one large mashed banana for every 225g (8 ounces) of cream cheese to your favourite cheesecake recipe. Mine is thick and crumbly, like a European baked cheesecake, but even if you use a more custardy style, like a New York cheesecake, bananas have a good setting quality like eggs when used in baking, so don’t worry about the recipe being too soft or soupy. 

Next time I make this, I'll make a round one; but, because I had so many bananas, I made two loaves. One went to my friend, and the other went to college with my fiancé.

Tuesday, 22 May 2018

Madeira Cake, Two Ways! A Traditional English Tea Time Treat

👻 ❤ HAPPY WORLD GOTH DAY EVERYONE! ❤ 👻

I had had another recipe planned for today, but unfortunately it went horribly wrong and went into the bin. Oh well, these things happen! I can't get it right all the time. However, a cake with eyes is spooky enough to qualify for a Goth cake....

So you hopefully have seen my most recent pride and joy—the Polish style loaf cake with eyes—and it relies on using a nice firm cake like a Madeira or Pound cake. As such, I thought I'd share with you my preferred recipe for a nice close-textured but surprisingly light cake.


It is commonly believed that Madeira cake is an invention of Portugal, where the Madeira Islands are: old wives tales will tell you that England imported the confection from their longest standing ally during the reign of Queen Elizabeth I. However, this is incorrect: Madeira cake is simple an eggier version of a traditional English pound cake, and got its name because it was frequently served as an accompaniment to Madeira wine at afternoon tea.

Madeira cake can be made in two ways: using a meringue base, or by creaming the butter. Either way works, but if you're going to use the creamed method I strongly recommend using margarine: it emulsifies a lot better than butter.

This cake can be made into a loaf cake, or this amount will also fit in an 8 inch (22 centimetre) round deep tin. If you make a round cake, split it in half, and make it into a sandwich with strawberry jam and cream, you'll make a wonderful Victoria Sandwich. Just remember to dust with icing sugar!

~~ ^ _ ^ ~~

DIFFICULTY
Requires gradually adding ingredients while whisking

TIME
Roughly 1½ hours

RECIPE RATING
Intermediate

~~ ^ _ ^ ~~

INGREDIMENTS

2 medium (US Large) eggs, at room temperature
4 ounces (115 grammes, half a cup) unsalted butter or block margarine, at room temperature. For a cake with more moisture, you can replace a quarter of the butter with sunflower oil
6 ounces (170 grammes, three-quarters of a cup) caster sugar
6 ounces (170 grammes, one-and-a-half cups) plain white spelt flour
1½ teaspoons (7 mililitres) baking powder
3 fluid ounces (90 millilitres, one-third cup plus one tablespoon) milk
Pinch of salt


METHOD
  • Grease and flour a 2 pound (900 gramme) loaf tin very well and dust it with flour. If you like, you can line the bottom with non-stick baking paper. Preheat the oven to 170°C (340°F, Gas Mk.3).
  • Prepare the cake to one of the methods below, and put the mixture into the loaf tin. Smooth out the top as best you can, and bake on the centre shelf for 45 minutes to an hour. Check for doneness after 45 minutes, but no sooner.
  • Once cooked, allow to cool slightly on a wire rack in the tin for about 15 minutes before turning out of the tin and returning to the wire rack to cool completely.


Method 1: Meringue Based Method (Traditional)

One of the earliest published recipes was by Eliza Acton in her Modern Cookery for Private Families (1845), which stated:

"A Good Madeira Cake: Whisk four fresh eggs until they are as light as possible, then, continuing still to whisk them, throw by slow degrees the following ingredients in the order in which they are written: six ounces of dry pounded and sifted sugar; six of flour, also dried and sifted; four ounces of butter just dissolved, but not heated; the rind of a fresh lemon; and the instant before the cake is moulded beat well in the third of a teaspoonful of carbonate of soda: bake an hour in a moderate oven."

This recipe makes a cake that's very heavy on the eggs, and the problem with eggy cakes is that if they don't rise properly they can taste like omelette. Also, I personally find it easier to whisk eggs to full capacity if they're separated first, then mixed back together: whisking whole eggs alone can take an age, as the fat in the yolks interferes with the aeration of the protein in the whites.

Below, is my adaptation of the traditional recipe. You'll probably have noticed I quite frequently do meringue- or sabayon based sponge cakes, because getting full and proper aeration in a creamed butter mixture can take a lot of practise.

Instructions
  • Set out a sheet of non-stick baking paper, and sieve the flour, baking powder, and salt out onto the paper. Set aside for later.
  • In a a heatproof bowl over warm water, or in a jug in the microwave on the "Defrost" setting, heat together the milk and butter until melted, but not hot. Stir in half of the sugar, and set aside to cool completely.
  • Separate the egg, and put the whites into a large mixing bowl. Stir the yolks into the melted butter mixture.
  • Whisk the eggs to soft peaks, and then gradually add in the remaining sugar to make a stiff meringue.
  • Take a spoon of the meringue and stir it into the melted butter to lighten it, then add that mixture back into the mixing bowl. Fold through gently but quickly with a metal spoon.
  • Pour the flour back into the sieve, and sieve it into the bowl. Fold again gently but thoroughly until you have a batter of soft-dropping consistency

Method 2: Creamed Butter Method (Modern)
Every baker started with a good old pound cake recipe: quarter pound each of butter, sugar, eggs, and self-raising flour mixed together with an electric mixer. The all in one method is very good for beginners, but runs the risk of being uneven or over-mixed, and the longer method of creaming the butter and sugar together and adding the egg gradually runs of the risk of splitting or curdling.

I personally have found the best way to avoid curdling of the butter and eggs is to use margarine, not butter: margarine contains emulsifiers that help bind the eggs and butter together. Also, when adding the egg, it's best to focus the beaters only on the area where the eggs are until it's completely emulsified, before running the beater around the whole bowl.

Instructions
  • Set out a sheet of non-stick baking paper, and sieve the flour, baking powder, and salt out onto the paper. Set aside for later.
  • In a large mixing bowl, beat the butter and sugar together very well for a full two to three minutes, until light and fluffy.
  • Beat the eggs together in a jug, and add the egg to the butter mixture in 4 additions, beating well after each. As I explained earlier: focus your beaters on the butter surrounding the egg until completely mixed before running the beater around the whole bowl to mix the whole thing together.
  • Sieve in a third of the flour and fold in gently but quickly until mixed. Fold in half the milk in the same way. Alternate the rest of the flour and milk, finishing with the flour.

THIS TIME IN 2017: Happy World Goth Day! (Goth Fairy Cakes)
THIS TIME IN 2015: Super Moist and Rich Chocolate Cake
THIS TIME IN 2013: Coconut Custard Creams (Wheat Free)
There were no blogs at this time in 2014 nor 2016.

Monday, 21 May 2018

Cake for Aimée: Madeira Loaf with Strawberry "Eyes" (Warning: Long Post)

On this wonderful day before World Goth Day, I present to you a cake that's been weeks in the making: Madeira Loaf Cake... with Spooky Eyes!


A few weeks ago, I began to make videos again for my YouTube channel. Normally when I do a video (although life has been a bit hectic recently so I've not done one for a while; I'd better correct that) I finish with an invitation for suggestions or questions. After I released a cake review video, I got a message from a friend of mine, named Aimée, who is currently travelling Southeast Asia. Our conversation went a little something like this:

"My Nannie used to buy this cake when we were younger but I thinks it’s been discontinued for a good while now, and I thought who’d be there most likely person to know about it: you my cake guru friend"

I was flattered to be referred to as a "cake guru", so I continued reading:

"It was a rectangle log, with shiny green-black wrapper, the inside was Madeira and the outside had a light layer of chocolate covering the whole thing. And through the middle were two strips of limey jelly so when you cut into it the line bit almost looked like eyes.

It was utterly delish but I cannot for the life of me remember what it was called and I've been trying for weeks to remember!"


After posting this question into a few baking groups on social media, and doing a bit of scratching around on Google, I came to a possible answer. After Aimée and I conversed back and forth, we came to the conclusion that the cake her Nan used to buy must have been this:


From my research I discovered that these kinds of cakes are very common on the continent, and used to be found here in Ireland in the Polish goods aisle of most large supermarkets: Aimée told me her Nan used to get hers in Supervalu. However, she was right in her assumption that this cake is now discontinued: I could not for the life of me find a cake like this in the Irish supermarkets, or the Eastern European supermarkets here in Limerick.

Because I couldn't get a hold of the actual cake itself, I had to do all of my investigation from photographs of the outer packaging, promotional photos of the cake itself on the company website, and from other people's blogs where they reviewed the cake.

I must have made about six versions of this cake (nearly all of which ended up in the food processor to be reincarnated as cake pops), and I tried loads of methods to get the two channels of jelly into the cake: I tried baking the cake with the jam in it with raw jam and cake, I tried freezing the jam into logs first and then baking it into the cake - some dusted with flour, some not - I tried baking half of the cake then adding the jam and the remaining cake mixture on the top to prevent to jam sinking. None of these worked, as each time the jam sank to the bottom, or there was a seam where the two cake halves met.

Then, on closer inspection of the photographs, the answer became clearer: the cakes were injected with jam filling. In the factory, the cakes must be stabbed with a double injection nozzle. Of course! It's so simple; and here was I making it unnecessarily complicated.

Here, you can see the difference between baking the jam in (left), and injecting is afterwards (right):


Of course, no-one has an industrial injection nozzle in their home, so the way I found to mimic it is to poke a channel, or two, all the way through the cake with a chopstick, widen it with the handle of a wooden spoon, and then squeeze the jam in with a piping bag. Make sure to make the opening of the piping bag quite narrow, and if needs be you can coax the jam all the way in using the chopstick.

I used raspberry jam which I had thickened with a little cornflour, as directed in my Bakewell Gateau recipe, and am still working on how to make a kiwi version as I've never, ever seen kiwi jam. I may just have to make it myself. I tried making a version using kiwi jelly crystals, but it was a miserable failure as the cake soaked up all the liquid jelly; you need to use something with a thicker consistency to prevent soakage, and you need a cake with a fairly dense texture, like a Madeira cake or a pound cake.

So, let me explain how I did it:

INGREDIMENTS


1 loaf-shaped Madeira or pound cake, made in a two-pound (1 kilogram) loaf tin, or shopbought

Roughly 4 ounces (115 grammes) filling of your choice: strawberry or any other jam, lemon curd, Nutella, custard, etc.

About 4 or 6 ounces (115 to 170 grammes) glaze of your choice: glacé icing, melted chocolate, etc.


METHOD
  • Take your completely cooled homemade or shopbought cake and chill it for about 20 minutes to make it easier to work with.
  • Because this cake will be served upside down, cut the dome off the cake so it will sit flat. If the two short ends are sloped, cut a narrow slice of each end to make them completely flat.
  • Turn the cake up on its narrow end and using a chopstick, poke channels gently through the middle of the cake to resemble two eyes. Widen the channels by going through them again with the handle of a wooden spoon.
  • Fit a piping bag with a narrow round nozzle - or better, an injection nozzle (don't worry, this isn't an affiliate link: it's just a link for visual reference) - and pipe the filling into the channels. To get the most filling in, you might have to fill from both ends and coax it down with the end of the chopstick.
  • Pop into the fridge again for about 30 minutes to help set the filling.
  • To decorate, glaze with some simple glacé icing, or with melted chocolate. I used a simple glaze of dark chocolate and sunflower oil.


STORAGE
This cake is best stored in the fridge in an airtight container for up to a week, but is best served at room temperature. For that reason, I recommend taking the cake out of the fridge an hour before serving.

There were no blogs on this day in 2017, 2015, nor 2014.

Sunday, 19 February 2017

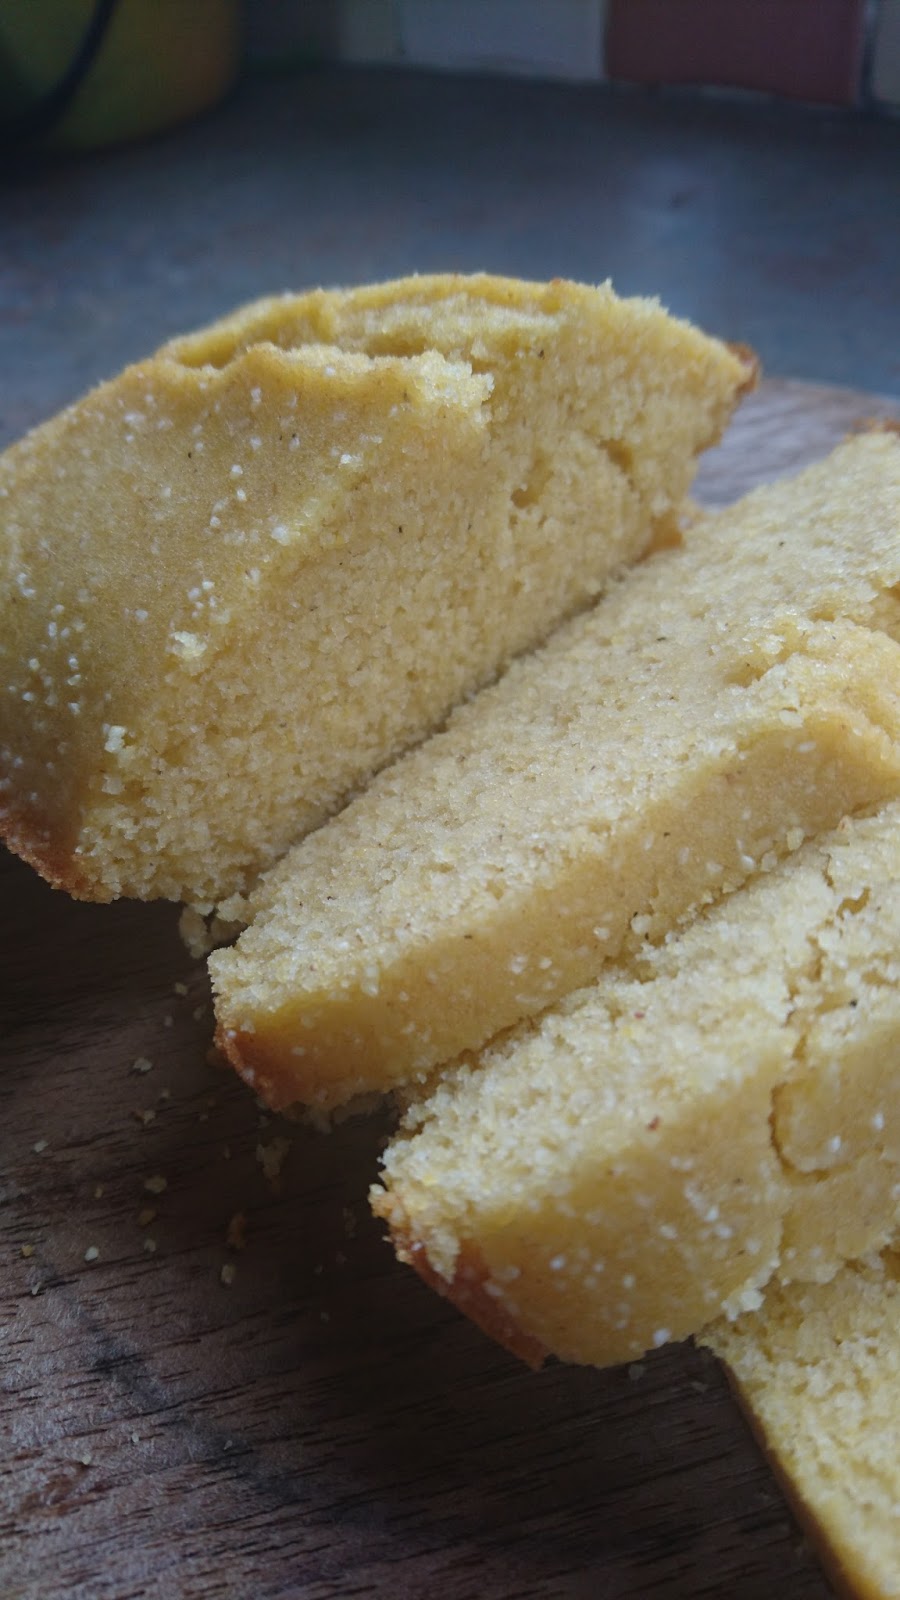
American Style Cornbread (Wheat Free, with Dairy Free Option)

I was feeling ill yesterday and avoiding college work, and still am right now! Although I have finished my 2000 word essay, I still have about a million blogs left over and a 20 second short animation. To say I feel overwhelmed is an understatement.


But yesterday, I was wrapped up in a blankie on the sofa, bingefesting Netflix true crime documentaries, and wishing I felt better. So, I decided to try something simple, a kind of mix-it-all-together-in-one-bowl simple.

I found inspiration in a strange place: recently, I moved in with my beloved companion, and had to move the contents of my kitchen cupboards. In the process, I rediscovered some ingredients that I hadn't had the change to use in my previous abode, one of which was a jar of fine cornmeal. I had actually bought it from the Polish shop, where it is called kasza kukurydziana, a year or so ago, and seeing as it was in a jar I had no idea of its sell-by date, but it didn't kill me so it must still be good.


The sight of the beautiful sunny golden hue of the cornmeal inspired me to make a Southern United States staple. It's something I always see in African American TV and films, and I've always been attracted to it as a food. So, I turned to one of my go-to cookery books, 1000 Recipes: From deliciously light snacks to fabulous gourmet dishes, by Martha Day (Anness Publishing Limited, London. 1997), however the recipe was pretty much exclusively butter. I improvised, using a few recipes I sourced on recipe forums (like AllRecipes UK) to make a version using sunflower oil, and much less than suggested.

Although it is called bread, don't be fooled! It's more like a cake, or a tea bread. I certainly wouldn't eat it like bread, but then again I have no idea how it's eaten by people in the Deep South where it originated.


INGREDIMENTS
For one loaf

  • 4 ounces (115 grammes) white spelt flour
  • 6 ounces (170 grammes) fine cornmeal
  • 2 ounces (55 grammes) caster sugar
  • 1 tablespoon (15 millilitres) baking powder
  • Pinch of salt
  • 6 fluid ounces (180 millilitres) milk, or milk alternative
  • 3 ounces (85 grammes) sunflower oil
  • 1 medium egg, beaten


HOW-TO

  • Preheat the oven to 200°C (4000°F, Gas Mk.6), and lightly grease and flour a loaf pan.
  • In bowl, mix together all the dry ingredients: flour, cornmeal, sugar, baking powder, and salt. Mix together thoroughly.
  • Make a well in the centre and add the milk, oil, and egg. Mix together gently until everything is just combined: no over-mixing!
  • Pour the mixture into the prepared baking tin, and bake in the centre of the preheated oven for 45 minutes to an hour, depending on doneness. Check for doneness at the 45 minute mark by poking a skewer into the thickest part of the bread, and if it comes out clean the bread is done. If it comes out sticky, continue to cook for another 10 minutes.
  • Once cooked, allow to cool in the tin on a wire rack for about 10 minutes before turning out gently and cooling completely on the rack.
  • Enjoy in slices with butter, or jam.

Seeing as we ate this over the course of three days, I actually don't know how long it keeps generally. However, it was still good on day three! I recommend keeping this in an airtight container and enjoying within a week.

THIS TIME IN 2016: No recipe
THIS TIME IN 2015: Dessert Mashup: Millionaire's Shortbread Ice-Cream (Egg and Wheat Free)
THIS TIME IN 2014: No recipe

Friday, 25 July 2014

Variation on a Theme: Persian Banana Bread

I usually like to experiment with ingredients and flavours and see what mental image they bring to mind, and when I looked in the press and saw leftover pistachio nuts from my pistachio ice-cream fiasco, an image of hanging gardens, men in parachute pants on black horses with curved swords, and bejewelled belly-dancers in head scarves came to mind. Do not ask me why, although my recent works-of-Zack-Snyder marathon (including "300") may have put me in the right frame of mind to conjure such images.

So, I went ahead and made a Persian inspired banana bread with pistachios and orange-lemon glaze.


Middle-Eastern cookery has been fashionable over the last 5 or so years, I have found. Here in Limerick all of a sudden Lebanese restaurants have sprung up, jars of Moroccan spices and preserved lemons have started to appear in the supermarkets, and cookery programmes have been centred on Moroccan and "Persian-style" cookery and street food. I know that Morocco is nowhere near the Middle East, but countries that border the Mediterranean sea to the south and the east tend to have the same sensibility when it comes to flavours and combinations.

When I think of Persian food, I think of citrus fruits (especially lemons), pistachios, prunes, lamb, spices (cinnamon, ginger, star anise, turmeric, paprika, mint, coriander, and cloves spring foremost to mind) honey, almonds, chickpeas and flatbreads. I know there isn't a single banana in sight in that list, but I just fancied some banana bread and making it a little bit more interesting.

So, I used my vegan banana bread recipe (and it turned out quite differently this time, the high likelihood of which I explain in that recipe) and added:
  • 1 teaspoon cinnamon, 1/2 teaspoon ginger and 1/2 teaspoon garam masala blend for the spices
  • 2 ounces (55 grammes) toasted and chopped pistachio nuts for the filling
When it was cooked, I brushed the top with some very delicious Seville orange marmalade, warmed mixed with about 2 teaspoons of lemon juice, and then put the loaf back in the oven for about 3 minutes to set the glaze.

Needless to say it is very delicious, but due to the variant nature of bananas, this one turned out much drier than usual. I'm thinking maybe some sort of peanut butter and jam sandwich inspired load next, but I am yet to work out how exactly that would translate into a loaf.


It's been a while! Happy 9th Anniversary!

  It's been a while. The past two years have been a helluva a ride. This year is gonna hold some big changes for this blog. I'm comp...