Showing posts with label dinner. Show all posts

Monday, 30 September 2019

Make Ahead Dinners #1: Mini Meatloaf

Here is my first ever installment in my newest venture: sharing my tips and tricks for make ahead dinners that are easy to prepare and are suitable for home freezing. From meatloaf to fish pie to falafel, I have a lot in store!

So, you looking for a make ahead dinner that's comforting and warming? How about some meatloaf, but in mini form for easy storage and reheating?


As we move closer to the winter months, we're all looking for that lovely, warming comfort food to get us through the darkening evenings. Sometimes, after a long day of work or studies, we don't really feel like cooking. But, instead of reaching for that pack of instant noodles or that TV dinner, you could spend an hour of two on a Sunday afternoon when you have some spare time prepping meals for the week. Meatloaf if a good one for minimum input and maximum output! Making mini loaves means you can freeze them, and then just take one at a time out of the freezer for whenever you want them.

I love meatloaf, despite the fact that in this country it's really not popular: it's definitely an American thing. Here in Ireland, mince normally finds itself in cottage pie, burgers, pasties, lasagne, or pasta sauce, but I've never seen an Irish family eat meatloaf. The only people I've seen eat meatloaf are the American people on the telly.


So, one day I decided to make it and it was utterly delicious! I used Chef John Mitzewich's recipe on his zombie meatloaf video at first, but after a few times I tweaked it to have a nice memorable formula: 1 pound of mince, 1 ounce of breadcrumbs, 1 egg, 1 tablespoon of milk, and 1 teaspoon of salt. Now, I add in some aromatic vegetables for extra flavour, but that's the basic formula to make deliciously moist meatloaves every time. I really enjoy making meatloaf with lamb, but you can go with the more traditional beef and pork mince.

This recipe can be made into one big meatloaf in a 1 pound (455 gramme) loaf tin, or into mini ones using a muffin tin, which is what I did. Or, you could even make into balls by hand and braise in tomato sauce; I believe in America meatloaf is often braised in tomato sauce.

My husband, who was raised in the English Midlands, says that they look and taste like faggots (which is an English dish of little loaves of breadcrumbs, herbs, and pork mince and liver). So, if you want lamb faggots, this recipe could work for you!

INGREDIMENTS

1 ounce (30 grammes) unsalted butter or oil
1 small red onion, or a 5-inch (12 centimetres) piece of leek, chopped finely
1 medium carrot, chopped finely
1 ounce (30 grammes) breadcrumbs, or ground almonds for a a gluten free version
1 medium egg

1 tablespoon (15 millilitres) milk
1 pound (455 grammes) lamb mince (preferably 85/15 lean to fat)*
1 teaspoon (5 millilitres) salt
½ teaspoon (2 millilitres) black pepper
Optional: 1 tablespoon (15 millilitres) mint sauce

* You can use any meat you want, but if you're not using lamb you can swap this out for another seasoning, like Worcestershire sauce or horseradish

METHOD
  • In a frying pan, sweat the onion (or leek) and the carrot in the butter (or oil) until soft, and then let cool down to room temperature.
  • Preheat the oven to 160C (320F).
  • I a large, roomy mixing bowl, mix together the breadcrumbs, egg, and milk. Allow to sit for 20 minutes until the breadcrumbs are completely soaked.
  • Add in the cooked vegetables and the remaining ingredients and mix thoroughly with a gentle touch.
  • Press the mixture into a loaf tin, or divide the mixture 5 or 6 holes on a muffin tin (depending on how big you want the mini loaves), then bake on the centre shelf of the preheated oven for about an hour for the whole loaf, for 25 to 30 minutes for the mini loaves. I use a meat thermometre so I cook the loaves to an internal temperature of 65C.
  • If you're making mini loaves, remove the tin from the oven and raise the temperature to 200C (400F). Take the loaves out of the muffin tin and sit them on a flat tray, and bake for a further 5 minutes until nicely browned.
  • Serve with mashed potato, steamed vegetables, and plenty of gravy.

Sunday, 21 July 2019

Something Savoury: Teriyaki Chicken Nuggets (Dairy and Egg Free)

Summertime is party time, and party time is party food time! Here is a different take on chicken nuggets with an Asian flair.


I love chicken nuggets and dippers: they're just so gloriously naff. However, if you're someone who isn't so sure about the quality of the meat involved, or how exactly is was "mechanically reclaimed" from the source animal, then I suggest you make your own minced filling.

I like making chicken nuggets, dippers, and burgers from scratch because you are 100% in control of the meat used. I get thighs and breasts and chop them finely with a nice big knife. I don't mince it so finely that it no longer has any texture. For this you could also use turkey, which has a meatier flavour than chicken.

I served this with some crinkle cut oven chips bought from the supermarket, and a quick homemade iced tea.

INGREDIMENTS

For the chicken filling

350 grammes (about 12 ounces) chicken, either breast meat or 50/50 mix of thigh and breast
1 teaspoon (5 millilitres) dark soy sauce
1 teaspoon (5 millilitres) maple syrup, or brown sugar
One grated garlic clove, or 1/4 tsp dehydrated chopped garlic
1 tsp grated ginger root, or 1/4 tsp ground ginger
Pinch of salt
A few cracks of black pepper

For the coating

4 tablespoons (55 millilitres) plain flour
4 tablespoons (55 millilitres) cornflour
About 4 fluid ounces (115 millilitres) of cold water
Salt and pepper


METHOD

  • If using dehydrated garlic, rehydrate it in a teaspoon of hot water. Allow to soak for 10 minutes.
  • Chop the chicken very finely into a mince. In a bowl, mix the chicken, soy sauce, maple syrup or sugar, garlic, and ginger with a fork until well mixed. If using fresh garlic, add a teaspoon of water. Season with some salt and pepper. 
  • Chill the mixture for at least 2 hours to marinate. I let mine marinate for about 4 hours and it was fine.
  • Mix the flours and seasoning in a bowl, and mix with water until you get a consistency of crepe batter. Chill for 30 minutes.
  • Heat the deep frying oil to 180C. Or, if shallow frying, heat about half an inch of oil in a frying pan on medium-high heat. 
  • Shape the mixture into 12 nuggets, and dust with flour. Dip each nugget in the batter, then put in the oil. 
  • Cook for 5 to 6 minutes (flipping halfway if shallow frying) until the batter is crispy, but still pale. 
  • Remove from the heat and allow to cool slightly before returning to the oil for a further 5 to 6 minutes until a delicious golden colour and very crispy.
  • Serve with chips and dipping sauces, like ketchup or sweet chili sauce.


Variation
You can skip the batter and fry the chicken in burger patties, and serve in toasted buns with lettuce and tomato. Or, you could make meatballs and serve in teriyaki sauce with jasmine rice and steamed vegetables.

Thursday, 18 October 2018

American Style: Deep Pan Pizza (Egg Free with Wheat Free Option)

Looking for a hearty, comforting dinner? Why not try this recipe for deep pan pizza! (It comes with my fiancé's approval, as seen below)


Autumn and Winter are full of party occasions and opportunities: in my family, even without the traditional holiday events, there are three birthdays in October and November. This time of year is a real season of festive eating!

When we were kids, we had normal kids' party food at all these kinds of occasions: sausage rolls, cocktail sausages, chips, and either hamburgers, or pizza. In the 1990s, supermarkets where I lived began to stock cook-from-frozen pizzas, and normally they had big, fluffy bread bases. I didn't see a thin and crispy based pizza until I was in my mid-late teens.


The most commonly eaten brand was Goodfellas, but there were many others, including supermarket own branded pizzas. I have very fond associations with thick based pizzas, even though when I eat shop bought ones now my adult taste buds aren't able to taste what was so amazing to my childhood taste buds....

I've been meaning to try a deep pan pizza for a very long time: I popped it on my list of projects to try about this time last year, I just never had the opportunity to try it. I was reminded to try it when I was watching Chef John's Detroit style pizza video on Youtube earlier last week.


My pizza differs from his, insofar as it's just a regular (well, what I consider regular) pizza with a thicker base. I use a completely different dough recipe to his, and different toppings. But, I was inspired by his idea to rise the bread dough in the tin it will be cooked in, rather than in a bowl.


DIFFICULTY
Intermediate


INGREDIMENTS

For the bread dough

6 fluid ounces (170 millilitres) warm water
One ¼ ounce (7 gramme) sachet of dry active yeast
1 tablespoon (15 grammes) caster sugar
½ teaspoon (3 millilitres) salt
1 ounce (30 grammes) light olive oil, or sunflower oil
12 ounces (340 grammes) plain flour: wheat or spelt
½ teaspoon (3 millilitres) baking powder

For the topping

Roughly 5 or 6 tablespoons (2½ or 3 fluid ounces; 75 or 90 millilitres) tomato pasta sauce, with herbs and garlic
Pinch of sugar
Salt and black pepper
Roughly 4 or 5 ounces (115 to 140 grammes) grated mozzarella cheese
Sliced meat of your choice: pepperoni, salami, ham, chicken, sausage, etc.
Thinly sliced vegetables of your choice: pepper, tomato, mushroom, courgette, etc.


HOW-TO
  • Grease a 9 by 7 inch (23 by 18 centimetre) deep baking tin with a tablepoon (15 millilitres) of sunflower or light olive oil. Set aside for later
  • In a large mixing bowl, mix the yeast, sugar, oil, and warm water together. Add in about half of the flour and mix into a sticky paste. Cover, and leave to rise in a warm place for about 30 minutes, or until doubled in size and very spongy in appearance.
  • Once risen, tap the bowl sharply on the counter top to release the air. Sieve in the half of the remaining flour, the baking powder, and salt and mix together with a wooden spoon until combined.
  • Sprinkle some of the remaining flour on the work surface, scrape out the dough in the bowl, and sprinkle some more flour on top. Knead the dough, adding flour only if you need to, until you have a smooth, tacky dough. You may not need all the flour, so don't add it all in at the beginning.
  • Knead the dough for a good 10 minutes until smooth and elastic. Press the dough into the bottom of your oiled tin and allow to rise for 30 to 40 minutes, or until doubled in size once more.
  • Once it has doubled, press the air out with floured hands and spread the tomato sauce on top, leaving a half-inch (1 centimetre) border around the edge of the pizza. Decorate with your toppings.
  • Set the oven to preheat to 190°C (375°F, Gas Mk.5) and allow the pizza to puff slightly while the oven is heating. Once the oven is hot enough, bake the pizza on the centre shelf for 30 to 25 minutes. If the toppings are browning too fast, cover the pizza with a piece of tin foil.
  • When fully cooked, remove from the oven and gently transfer the pizza to a wire rack. This will stop the crust from getting soggy with condensation.
  • Serve hot from the oven with side salad, or chips.

Sunday, 7 May 2017

Variation on a Theme: Pepperoni, Mozarella, and Spinach Quiche

Got leftover pizza toppings and eggs in the fridge? Why, make a quiche of course!

A few weeks ago, I made my first ever quiche and became a convert: who'd have thought that an omelette in an edible plate of pastry would be so delicious? And also, who'd have thought that--like and omelette--they're great for using up stuff in the fridge.


The other night, my companion and I had a pizza, and I had some leftover pepperoni, mozzarella, and spinach. So, I just cooked up the leftover pepperoni, about 2 ounces (55 grammes) worth, and a few handfuls of spinach with half a red onion, chopped finely, and then scattered it into the pre-baked 9 inch pastry crust along with a few handfuls of mozzarella. I know these measurements aren't really exact, but quiche filling isn't an exact science!


I used three medium eggs in the filling, mixed with twice as much (in weight) milk, for the filling. I replaced about an ounce (30 grammes) of the milk with some yoghurt for extra interest. After adding salt, pepper, and cayenne pepper to taste, I poured it over the filling in the pastry case before topping off with some grated cheddar for added crustification (which is now a word thanks to Chef John of Food Wishes).


I baked the quiche for about 40 minutes at 180°C (350°F, Gas Mk.4), until it was puffed and golden. Because I cooked this the night before for my companion to enjoy the next day while I wasn't around, I didn't have any; but I have it on his good authority that it was very, very tasty indeed!

THIS TIME IN 2015: Peppermint Ice (Totally not a rip off of Kendal Mint Cake at all. I promise)
No blogs on this day in 2016, 2014, or 2013

Photographs by SilverBolt

Monday, 10 April 2017

Something Savoury: Bacon and Onion Quiche (Wheat Free)

Bonjour, mes amis! Aujourd'hui, j'ai un repas pour vous: quiche, au bacon et onion!


I did French to leaving cert when I was 17, so by now it's a little rusty. However, my delight in French cuisine has not faded.

Having said that, I've never been the world's biggest fan of quiche. I've always been fed shop-bought varieties that are somehow simultaneously gelatinous and dry. But, my companion loves to eat it as a lunch.

Quiche is something that is quite present in the lives of English (and somewhat English) people, as English cookery is actually quite heavily influenced by French and German cuisine. Seeing that English renditions of European foods tend to be quite heavy and stodgy, I assumed that it was the same for quiche.... until I saw a quiche being made by a French woman.

I have a close friend who I visit often, and her housemate it French. I saw her making a quiche for herself, and when I asked her how she was making it her response was quite simply: It's like omelette in a pastry, and the pastry it has to be made with butter, otherwise it's not good. She didn't seem to be using any scales or measurements either, except to say that you use roughly twice as much milk as egg, and the quiche that resulted looked quite tasty!

Turns out that French people also like stodge, it seems. And it also seems that quiche is quite forgiving, and doesn't need precise measurements.


Although I heard straight from the horse's mouth that the pastry has to be made with only butter, I've never been the biggest fan of all butter pastry in savoury food. It's something I associate with sweet tarts, and find way too heavy going for a savoury dish, especially something as heavy as quiche (sorry, French housemate). As such I use a shortcrust pastry made in part with sunflower oil, which I know it completely blasphemous, but hey ho.

INGREDIMENTS
To make one 9 inch (22 centimetre) quiche

For pastry,
  • 10 ounces (280 grammes) white spelt flour, cold
  • Pinch of salt
  • Pinch of sugar
  • 2½ ounces (70 grammes) butter, cold
  • 2½ fluid ounces (5 tablespoons, 75 millilitres) sunflower oil
  • Cold water, to combine
For the filling,

  • 4 ounces (115 grammes) bacon rashers cut into little pieces, or lardons
  • 1 medium red onion, sliced thinly
  • 2 ounces (55 grammes) medium chedder cheese, grated
  • 3 medium eggs
  • Half an imperial pint (1¼ cups, 285 millilitres) whole milk
  • Salt and pepper, to taste

HOW-TO

First, make the pastry
  • In a large mixing bowl, mix the flour, salt, and sugar together. Grate in the butter, dipping it in the flour every few strokes and tossing the flour around to stop everything from sticking. Once the butter is grated in, gently rub with your fingers until it looks like breadcrumbs. Alternatively, which is what I do, you can keep running handfuls of the mixture through the grater instead of rubbing with the fingertips.
  • When the butter is rubbed in, add in the oil. Rub again gently, only to mix the oil through.
  • Mixing with the tip of a knife, add the water gradually until it forms a nice soft dough.
  • Form into a disc, wrap in cling film, and refrigerate for an hour.
Next, prepare the fillings
  • In a non-stick frying pan set over the hob with the heat off, add the bacon and turn the heat onto medium.
  • Once the pan has fully heated, cook the bacon until well browned and all visible fat is thoroughly cooked.
  • Remove the bacon from the pan, leaving the oil it has rendered behind in the pan. Add in the onions and cook over medium heat until well browned and fragrant.
  • Allow the bacon and onion to fully cool.
Then, blind bake the pastry case
  • Roll out the dough on a floured surface and fit into a 9 inch (22 centimetre) straight sided pie dish. My one is ceramic, but a metal or glass one would work so much better.
  • Trim the edges, and prick the base and sides all over with a fork. Put in the fridge for about half an hour. 
  • While it's chilling, preheat the oven to 200°C (400°F, Gas Mk.7), with a flat baking tray in the oven on the centre shelf. Make sure the tray is large enough to accommodate your pie dish.
  • Now it's time to blind bake the pastry case. Take out of the fridge, and line the whole case with a piece of tin foil, pressing it into every nook and cranny. Crumple any excess into the middle, making sure the foil is still covering all the pastry.
  • Place in the oven directly on top of the preheated tray, and bake for about 15 minutes.
  • After 15 minutes, remove the foil and bake for a further 8 to 10 minutes, or until the crust is lightly golden and fully cooked.
Finally, assemble and bake the quiche
  • Remove the blind baked case from the oven and let stand for about 5 minutes. Reduce the oven temperature to 180°C (350°F, Gas Mk.4).
  • Sprinkle the bacon and onion evenly on the bottom of the quiche, then top with about half the cheese.
  • In a jug, beat together the eggs and milk, and season it to taste (I personally have no problem with tasting raw egg, but that's up to you).
  • Pour the egg and milk mixture into the quiche, and then sprinkle the remaining cheese on top.
  • Return to the oven, on top of the tray as before, and cook for 35 to 45 minutes, or until the top is lightly browned and crispy, the filling is slightly puffy, and when you touch the centre it feels set and no longer liquid.
  • Remove from the oven and cool for about 20 minutes before serving, to let it set a little more. Or, you can let it cool to room temperature, chill it, and serve it cold.

No blog from this time in 2014

Tuesday, 21 March 2017

Something Savoury: Peanut Satay Sauce (Gluten-, Dairy-, and Egg Free)

After a weekend of St Patrick's excess, I think we all need a good meal. So here's another savoury dish for you all: peanut satay sauce!


In Limerick there is a popular Asian fusion takeaway chain called Wokking, which sells cheap and cheerful Westernised gloop for under a tenner a piece. The one in the city centre is painted luminous orange, and plays exclusively chart tunes on the radio. When you order your food, you get a little piece of paper with your order number on it, and wait at your table until the number is shouted at you in a wonderful local twang.

One of the most popular orders is a "3-in-1": usually it comprises of fried rice, chips, and curry sauce. However, you can have a combination of two of the side dishes--boiled rice, fried rice, chips, or fried noodles--and a serving of curry sauce, sweet and sour sauce, satay sauce, or black bean sauce. For an extra euro or euro-fifty, you can add some meat and make it a "4-in-1".

Whenever I go to Wokking, I usually order a 4-in-1 of satay chicken with boiled rice and fried noodles. I love the combination of the chewy noodles, the soft rice, and the sweetly salty peanut sauce slopped all over some oddly wiggly chicken breast strips. It's delicious!

I have read many, many recipes online about making satay sauce, but for years I could never quite find the right one. They all used coconut milk, which is nothing like the Chinese takeaway satay. Eventually, I gave up.

Then I went to have dinner at the home of a Dutch friend, and she prepared some satay meatballs, which tasted even better than my favourite takeaway satay sauce: it was utterly scrumptious! I asked her for the recipe, and she willingly supplied it, but it contained some Dutch ingredients that I had never come across before. Apparently, as a result of Holland's colonial relationship with Indonesia, Dutch people use a lot of Indonesian ingredients in their cookery, including ketjap manis and sambal oelek.

I took to the internet and did some research about how to approximate the Dutch ingredients. I also cross referenced a few already existing recipes for Dutch style satay meatballs. Turns out, my prior research had been too focused on actual Indonesian and Malaysian satay, and not its Western approximation.

The following recipe is one that I have formulated after a serious amount of trial and error. It can be altered in accordance to taste: add more salt, sugar, soy sauce, or vinegar according to your liking. This is just how I like it done.

INGREDIMENTS
To serve 3 people, or 2 hungry people

For the sauce,
  • 1 tablespoon (15 millilitres) dark soy sauce
  • 2 teaspoons (10 millilitres) white vinegar
  • 1 tablespoons (15 grammes) brown sugar, dark or light, to taste
  • 2 tablespoons (30 millilitres) peanut butter, smooth or crunchy
  • ¼ teaspoon chinese five spice powder
  • ½ teaspoon hot chilli powder
  • 1 inch (2 centimetres) peeled ginger root
  • 2 large garlic cloves
  • Half an Imperial pint (1 cups, 285 millilitres) water
  • ¾ pound (350 grammes) meat or alternative of your choice, cut into chunks
  • 1 tablespoon (15 millilitres) cornflour
  • Oil, for frying
  • Optional: chopped mixed vegetables, such as red onion, pepper, or baby corn
To make fried noodles
  • Dry fine egg noodles, or gluten free noodles, enough for two or three people
  • Sesame oil, for tossing, or flavourless oil
  • 2 teaspoons (10 millilitres) dark soy sauce
  • 1 teaspoon (5 millilitres) white vinegar
  • Finely sliced coriander, to garnish

HOW-TO

First, prepare the sauce
  • Finely chop or grate the ginger and garlic, and in a small bowl or cup mix together the soy sauce, vinegar, sugar, peanut butter, five spice, and chili powder to make a paste.
  • Heat about a tablespoon (15 millilitres) of oil in a medium saucepan, and gently fry the ginger and garlic until fragrant. If you are using vegetables, add them to the pot and stir fry for about 2 minutes. 
  • Add in the paste and cook until smooth, then add in the meat and cook until sealed on the outside. Pour over the water, and simmer for about 10 minutes to cook the meat through. (If you are using a vegetarian alternative, cook accordingly.)
  • Mix the cornflour with some water in a small bowl or glass to make a slurry, then add to the pot, stirring all the time. Bring to the boil and cook at a boil for a full 3 minutes.
  • Taste the sauce, and adjust for seasoning: I like my sauce quite salty, so I add more salt, but you may like to add more vinegar or more sugar. It's up to you!
Then, prepare the noodles,
  • In a large mixing bowl,pour hot water over the dry noodles and allow to stand for 30 seconds. Then, separate the noodles with two forks to prevent clumping.
  • Drain and rinse the softened noodles in cold water to further prevent clumping. Return to the bowl and toss in about a teaspoonful of sesame oil or flavourless oil.
  • In a small bowl or glass, mix together the soy sauce and vinegar and set aside.
  • Heat a large frying pan on a medium heat, and add the noodles to the pan dry. Fry until they start to go dry, and then pour in the sauce. Toss and stir with a fork to keep the noodles separated so they cook evenly.
  • Test the noodles: if they are too firm for your liking, add a splash of water and continue cooking.
  • Serve the noodles straight from the pan with the satay sauce and meat. If you like, you can serve with steamed white rice and steamed green vegetables.
No blogs on this day in 2014, 2015, or 2016
THIS TIME IN 2013: Wheat Flour Alternatives

Thursday, 16 March 2017

St Patrick's Day 2017: Beef and Beer Pie (Wheat Free with Dairy- and Egg Free Option)

Looking for a hearty meal for your table this weekend? Here is a delicious pie made with super flaky pastry, succulent tender beef, enveloped in a rich beer gravy.

(I did take a photo of the whole pie, but my new phone sometimes
forgets to save photos, for some reason)

It's no lie: Irish people love beer, and they love beef; and on St Patrick's Day, we love to celebrate our Irishness by buying into our own cultural stereotype heart and soul. So, I decided to mix our two great loves together in a pie, with the addition of another great love of ours: butter.

However, here is where I make a little switcheroo. As any of my long term readers, and people who know me personally, will know, I am a bit of a mongrel: I'm Irish, but I'm also English. Being the child of two nations who have a very difficult historically colonial relationship is challenging, it has to be said.

So, to bring a little bit of my own Englishness into this dish, I swapped the usual Irish pie topping of mashed potato for a flaky pastry, more commonly associated with English cookery. As much as I love mashed potato, my companion—who is also a mongrel like me, being a little bit Roscommon man, and a little bit Birmingham man—loves a good English style pastry pie, so I thought I'd do it for a change.

I use the same kind of pastry as in my cherry pie recipe, however I reduced the sugar to a pinch or two, added some black pepper, used a pound (455 grammes) of flour and scaled all the other ingredients accordingly.

The other thing I will say about this recipe is that I use my slow cooker to make the stew. If you don't have a slow cooker, that's perfectly okay. You can cook the stew on the stove top in a pan, or in a pot in the oven. It really doesn't matter, as long as the meat is appropriately cooked.

This recipe takes a long time, about 6 hours, but it's well worth it in the end!

INGREDIMENTS
For one 9 inch (22 centimetre) square, or 10 inch (25 centimetre) round pie, ie. 4¼ UK pint (5 US pint, 2½ litre)

For the stew filling,
  • 2¼ pounds (1 kilogramme) diced stewing beef
  • 1 large onion, white or red, sliced thinly
  • 6 ounces (170 grammes) passata, or 2 tablespoons (30 millilitres) tomato purée
  • 1 bottle (500 millilitres) pale beer, or gluten free beer
  • 2 teaspoons (10 millilitres) Worcestershire sauce, or fish sauce
  • 1 teaspoon (5 millilitres) brown sugar
  • 1 rounded teaspoon (7 millilitres) dried parsley
  • A small pinch of dried rosemary
  • 1 beef stock cube
  • 4 ounces (115 grammes) button mushrooms, cut into halves
  • 1 medium sized carrot, sliced into coins
  • 2 tablespoons (30 millilitres) cornflour
  • Salt and pepper, to taste

For the pastry,
  • 1 pound (455 grammes) white spelt flour
  • 4 ounces (115 grammes) butter, or margarine, very cold
  • 4 ounces (115 grammes) block vegetable fat, or lard, very cold
  • 1 teaspoon (5 millilitres) caster sugar
  • About 5 ot 6 fluid ounces (150 to 180 millilitres) cold water
  • Salt and pepper
  • An egg, for egg washing, or milk, or omit

HOW-TO

First, make the stew,

If you have a slow cooker,

  • Put the meat, passata, beer, onion, Worcestershire sauce, sugar, dried herbs, the stock cube, and about half a teaspoon (3 millitres) of salt. Stir well once more, then cover and cook on High for 3 hours until the meat is almost tender.
  • Add in the mushrooms and carrots, and cook for a further hour with the lid off to allow the sauce to reduce.
  • Mix the cornflour in a small bowl or glass with some water, and stir into the pot well. Cook on High for a further 15 minutes until the sauce is well thickened.
  • After cooking, allow to stew to cool down fully to room temperature.
If you don't have a slow cooker,
  • Preheat the oven to 150°C (300°F, Gas Mk.2), and place the  meat, passata, beer, onion, Worcestershire sauce, sugar,
  •  dried herbs, the stock cube, and about half a teaspoon (3 millitres) of salt in a large casserole dish with a lid.
  • Cover with the lid, and place in the centre of the preheated oven. Cook for 1½ to 2 hours, or until the meat is almost tender.
  • Add in the mushrooms and carrots, and continue to cook without the lid for a further 45 minutes to an hour until the vegetables and meat are tender.
  • When the meat is cooked, place the casserole dish over a medium flame, and mix the cornflour with a little water in a small bowl or glass. Add to the stew and bring to the boil, mixing continuously, until the sauce is thickened.
  • After cooking, allow the stew to cool down full to room temperature.

While the stew is cooking, prepare the pastry,

  • In a large mixing bowl, add the flour, salt, and pepper, then grate in the butter and the fat on the coarse side, dipping the grating side in the flour between strokes to prevent clumping.
  • Very gently rub and break up the strands of butter and fat between your fingers to make the pieces smaller, about the size of peas.
  • Add in the lemon juice or vinegar, then add in a tablespoon or two (15 or 30 millilitres) of the water. Use the tip of a table knife to mix the water through. Continue this until you get a nice soft dough. It shouldn't be sticky. I added about 8 tablespoons in total myself, but it depends a lot on humidity and flour quality.
  • Make the dough into a disc, wrap in clingfilm, and chill in the fridge for half an hour.
  • Take out of the fridge, and roll out to a thickness of about half an inch (1 centimetre). Fold one outer third into the middle, then fold the other third over on top, like folding a letter into three. Roll out and fold in the exact same way.
  • Wrap up and return to the fridge once more until ready to use.

Finally, assemble the pie,
  • Preheat the oven to 180°C (350°F, Gas Mk.4), and get your chosen pie dish.
  • Take the dough out of the fridge, and divide into two pieces: two thirds, and one third. Wrap the smaller piece up and return to the fridge.
  • Roll the larger piece of dough to roughly a quarter inch thick (5 millimetres), and drape into the pie dish, pressing into the base and edges. Leave the overhang intact for to make adding the lid easier.
  • Gently scoop in the stew, and brush the edge of the crust with egg wash, milk, or water.
  • Roll out the other piece of dough in exactly the same way, and drape over the top. Press together the base and the lid with your fingertips, or a fork. Trim the overhang.
  • Brush the top of the pie with egg wash or milk, and pierce the top to allow steam to escape.
  • Cook in the centre of the preheated oven for about a 45 minutes to an hour.
  • Serve hot with steamed or roasted vegetables.
No blogs on this day in 2016, 2014, or 2013

Saturday, 25 February 2017

Shrove Tuesday: "Crepelloni", Italitan Style Spinach and Cheese Rolls with Tomato Sauce (Vegetarian Friendly)

This is the last weekend before Lent, and that means only one thing: Shrove Tuesday is just around the corner! So to mark the occasion, I will be sharing a variety of recipes to try out this year. Starting with this one: Italian style 'Crepelloni'!


Here in Ireland, we celebrate Shrove Tuesday with pancakes, as such it's mostly called Pancake Tuesday. We generally speaking eat crêpe style pancakes, not American style thick pancakes (drop scones), and they work for sweet or savoury toppings. They are particularly nice with lemon juice and sugar, which is traditional in Ireland and Great Britain, for sure.

According to my mother, and her mother, and probably her mother too, to make pancakes you use quarter of a pound of flour, half a (UK) pint of milk, and an egg (which is 115 grammes, 285 millilitres, and an egg). So, that is how I've always made them for my whole life, and they've never done me wrong.

However, I thought I'd do something a little different this year, which is inspired greatly by the work of Delia Smith. On one of her cookery programmes from 20 odd years ago, Delia made some Italian cannelloni using pancakes rather than traditional tube pasta (in more recent books and programmes, she uses cooked lasagne sheets), and it works really well. When I tried to find a reference for the book or programme, I couldn't find the original publication, but I did find that a few other people have tried this and written about it. The only reference I could find is a 21 year old newspaper article from the British Independent.


There are so many things you could put in these, but this time I went for something vegetarian. Spinach and soft cheese filling with tomato sauce is one of my all time favourite Italian combinations, and good for veggie boys and girls, it contains no meat whatsoever.

This means you can have pancakes for breakfast and dinner on Shrove Tuesday!

INGREDIMENTS
Makes 6 cannelloni
  • 4 ounces (155 grammes) white spelt flour
  • ½ UK pint (1¼ cups, 285 millilitres) milk, or milk alternative
  • 1 egg, medium or large
  • Butter, or margarine, for frying
For the filling and sauce,
  • 6 ounces (170 grammes) spinach, cooked and finely cut
  • 8 ounces (225 grammes) soft low fat cheese, such as ricotta, cottage cheese, or quark
  • 1 medium egg
  • 2 ounces (55 grammes) grated mozzarella
  • Salt and pepper, to taste
  • 8 or so ounces (225 grammes) tomato pasta sauce of your liking
  • Grated mozzarella and cheddar cheese, for topping
  • Butter, or margarine, for greasing

HOW-TO

First, make the crepes,
  • In a mixing bowl, sieve the flour and make a well in the centre. Add the egg, and then mix in the milk a little at a time using a wire whisk until all the milk is added, making sure to mix well after each addition to get rid of any lumps.
  • Allow to the batter to sit on the work surface for about half an hour to relax.
  • When you want to fry them, heat a large frying pan over medium heat. Add about quarter of a teaspoon of butter, or margarine, and swirl it around the pan until it has melted.
  • Add about a third of a cup (85 millilitres) of batter to the pan and swirl it around the cover the base of the pan. Cook for about 45 seconds to a minute, until the top is dry and set, and underneath is lightly browned
  • Flip the pancake, and cook for a further 45 seconds to a minute, until it has browned also.
  • Continue cooking the pancakes until you have used all the batter. You should get about 6 or 7 large pancakes.
To complete the dish,
  • Grease a 6x8 inch (15x20 centimetre) baking dish lightly, and preheat the oven to 200°C (400°F, Gas Mk.6).
  • In a mixing bowl, mix all the spinach, soft cheese, egg, and grated mozzarella until smooth and well mixed. Season to taste with salt and pepper (you can skip this if you have a problem with eating raw egg).
  • Take a pancake, place a sixth of the filling in the middle. Fold in the sides a little, then roll the pancake around the filling to make a parcel.
  • Repeat this with six pancakes in total, then place the rolls in the dish. Pour as much sauce as you like on top of the the rolls, then top off with the cheeses to your liking.
  • Bake for 20 to 30 minutes, depending on the level of crispiness you want on top, then serve hot in warmed pasta bowls, or plates.

THIS TIME IN 2016: No blog
THIS TIME IN 2014: No blog

Tuesday, 14 February 2017

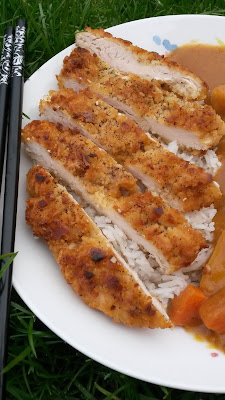
Something Savoury: Japanese Style Curry with "Breaded" Chicken (カツカレー) (Gluten and Dairy Free with No Added Sugar)

Happy Valentine's Day! As you can probably tell, I've been on a meals buzz recently. Today, my offering is Japanese style curry, with breaded chicken!


Seeing as my birthday and Valentine's Day are quite close together on the calendar, my companion and I went to a Japanese restaurant around my birthday to combine the two events into one celebration. We both ordered something with curry: I got a curry chicken katsudon, and he got curry ramen. Japanese curry is essentially like what I'd call a chip shop curry, but much spicier and darker.

I decided I would try and make it at home, but with all natural ingredients, or at least as many as possible. I didn't want to use any refined sugar or processed stock cubes, to make it as clean eating as I could. In the same way I did for my tomato soup recipe, I use an apple in this for natural sweetness.


However, because it kinda involves making a stock from scratch, it's a little time consuming. I'd say the whole curry takes about 90 minutes to two hours to prepare from start to finish, including chopping. But, it's very flavourful, and you get to revel in the satisfaction of making a takeaway meal in a mostly healthy way. Don't be overwhelmed by the long list of ingredients: you probably already have most of them.

For a Valentine's day twist, I cut some of the pieces of carrot into heart shapes using a little fondant cutter. You could cut the vegetables into any shape.

And as for the "breaded" chicken, it's actually not bread at all: it's crusted used flaked almonds, which means it's completely gluten free! The almonds are naturally dry and crunchy, so when used as a coating they stay super crusty and crispy, and crunch like glass when you eat them. They don't go soggy after five minutes of frying. So satisfying. So dangerously addictive. I think I may make more recipes using the almond breaded chicken.... (whenever making gluten free food, always check ingredient labels for allergens).

INGREDIMENTS
Serves four people

For the base gravy,
  • 1 medium sized sweet green apple, peeled and diced
  • 1 large onion, white or red, diced
  • 1 small carrot, peeled and cut into small dice
  • 2 cloves garlic, peeled and crushed
  • 2 inch (5 centimetre) piece of fresh ginger, peeled and grated
  • 1 tablespoon (15 millilitres) tomato purée
  • 1 pint (2½ cups, 570 millilitres) water
  • 1 tablespoon (15 millilitres) cooking oil
  • ¼ teaspoon (1 millilitre) fine salt

For the curry,
  • Up to 4 teaspoons (20 millilitres) curry powder, spiciness of your choice
  • 1 tablespoon (15 millilitres) soy sauce, or tamari for gluten free option
  • 1 teaspoon (5 millilitres) white vinegar, or lemon juice
  • 1 small carrot, peeled and cut into thin coins
  • 1 medium potato, peeled and cut into one inch (2½ centimetres) chunks
  • Optional: Half a small onion, cut into slices
  • Optional: 1 or 2 teaspoons (5 or 10 millilitres) cornflour, depending on desired thickness

For the chicken schnitzel,
  • 4 chicken breasts, roughly 5 or 6 ounces (140 or 170 grammes) each
  • Cornflour, for dusting
  • 2 medium eggs
  • Roughly 5 ounces (140 grammes) flaked almonds, or crushed cornflakes if you cannot eat nuts
  • Salt and pepper

For serving
  • 4 servings of steamed white rice, long grain or Jasmine
  • Optional: Sesame seeds, for garnish
  • Optional: Thinly sliced spring onion, for garnish

HOW-TO

First, make the base gravy,

  • In a medium sized saucepan, heat the cooking oil over medium heat. Stir fry the ginger and garlic for about a minute or so until fragrant.
  • Add the onion, carrot, apple, and the salt, and continue to cook until softened. Add the tomato purée, and cook until caramelised and the bottom of the pan is slightly brown. Get a good brown layer—called a fonde—going on the bottom of the pan: this will add more flavour to the finished curry.
  • Pour the water over the top, stir briefly, and reduce the heat to low. Cover then simmer until all the vegetables and apple are tender, about 30 minutes.
  • Once cooked, allow to cool slightly and then blend in a blender or food processor until completely smooth. (What if I don't have a blender? Cook for a full hour until completely broken down, then push a little at a time through a sieve into a large bowl).
Then, complete the curry,
  • Return the gravy to the saucepan, and add the soy sauce and vinegar, or lemon juice. Mix the curry powder with a little water in a cup, a teaspoon at a time, then stir into the curry. Add as much curry powder as you like.
  • Add the carrots, then cover and simmer the sauce over low heat for about 10 minutes. Add the potato, and onions if using, cover and simmer again for another 15 to 20 minutes, or until the potato is tender but still maintaining its shape, and the carrot is tender.
  • The naturally occurring starch in the potato will thicken the curry a little bit, but if you want to adjust the thickness you can add cornflour. Start with mixing one teaspoon in a cup with a tablespoon of water, and adding to the curry. If you want it thicker, add another teaspoon mixed with water, and so on.
  • Keep covered until while you prepare the chicken, and it will keep its head very well.
To make the chicken schnitzel,

  • Place the almonds in a sandwich bag, and crush them gently with a rolling pin. Get a good range of texture, from fine crumbs to bigger flatkes: this will make it more crispy.
  • Put one chicken breast at a time into a sandwich bag, lie flat on the work surface, then bash with a rolling pin until it is roughly half an inch (1 centimetre) in thickness. Repeat with the other fillets. Place all the pieces onto a large plate or tray. You can use the same bag for all of them, unless is splits.
  • Set up two wide shallow bowls: place the almond crumbs in one, and beat the eggs with a tablespoon of water.
  • Sprinkle the fillets with cornflour on their tray and completely coat on both sides (a pastry brush is helpful here). Take one fillet at a time, dip both sides in the beaten egg, then cover both sides with the almond crumbs. After crusting, season on both sides with salt and pepper.
  • Heat a frying pan and add enough cooking oil to coat the bottom of the pan in a good layer. Test the heat with a spare almond flake: if it bubbles immediately, it's hot enough.
  • Fry one chicken fillet at a time—or two, if you have a large enough pan—for about three minutes on each side, or until golden brown on both sides.
  • As you fry the fillets, keep the cooked ones on a tray in the oven on the lowest temperature setting, to keep them warm.
To serve,
  • Divide the rice between four wide bowls and keep to one side. 
  • Cut each chicken fillet into strips and lie on top of the rice, then pour the curry onto the empty side of the bowl.
  • Sprinkle with a garnish of sesame seeds or spring onion, if you like.
I think I may do a few more recipes using the "almonded" chicken approach, because it was seriously tasty. Maybe a nice chicken burger? Or American style tenders? We'll see...

UPDATE 18/04/17: Instead of flaked almonds, you can use crushed cornflakes.

THIS TIME IN 2016: No recipe
THIS TIME IN 2014: No recipe

Saturday, 11 February 2017

Valentine's Day: I ❤ Pizza! (Wheat-, Egg-, and Dairy Free Base)

What's sweeter than being able to share a couple sized meal with your sweetheart? Nothing, which is why I made these cute little pepperoni pizzas!


Whenever I think of romantic candlelit dinners, I always think of Italian food for some reason. Maybe it's because in The Lady and the Tramp the dogs eat spaghetti and meatballs, or because there was an advert for Ristorante pizzas on telly when I was a kid that showed a couple romantically eating pizza in a swanky Mediterranean open air restaurant, or because most of the high end restaurants in Limerick are Italian, I'm not sure. Although, it's not the most dignified or romantic thing to eat, and the fact it started life as peasant food makes it even more ironic.

However, I can tell you categorically, I love pizza. Especially Chicago style pizza with thick, fluffy bases.

I had promised in my bread rolls post that I'd do a pizza recipe, and I always deliver (well, sometimes)! So, I thought I'd try and do something nice and Valentine-y with pizza.

To make these you will need these ingrediments to make 3 individual pizzas, or one 9 inch (23 centimetre) pizza:

  • Half a batch of dough, made with this recipe, with half the directed amount of sugar
  • Sliced pepperoni, or salami
  • 3½ ounces (100 grammes) grated mozzarella cheese
  • 3 ounces (85 grammes) grated mild cheddar cheese
  • Half a bell pepper, colour of your choice, cut into quarter inch (5 millimetre) cubes
  • 5 ounces (140 grammes) passata with herbs and garlic, or plain pasta sauce
  • Optional: Quarter of a red onion, thinly sliced
And this equipment:
  • 2 large flat baking trays, or 12 inch (30 centimetre) pizza tray
  • Deep casserole dish with a lid, or a large mixing bowl and clingfilm
  • Rolling pin
  • Small saucepan

HOW TO:
  • Prepare the dough according to the recipe, which will take roughly two hours.
  • When it has finished its second proof, preheat the oven to 200°C (400°F, Gas Mk.6)
  • Make the pizza sauce by cooking the passata, or pasta sauce, in a saucepan over medium high heat and reduce it by half the thicken it.


  • Using a heart shaped cutter, cut hearts out of as many slices of pepperoni you want. Cut the scrap pepperoni into little pieces to sprinkle over the pizzas.
To make individual pizzas,
  • Divide the dough into three (roughly 100 grammes per portion), roll into balls, and leave the other two balls covered while you work with the first one.
  • Roll the dough ball out to about a quarter inch (5 millimetres) thick. Pick it up, and stretch it out a little: this will make the middle thinner and the edges thicker, to make a crust.
  • Place the pizza bases onto the baking trays before putting on the toppings, because they are difficult to move once decorated.
  • Spread a third of the sauce all over each pizza, leaving the crust clear, then sprinkle the mozzarella, chopped pepperoni, pepper, and onion, if using, all over the tops.
  • Sprinkle the cheddar on top of the other toppings, and then decorate the tops with a pepperoni heart each.
  • Cook in the oven for 15 minutes, swapping the trays half way through to allow each tray to get a trip near the top of the oven for extra crispiness. 
To make one large pizza,
  • Roll the full dough ball as above, then place on the round pizza tray.
  • Put the toppings on as above, decorating finally with pepperoni hearts.
  • Cook for 20 minutes, or until the bread is nicely browned, and the cheese is nice and crispy.

This recipe is quite adaptable and versatile, so you could put anything on the top. You could also make the pizzas heart shaped if you like, or use this recipe for any kind of celebration!

THIS TIME IN 2014: No blog

Sunday, 29 January 2017

Soft White Bread Rolls (Wheat-, Egg-, and Dairy Free)

There are very few things in this life that are better than freshly baked bread. And luckily, using this recipe, it can be enjoyed if you are a spelt eater


 I remember when I was a little girl, Mum used to bake delicious white bread. The excitement of watching the dough rise, then watching the loaf go into the range (yes: we had a range. I was brought up in very rural West Clare in the '90s), then watching it emerge as a delicious treat waiting to happen. When it was St. Patrick's Day, Mum used to tint the dough green, so we could have green toast. It was exactly the kind of novelty that little children revel in, especially my brother, who is called Patrick.

I'm just wondering how many other applications there are for this dough: it seems incredibly versatile. This recipe uses exactly the same bread recipe as I used to make the pork dim sum, but applied to a slightly different context. I also discovered that this bread dough can be used to make delicious thin crust pizza, but I want to experiment with deep dish pizza, which has always been a favourite of mine.
FREE FROM

☑ Soya (check for soya lecithin)

☑ Wheat
☑ Nuts
☑ Eggs
☑ Dairy

CONTAINS
☒ Gluten
☒ Yeast
☒ Refined sugar products


INGREDIMENTS
For 10 small buns, or 8 medium sized buns

  • 12 ounces (340 grammes) white spelt flour
  • 1 quarter-ounce (7 grammes) package of instant yeast
  • ½ teaspoon (3 millilitres) baking powder
  • 6 fluid ounces (180 millilitres) hand hot water
  • 1 ounce (30 grammes) sugar
  • 1 ounce (30 grammes) sunflower oil

METHOD

First, prepare the yeast dough.

  • In a large mixing bowl, mix 8 ounces (225 grammes) of the flour, the yeast, sugar, oil, and warm water together. Mix into a sticky paste, cover, and leave to rise in a warm place for 45 minutes, or until doubled in size and very spongy in appearance.
  • Once risen, remove from the oven and sieve in the rest of the flour, the baking powder, and salt and mix together by hand until fully incorporated.
  • Knead in the bowl until it forms a dough ball, and until the bowl is completely clean. Turn out onto a lightly floured work surface and knead continuously for 4 minutes.
  • Return the dough to the bowl, cover again, and leave to rise again for 1 to 1½ hours, or until about doubled in size.

Next, assemble and cook the rolls.
  • When the dough is fully risen, take it out and gently deflate it. Gently flatten the dough into a circle, and cut the circle into 10 or 8 pieces. If you like, you can use a digital scale to be more precise with the division.
  • Take each piece and wad up into a ball, keeping the surface nice and taught. Place on a floured baking tray about an inch apart, so they can grow into each other.
  • Cover lightly with a piece of cling film, put back in the warm place, and proof for a further 25 to 35 minutes, until doubled in size and touching.
  • While the dough is proofing, preheat the oven to 220°C (425°F, Gas Mk.7), with a oven proof jug of boiled water on the bottom to make it steamy.
  • When the buns are risen, sprinkle with a little bit of flour, score the tops in a cross shape, then place in the steamy preheated oven and bake for 20 minutes, until brown on top.
  • Once cooked, allow to cool for at least 10 minutes before eating.

Like with any kind of bread rolls, they are best eaten on the day they are eaten. I follow the adage: today it's bread, tomorrow it's toast, the next day it's for the birds.

However, these can be frozen raw. Once you have formed the dough balls, freeze on a tray before proofing the second time, pack them into bags once frozen, and freeze them for up to 2 weeks. When you want them, line them up on a floured tray as instructed, and allow to thaw and proof in a warm place for about 4 or 5 hours. Bake as instructed.

Friday, 13 January 2017

Spelt Burger Buns, Brioche Style (Wheat Free)

Yayeeee!! First post of 2017!! I have an excite about it! And today, I've rustled up some burger buns.


My bread phase is still alive and kicking after the Christmas period, and myself and my companion thought we'd have some nice lamb burgers. We went to a concert this week, and had planned to stop by Dublin's Eddie Rockets restaurant to have some fine American diner food, but we hadn't timed it well enough. So, the day after we thought we'd make some burgers and chips: he made the lamb mince burgers, and made the buns.


This isn't so much as recipe as an idea for something to do with this dough recipe that I used to make the iced buns. It's a super soft dough, which is firm enough to use for brioche style burger buns. The crumb is firm and strong enough to hold a meat patty, but still soft and fluffy, like an edible pillow.


The difference is this time I used half the quantity of the original recipe, and instead of rolling the dough into fingers, I divided the dough into six equal balls and flattened them to about half an inch (1 centimetre) thick. I lightly greased and floured a flat tray, placed the dough pieces on the tray in a 2-1-2-1 pattern to they'd have soft corners, then allowed to proof until doubled in size. I preheated the oven to the same temperature as the original recipe, brushed each bun with egg wash and sprinkled with sesame seeds. I baked them for 15 minutes, turning the tray through 180 degrees halfway through cooking, until they were golden and brown.


These buns are best eaten on the day they're made, when fully cooled. The next day, they can be eaten as sandwiches. They day after, they can be eaten as toast. But after that, they're best as dog food. I wish I had taken some pictures of them as hamburger sandwiches, but it was night time and the photos didn't come out very well.


If one were to use the full recipe quantity, this would make 12 buns suitable for quarter-pounder meat patties, or 24 buns or slider burgers, which would be super cute and adorable. If you don't like sesame seeds, you can leave them off, or you could also use poppy seeds. I'd personally love to find some black sesame seeds for next time.


I bought a packet of sesame seeds from Lidl, and they had 100 gramme bags. So now I have a load of sesame seeds in my companion's cupboard. If anyone has suggestions for recipes that need lots and lots of sesame seeds, I'm all ears!

This time in 2014: Oatie Biscuits (Wheat Free)

It's been a while! Happy 9th Anniversary!

  It's been a while. The past two years have been a helluva a ride. This year is gonna hold some big changes for this blog. I'm comp...