Friday, 20 May 2016

Mocha Cupcakes: Chocolate and Coffee Join Forces (Gluten Free; Dairy Free Option)

Greetings from the UK!

I'm currently on holiday visiting relatives in Kent, so my recipes will be few and far between. My cousin has a fantastic new kitchen which is great to cook in... so I'll probably be experimenting a bit while I'm here...

Looking for a cutesy cupcake project? Look no further! I decided to make some of these little lovelies for a film night I was having at mine. I needed to stay up all night to be at a gig which started at 2:30am (it was for a worthy cause), so I made some snacks for the journey. I actually didn't last: I had to go to bed around 11:30pm. So, behold the mocha cupcakes!


It was actually last week that this happened, but I didn't get around to writing this post until now: things have been busy getting ready to go abroad, going to visit friends in Roscommon, and performing midnight gigs.

I was wandering through Tiger -- which is essentially a slightly posher and more Scandinavian discount shop -- and found these lovely dark chocolate 'coffee beans'. Originally, I thought they were chocolate coated coffee beans, which are the business, but they weren't: they were coffee infused 52% dark chocolate shaped in little bean shapes. And in fairness I think that's better.


I've also been practising my icing swirl technique recently, and felt like a bit of an eejit: I never really realised that to make tall icing swirls, you need to pipe a dollop in the centre of the cake, and swirl around it. Obvious when you think about it... but it had never occurred to me to do it like that.

To make these, I used my go to light and fluffy sponge cake mixture, as opposed to the slightly denser cake mixture I use for layer cakes. I replaced the cornflour with cocoa powder to make the cakes chocolate flavoured, and I also used gluten free plain flour instead of spelt flour. They worked out really well! Dare I say, that recipe works better with gluten free flour than with spelt or wheat flour. 

I then made some buttercream, using strong espresso to taste, then adjusting the consistency -- if needed -- with some milk. Swirling on the icing using a closed star nozzle, I topped it off with a coffee bean chocolate.


I think I might make some when my cousins come over for dinner on Thursday, if they're fans of coffee and chocolate.

Friday, 13 May 2016

Chocolate Biscuit Cake, a.k.a: Rocky Road

Chocolate biscuit cake is a recipe that everyone's mother has a recipe for: it's literally a matter of cobbling together the ends of bags of sweets and biscuits from around the house and melting them together. As simple a treat as it is, it's enjoyed by adults and children alike.


However, usually it's as hard as rock and takes a lot of biting, so I made sure that with this batch I made it a tad softer. When you leave it for a few days, everything settles in and it become softer, and way too easy to eat.

I made this batch for visiting my friends in Roscommon over last weekend, because it was requested. I made sure to make the top all prettiful for them.

FREE FROM
☑ Soya (check for soya lecithin)
☑ Yeast
☑ Wheat
☑ Nuts
☑ Eggs

CONTAINS
☒ Gluten (unless you buy gluten free biscuits)
☒ Dairy (dairy substitutes can be found in italics)
☒ Refined sugar products


INGREDIMENTS


To fill a 10 inch (25 centimetre) square tin,
  • 9 ounces (250 grammes) milk or dark chocolate, broken up into pieces
  • 6 ounces (170 grammes) condensed milk
  • 2 ounces (55 grammes) butter
  • 8 ounces (225 grammes) plain biscuits, broken into chunks, get gluten free ones if you have to
  • 4 ounces (115 grammes) mini marshmallows, or cut up marshmallows
  • 4 ounces (115 grammes) sweets or dried fruit of your choice
  • Some sweets and sprinkles for decorating

HOW-TO
  • In a heatproof bowl over a pan of simmering water, melt together the chocolate, condensed milk, and butter, stirring constantly. I would not recommend using a microwave for this.
  • Once the mixture has melted into a thick fudgy consistency, stir in all the remaining ingredients.
  • Pour the mixture into the tin and smooth out with the spoon. Sprinkle some sweets and sprinkle on top, pressing them in a bit with your fingers.
  • Chill in the fridge for at least 2 hours before cutting and serving.

This is great for parties because it's cheap and cheerful, and very adaptable: you can put pretty much anything into it...

Tuesday, 10 May 2016

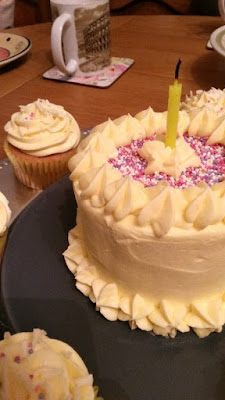
Birthday Cupcakes and Centre Piece Cake: Wheat-Free Lemon Sponge

As I have mentioned in many, many, many blog posts before now, when one has made at least five birthday cakes a year for roughly eleven years, you run out of ideas after a while. Sometimes, you need to shake it up a bit.


I decided this year to act on inspiration from a wedding I was at a few years ago: they had no big wedding cake, but they have a whole ream of little fairy cakes, iced with white buttercream and decorated with fondant shapes following the theme of Alice in Wonderland. They had a little centre piece cake that they could cut for the photos, but because the cakes were all individual there wasn't the hassle of cutting up a whole cake and serving it to all the guests.

I decided to take this inspiration and use it to make my mother's birthday cake this year: I made a small cake -- using the same tin as I used for the photoshoot cake -- and then made a load of little cakes to go with it, one for each guest at the birthday dinner.

The photos for this one aren't so great because it was the evening time when I got around to take them: my phone battery is cat these days, and that's what I use for my camera.

This was a lemon cake with nice zingy icing, like last year. My mother like lemon...

FREE FROM
☑ Soya (check for soya lecithin)
☑ Yeast
☑ Wheat
☑ Nuts

CONTAINS
☒ Eggs
☒ Dairy (dairy substitutes can be found in italics)
☒ Gluten
☒ Refined sugar products


INGREDIMENTS


For one 4 inch sponge cake:
  • 1½ ounces (40 grammes) white spelt flour
  • ½ ounce (15 grammes) cornflour
  • ½ teaspoon (3 millilitres) baking powder
  • Pinch of salt
  • 1 medium egg
  • 1½ ounces (40 grammes) caster sugar
  • 1 ounce (30 grammes) sunflower oil
  • 1 fluid ounce (30 millilitres) milk, or milk alternative
  • 1 teaspoon (5 millilitres) vanilla essence
  • Zest of half a lemon
  • Optional: 2 tablespoons of poppy seeds, or hundreds and thousands, for visual interest
Repeat this quantity of batter to make 6 individual fairy cakes, meaning you will need double the above recipe overall.

For the icing:
  • 6 ounces (170 grammes) butter, softened or margarine
  • 12 ounces (340 grammes) icing sugar
  • Juice of half a lemon
  • 1 teaspoon vanilla essence
  • 1 to 2 tablespoons (15 to 30 millilitres) milk or milk alternative,
     to adjust the consistency
  • Hundred and thousands
  • A bar of white chocolate

HOW-TO

First, make the centre piece cake,
  • Make the cake mixture according to this recipe, using a greased and floured 4 inch round cake tin. I use a tin from a shop-bought steamed pudding. Bake at the recommended temperature for about 25 to 30 minutes.
  • Bake according to the recipe, then once it is out of the oven immediately drop onto the work surface from a height of roughly a foot (30 centimetres); that will reduce the chances of it shrinking. Allow to cool completely.

Then, make the fairy cakes,
  • Repeat the above recipe, lining a muffin tin with 6 large cake cases. Use yellow ones if you can find them.
  • Divide the recipe between the cake cases, which should be at three-quarters full. Bake this time at 190ºC (375ºF, Gas Mk.5) for about 15 minutes.
  • Once cooked, drop them on the work surface also. Transfer to a wire rack to cool completely.

Now to decorate,
  • Make the buttercream according to this recipe, if you don't know how to make buttercream already, starting off with the lemon juice and only adding the milk if the consistency needs adjusting.
  • Use just under a half of the icing to decorate the fairy cakes. Sprinkle the tops with a small amount of hundreds and thousands, then shave some white chocolate onto them using a vegetable peeler directly on the chocolate bar.
  • Cut the dome off the cake, cut it in half, then place upside down on the serving platter so the base is now the top. Fill and crumb coat then chill for an hour, then coat with a second coat, leaving about 6 ounces (170 grammes) of icing to pipe the rosettes around the top and bottom.
  • Before you pip the rosettes, cover the top of the cake with the sprinkles, leaving about half an inch of a border (about a centimetre), then pipe the rosettes on top. Pipe on in the middle to hold the candle.
  • Allow to set completely, either in the fridge for up to an hour, or on the work surface for up to 3 hours.

Saturday, 7 May 2016

Milky Ice Pops: Chocolate Flavour (Naturally Gluten Free; Dairy-Free Option)

What's that? One ice-cream recipe for May wasn't enough for you? Well in that case, have another one: chocolate ice pops!


These ice-pops are styled very much in the vein of an HB Mini Milk, which is essentially a milky water ice flavoured with vanilla, chocolate, and strawberry. I absolutely loved them as a little girl, but due to the indecorous manner in which I ate them, my Dad nicknamed them 'maxi mess'.


These were a bit of an experiment, it must be said. I will say, these turned out very much like those lollies you get when you freeze Angel Delight, but nicer (which wouldn't be hard). For those of you who don't know what Angel Delight is, it's essentially a sachet of instant pudding powder, and when I was young there would always be a recipe to try on the back of the packet, like how to make ice lollies or milkshakes.

When I revisited Angel Delight as an adult, I realised how truly disgusting it was, and vowed never to buy it again. So, to make these, I basically used a good old fashioned English custard recipe with some chocolate added to it. You could add a milkshake powder to make a strawberry or banana flavoured one, or you could leave it simply with vanilla essence.


Here is my sister Nixie Pixie holding one that she's nibbled, just to demonstrate the texture: it's kinda ice-creamy, kinda water icy, but it was mostly very tasty!

I used a four-hole ice lolly mould to make these, but used ice lolly sticks instead of the handles that were provided with the mould; they never work anyway.

FREE FROM
☑ Soya (check for soya lecithin)
☑ Yeast
☑ Gluten
☑ Wheat
☑ Eggs
☑ Nuts

CONTAINS
☒ Dairy, but dairy alternatives are in italics
☒ Refined sugar products
☒ Cocoa (yes, I thought I'd contain it because I was allergic to cocoa for a time)

INGREDIMENTS
Makes 4 moulded lollies
  • Half a pint (285 millilitres; 1 US cup plus 3 tablespoons) whole milk, or milk alternative
  • 2 ounces (55 grammes) caster sugar, or sugar of your choice
  • 2 tablespoons (30 millilitres) cornflour
  • 1 tablespoon (15 millilitres) cocoa powder, or hot chocolate powder of your choice
  • 1 teaspoon (5 millilitres) vanilla essence
  • Pinch of salt
  • Optional: 1 tablespoon (15 grammes) butter, or butter alternative

HOW-TO

  • In a cup or small bowl, mix together the sugar, cornflour, cocoa powder, and salt. Make sure it's well mixed and all lumps of cocoa powder and cornflour are broken up.
  • In a saucepan, heat the milk and vanilla essence until it just begins to bubble and steam. Remove from the heat, and add a few spoons of the heated milk to the powder mixture. Mix into a slurry, stirring until completely smooth.
  • Pour the slurry back into the saucepan, stir thoroughly, then return to medium heat. Bring to the boil, stirring constantly, and cook until thickened into a custard.
  • Once cooked, remove from the heat and allow to cool to room temperature. Make sure to stir it every so often so a skin doesn't form.
  • When it is cooled, divide between the lolly moulds. If you don't have lolly moulds, you can use plastic cups.
There are a few ways to put the sticks in:
  1. Clip two clothes pegs to each stick, and balance them on the rim of the mould. Make sure the stick is at least two-thirds of the way into each mould.
  2. Line the tops of each hole with foil, and pop the stick through the foil.
  3. Put the lollies in the freezer for about an hour and a half, then put the sticks in while they're half frozen.

To release them from the moulds, run under the cold tap until they become loose, then pop them out. Don't be tempted to use hot water, as it will melt the lollies and ruin their appearance.

Tuesday, 3 May 2016

American Style Cookie Dough Ice-Cream (No Churn, No Cook, Egg Free)

It's May, which means in Ireland it's finally summer! And nothing says summer like some lovely, rich, ice-cream!


I was inspired to make some cookie dough ice-cream because I've been trying out some American style stuff recently, and also my brother and sister really like it. But, I had some challenges. (And also, I've been feeling quite sorry for myself over the past few days, as this time last year was a time where my companion and I were enjoying his birthday, so I wanted something to challenge me and take my mind off it.)

The thing is raw cookie dough is pretty, well, raw tasting. There is a very distinctive taste off raw flour: it's quite acidic, and burns a little bit; raw bicarbonate of soda tastes like soap; and raw egg is a bit of a no-no in frozen things. So, I did some research about how to make edible 'raw' cookie dough, that's actually been cooked.

After looking around a few blogs, I was particularly inspired by Ann Reardon's approach to making a roux-style cookie dough. So, I cooked the dough in a saucepan to get rid of the raw taste, but I used my own recipe, just scaling it down.


So here is the final thing! It's pretty much just my go-to ice-cream base with some 'raw' cookie dough in it. But it's pretty tasty!

FREE FROM
☑ Soya (check for soya lecithin)
☑ Yeast
☑ Gluten
☑ Wheat
☑ Eggs
☑ Nuts

CONTAINS
☒ Dairy
☒ Refined sugar products
☒ Cocoa (yes, I thought I'd contain it because I was allergic to cocoa for a time)

INGREDIMENTS

For the ice cream base.
  • 8 fluid ounces (225 millilitres, 1 US cup) whipping cream, 35%-40% fat content, well chilled
  • 6 fluid ounces (170 millilitres, ¾ US cup) condensed milk, well chilled
  • 1 vanilla pod or 1 tablespoon vanilla essence
  • Pinch of salt
For the cookie dough,
  • 2 ounces (55 grammes) white spelt flour
  • 1 ounce (30 grammes) light brown sugar
  • 1 ounce (30 grammes) butter
  • 2 tablespoons (30 millilitres) milk
  • 1 teaspoon (5 millilitres) vanilla essence
  • 3½ ounces (100 grammes) milk chocolate chips, or milk chocolate cut into small pieces

HOW-TO
First, make the cookie dough:
  • Line a baking tray with non-stick baking paper, or use a silicone tray.
  • Mix the milk, sugar, butter, and vanilla essence together in a small saucepan. Heat together over low heat until the butter and sugar have melted, but don't boil.
  • Remove from the heat and add the flour all at once. Stir until completely mixed with no lumps of flour remaining.
  • Return to medium heat and cook until it becomes a thick paste. While still hot, thinly spread out on the tray and allow to cool completely.
  • When the dough is cool, mix with the chocolate chips (or chopped chocolate) to make a cookie dough. Congratulations! You now have edible raw cookie dough.

Then, make the ice-cream:
  • Using an electric hand mixer, beat the cream and condensed milk together until light and a soft-peak consistency. It wants to look like a soft whipped cream. For best results, put the bowl and the beaters in the freezer for about 15 minutes beforehand.
  • Pour a third of the mixture into a 2 pint (560 millilitre; 2½ US cup) container, then break up about a third of the cookie dough over the top. Mix a little to distribute the dough chunks.
  • Repeat with the remaining two thirds of ice-cream and dough, finishing with a sprinkle of dough.
  • Cover with the container's lid -- or clingfilm, directly touching the ice-cream's surface -- and freeze for 4 to 6 hours.
  • Allow to temper for about 5 to 10 minutes before serving. Serve as a sundae with syrups, sprinkles and other nice things, on its own, or with cake.

THIS TIME IN 2015: Battenberg Birthday Cake (Wheat and Dairy Free)
THIS TIME IN 2014: Minty Mint Brownies of Mintiness, with Marbled Glaze (Wheat Free)
THIS TIME IN 2013: How to Use and Abuse Royal Icing, and Wholemeal Gingerbread (Wheat Free)

It's been a while! Happy 9th Anniversary!

  It's been a while. The past two years have been a helluva a ride. This year is gonna hold some big changes for this blog. I'm comp...